-
Tomcat 源码分析 (Pipline机制) (八)
1.Pipline 和 Valve
当请求到达
Engine容器的时候,Engine并非是直接调用对应的Host去处理相关的请求,而是调用了自己的一个组件去处理,这个组件就叫做pipeline组件,跟pipeline相关的还有个也是容器内部的组件,叫做valve组件。Pipeline的作用是管道,可以把不同容器想象成一个独立的个体,pipeline就可以理解为不同容器之间的管道,道路,桥梁。Valve理解为阀门。每个管道上面都有阀门,
Pipeline和Valve关系也是一样的。Valve代表管道上的阀门,可以控制管道的流向,当然每个管道上可以有多个阀门。如果把Pipeline比作公路的话,那么Valve可以理解为公路上的收费站,车代表Pipeline中的内容,那么每个收费站都会对其中的内容做一些处理(收费,查证件等)。2.Tomcat 中的 Pipeline 和 Valve
在
Catalina中,我们有4种容器,每个容器都有自己的Pipeline组件,每个Pipeline组件上至少会设定一个Valve(阀门),这个Valve我们称之为BaseValve(基础阀)。基础阀的作用是连接当前容器的下一个容器(通常是自己的自容器),可以说基础阀是两个容器之间的桥梁。Pipeline定义对应的接口Pipeline,标准实现了StandardPipeline。Valve定义对应的接口Valve,抽象实现类ValveBase,4个容器对应基础阀门分别是StandardEngineValve,StandardHostValve,StandardContextValve,StandardWrapperValve。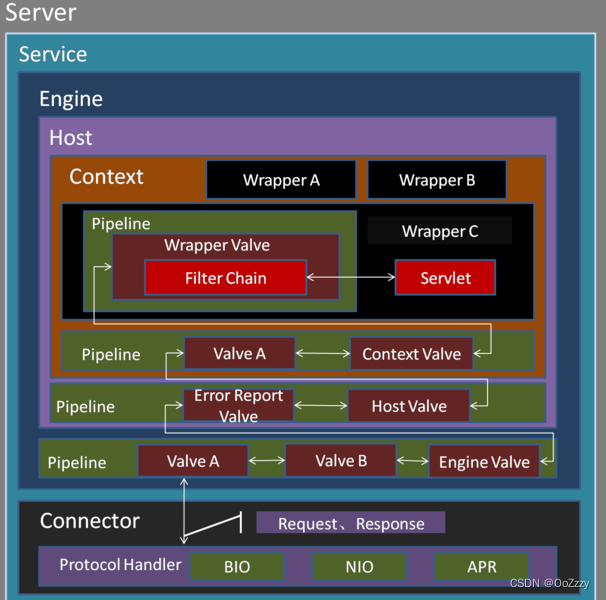
同一个
Pipeline上可以有多个Valve,每个Valve都可以做一些操作,无论是Pipeline还是Valve操作的都是Request和Response。而在容器之间Pipeline和Valve则起到了桥梁的作用.Valve.java
public interface Valve { public String getInfo(); public Valve getNext(); public void setNext(Valve valve); public void backgroundProcess(); public void invoke(Request request, Response response) throws IOException, ServletException; public void event(Request request, Response response, CometEvent event) throws IOException,ServletException; public boolean isAsyncSupported(); }- 1
- 2
- 3
- 4
- 5
- 6
- 7
- 8
- 9
- 10
- 11
- 12
- 13
- 14
- 15
- 16
- 17
一个
Pipeline上面可以有很多Valve,这些Valve存放的方式并非统一存放在Pipeline中, 通过getNext()获取到下一个Valve.Pipeline.java
public interface Pipeline { public Valve getBasic(); public void setBasic(Valve valve); public void addValve(Valve valve); public Valve[] getValves(); public void removeValve(Valve valve); public Valve getFirst(); public boolean isAsyncSupported(); public Container getContainer(); public void setContainer(Container container); }- 1
- 2
- 3
- 4
- 5
- 6
- 7
- 8
- 9
- 10
- 11
- 12
- 13
- 14
- 15
- 16
- 17
- 18
- 19
- 20
- 21
Pipeline中很多的方法都是操作Valve的,包括获取,设置,移除Valve,getFirst()返回的是Pipeline上的第一个Valve,而getBasic(),setBasic()则是获取/设置基础阀,在Pipeline中,每个pipeline至少都有一个阀门,叫做基础阀,而getBasic(),setBasic()则是操作基础阀的。3.代码分析 StandardPipeline
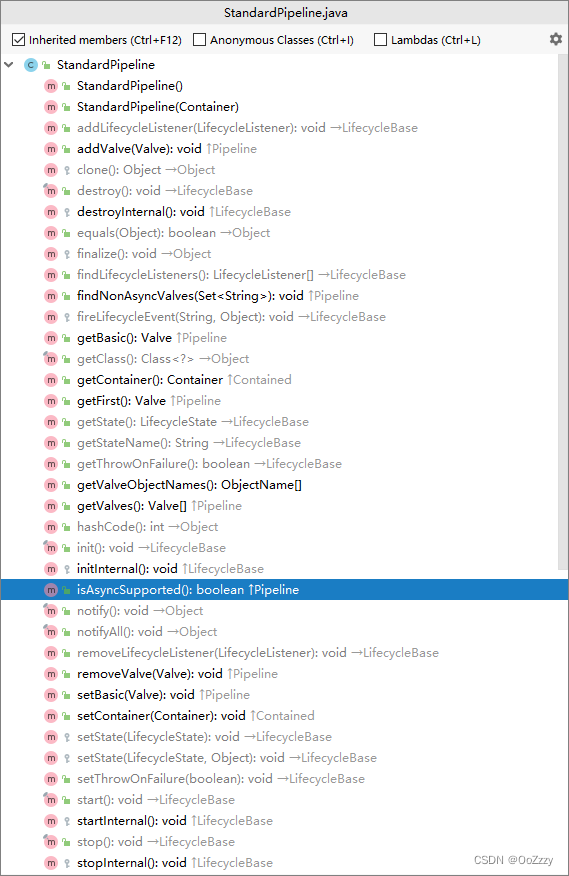
StandardPipeline.javastartInternal()public class StandardPipeline extends LifecycleBase implements Pipeline { public StandardPipeline() { this(null); } public StandardPipeline(Container container) { super(); setContainer(container); } protected Valve basic = null; protected Container container = null; protected Valve first = null; @Override protected synchronized void startInternal() throws LifecycleException { //管道启动都是做什么 // Start the Valves in our pipeline (including the basic), if any Valve current = first; if (current == null) { current = basic; } while (current != null) { if (current instanceof Lifecycle) ((Lifecycle) current).start(); current = current.getNext(); } setState(LifecycleState.STARTING); }- 1
- 2
- 3
- 4
- 5
- 6
- 7
- 8
- 9
- 10
- 11
- 12
- 13
- 14
- 15
- 16
- 17
- 18
- 19
- 20
- 21
- 22
- 23
- 24
- 25
- 26
- 27
- 28
- 29
- 30
- 31
- 32
- 33
- 34
- 35
- 36
- 37
first赋值给current- 如果
current为空的话,basic赋给current - 调用每一个对象的
start()方法, 最后设置pipline的状态为STARTING启动状态。
setBasic()@Override public void setBasic(Valve valve) { // Change components if necessary Valve oldBasic = this.basic; if (oldBasic == valve) return; // Stop the old component if necessary if (oldBasic != null) { if (getState().isAvailable() && (oldBasic instanceof Lifecycle)) { try { ((Lifecycle) oldBasic).stop(); } catch (LifecycleException e) { log.error(sm.getString("standardPipeline.basic.stop"), e); } } if (oldBasic instanceof Contained) { try { ((Contained) oldBasic).setContainer(null); } catch (Throwable t) { ExceptionUtils.handleThrowable(t); } } } // Start the new component if necessary if (valve == null) return; if (valve instanceof Contained) { ((Contained) valve).setContainer(this.container); } if (getState().isAvailable() && valve instanceof Lifecycle) { try { ((Lifecycle) valve).start(); } catch (LifecycleException e) { log.error(sm.getString("standardPipeline.basic.start"), e); return; } } // Update the pipeline Valve current = first; while (current != null) { if (current.getNext() == oldBasic) { current.setNext(valve); break; } current = current.getNext(); } this.basic = valve; }- 1
- 2
- 3
- 4
- 5
- 6
- 7
- 8
- 9
- 10
- 11
- 12
- 13
- 14
- 15
- 16
- 17
- 18
- 19
- 20
- 21
- 22
- 23
- 24
- 25
- 26
- 27
- 28
- 29
- 30
- 31
- 32
- 33
- 34
- 35
- 36
- 37
- 38
- 39
- 40
- 41
- 42
- 43
- 44
- 45
- 46
- 47
- 48
- 49
- 50
- 51
- 52
- 53
- 54
设置基础阀的方法,这个方法在每个容器的构造函数中调用,代码逻辑也比较简单,稍微注意的地方就是阀门链表的遍历。
addValve()@Override public void addValve(Valve valve) { // 验证Valve 关联Container if (valve instanceof Contained) ((Contained) valve).setContainer(this.container); // 验证组件状态,如果对的话 启动需要添加的Valve,调用start方法。 if (getState().isAvailable()) { if (valve instanceof Lifecycle) { try { ((Lifecycle) valve).start(); } catch (LifecycleException e) { log.error(sm.getString("standardPipeline.valve.start"), e); } } } // 如果 first变量为空,将valve赋值给first变量,并且设置 valve的下一个阀门为基础阀 // 之所以这样是因为,如果first为空说明这个容器只有一个基础阀,所以此次添加的阀门肯定是第一个非基础阀阀门 if (first == null) { first = valve; valve.setNext(basic); } else { // 否则 遍历阀门链表,将要被添加的阀门设置在 基础阀之前。 Valve current = first; while (current != null) { if (current.getNext() == basic) { current.setNext(valve); valve.setNext(basic); break; } current = current.getNext(); } } // container触发添加阀门事件 container.fireContainerEvent(Container.ADD_VALVE_EVENT, valve); }- 1
- 2
- 3
- 4
- 5
- 6
- 7
- 8
- 9
- 10
- 11
- 12
- 13
- 14
- 15
- 16
- 17
- 18
- 19
- 20
- 21
- 22
- 23
- 24
- 25
- 26
- 27
- 28
- 29
- 30
- 31
- 32
- 33
- 34
- 35
- 36
- 37
- 38
这方法是像容器中添加
Valve,在server.xml解析的时候也会调用该方法getFirst()@Override public Valve getFirst() { if (first != null) { return first; } return basic; }- 1
- 2
- 3
- 4
- 5
- 6
- 7
- 8
first指向的是容器第一个非基础阀门的阀门,first在只有一个基础阀的时候并不会指向基础阀 -
相关阅读:
【电商项目实战】用户登录(详细篇)
用稳定扩散生成4K PBR纹理【SDXL】
十六、代码校验(1)
深度学习中安装了包但是依然导入(import)失败这一问题,例如pytorch环境下已经安装了scikit-learn但是import不了
【数据挖掘】十大算法之Apriori关联算法
day6_C++
Python Day6 爬虫-lxml和多线程
如何利用Python开发自动发布文章脚本?记录开发万媒易发的心路历程
Grafana----Grafana快速体验
职场高薪 |「中高级测试」面试题
- 原文地址:https://blog.csdn.net/qq_43141726/article/details/126018121