-
Eureka服务注册与发现

当前项目架构存在的问题
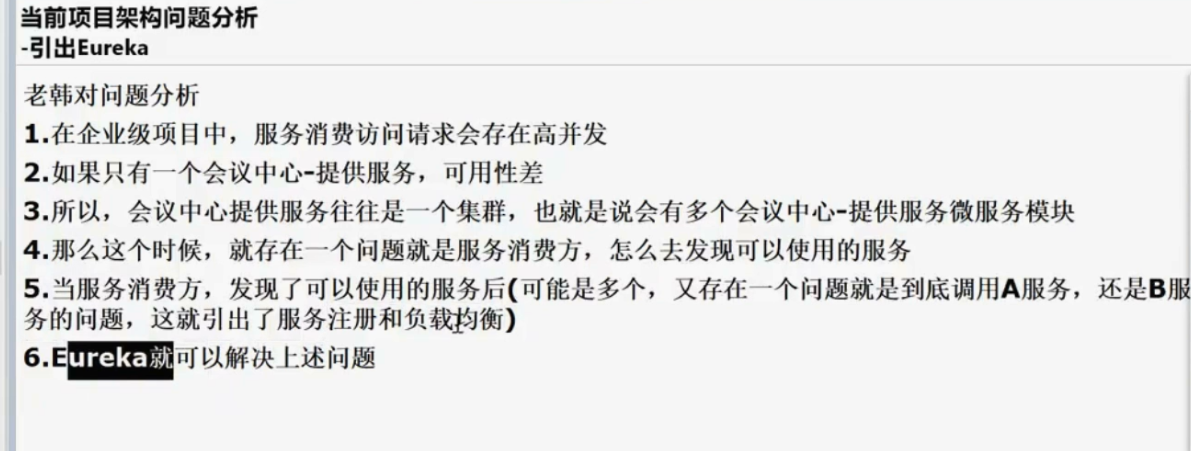
引出 Eureka
会员中心,这一块在项目中往往会做成 1 个集群
为什么需要做成集群呢?
解决高并发和负载量比较大的问题
举例:
会员中心-在 1 台主机上的,假设该主机最多只能接收 1w 请求数据
如果大量的请求去访问同 1 台服务器(会员中心),
这样肯定会造成服务器超负荷运行,可能导致各种问题
如果我们使用集群,也就是开多几个服务器(会员中心)
那么可以解决如上存在的问题

服务注册与发现的原理


创建单机 Eureka Server-注册中心


验证是否创建模块成功
在当前父级项目 pom.xml 中查看是否引入了创建的子模块

查看当前子模块是否在父级模块的内部

查看当前创建的子模块,是否成功与父级模块建立了依赖关系

eureka配置
修改 pom.xml , 加入依赖
引入后记得刷新,加载依赖后,继续下面的步骤
- <!-- 引入 e_commerce_center-common-api -->
- <dependency>
- <!-- 这里需要创建父模块的groupId-->
- <groupId>com.wwf.springcloud</groupId>
- <!-- 公共的api项目名-->
- <artifactId>e_commerce_center-common-api</artifactId>
- <version>${project.version}</version>
- </dependency>
- <!-- 引入 eureka-server -->
- <dependency>
- <groupId>org.springframework.cloud</groupId>
- <artifactId>spring-cloud-starter-netflix-eureka-server</artifactId>
- </dependency>
- <dependency>
- <groupId>org.springframework.boot</groupId>
- <artifactId>spring-boot-starter-web</artifactId>
- </dependency>
- <!-- 监控-生命服务是否健康 -->
- <dependency>
- <groupId>org.springframework.boot</groupId>
- <artifactId>spring-boot-starter-actuator</artifactId>
- </dependency>
- <dependency>
- <groupId>org.projectlombok</groupId>
- <artifactId>lombok</artifactId>
- <optional>true</optional>
- </dependency>
- <dependency>
- <groupId>org.springframework.boot</groupId>
- <artifactId>spring-boot-starter-test</artifactId>
- <scope>test</scope>
- </dependency>
- <dependency>
- <groupId>junit</groupId>
- <artifactId>junit</artifactId>
- </dependency>
创建 resources/application.yml
- server:
- port: 9001
- eureka:
- instance:
- hostname: localhost #eureka 服务端的实例名字
- #该注册中心将来也可能是集群
- client:
- register-with-eureka: false #不向注册中心注册自己
- #表示自己就是注册中心,职责是维护服务实例,并不需要去检索服务
- fetch-registry: false
- service-url:
- #设置与 eureka server 交互的模块,查询服务和注册服务都需要依赖这个地址
- defaultZone: http://${eureka.instance.hostname}:${server.port}/eureka/
创建主启动程序
- /**
- * @author 卒迹
- * @version 1.0
- */
- //@EnableEurekaServer 表示该程序,作为 Eureka Server
- @EnableEurekaServer
- // 配置注解扫描路径
- @SpringBootApplication(scanBasePackages = {"com.wwf"})
- public class EurekaApplication {
- public static void main(String[] args) {
- SpringApplication.run(EurekaApplication.class, args);
- }
- }
http://localhost:9001/
服务提供者(端口 10000)
当前服务被其他服务所调用


修改 pom.xml
引入后记得刷新
- <!-- 引入 eureka-client 依赖 -->
- <dependency>
- <groupId>org.springframework.cloud</groupId>
- <artifactId>spring-cloud-starter-netflix-eureka-client</artifactId>
- </dependency>
修改 resources/application.yml
- #eureka 客户端配置
- eureka:
- client:
- register-with-eureka: true #将自己注册到 EurekaServer
- #是否从从 EurekaServer 抓取注册信息,默认为 true, 单节点无所谓,
- #集群必须设置为 true 才能配合 ribbon 使用负载均衡
- fetchRegistry: true
- service-url:
- #表示将自己注册到哪个 eurekaServer
- defaultZone: http://localhost:9001/eureka
修改主启动类
- @SpringBootApplication
- //@EnableEurekaClient 将该程序标识为 EurekaClient
- @EnableEurekaClient
- public class MemberApplication {
- public static void main(String[] args) {
- SpringApplication.run(MemberApplication.class, args);
- }
- }


服务消费者(调用方 80 端口)
服务消费者:当前接口-调用了另外接口的方法

修改 pom

- <!-- 引入 eureka-client 依赖 -->
- <dependency>
- <groupId>org.springframework.cloud</groupId>
- <artifactId>spring-cloud-starter-netflix-eureka-client</artifactId>
- </dependency>
修改 application.yml

- server:
- port: 80
- spring:
- application:
- name: member-service-consumer #注册的名称
- #eureka 客户端配置
- eureka:
- client:
- service-url:
- #表示关联哪个 eurekaServer(注册/拉取服务信息)
- defaultZone: http://localhost:9001/eureka
- #将自己注册到 EurekaServer, 也可以设置 false, 不注册
- register-with-eureka: true
- #配置从 EurekaServer 抓取其它服务注册信息
- fetchRegistry: true
修改启动类
配置完记得重启 springBoot 启动类

Eureka 自我保护模式
在默认情况下, Eureka 启动了自我保护模式(如图红字, 需要刷新页面, 可以看到)


服务与注册中心→检测心跳→server
- server:
- port: 9001
- eureka:
- instance:
- hostname: localhost #eureka 服务端的实例名字
- #服务提供者(server)
- server:
- enable-self-preservation: false #禁用自我保护
- eviction-interval-timer-in-ms: 2000 #间隔时间2秒,即2秒收不到心跳就认为超时
- #服务消费者(client)
- client:
- register-with-eureka: false #不向注册中心注册自己
- #表示自己就是注册中心,职责是维护服务实例,并不需要去检索服务
- fetch-registry: false
- service-url:
- #设置与 eureka server 交互的模块,查询服务和注册服务都需要依赖这个地址
- defaultZone: http://${eureka.instance.hostname}:${server.port}/eureka/
修改服务提供者(10000) application.yml

- server:
- port: 10000 #服务端-端口号
- spring:
- application:
- name: member-service-provider #当前模块的项目名称-访问地址必须加上才能够访问
- datasource:
- type: com.alibaba.druid.pool.DruidDataSource
- # driver-class-name: org.gjt.mm.mysql.Driver
- #数据库地址:
- #jdbc:mysql://域名:端口/数据库名称?useUnicode=true&characterEncoding=utf-8&useSSL=false
- url: jdbc:mysql://localhost:3306/e_commerce_center_db?useUnicode=true&characterEncoding=utf-8&useSSL=false
- username: root #数据库名称
- password: abc123 #数据库密码
- #eureka 客户端配置
- eureka:
- client:
- register-with-eureka: true #将自己注册到 EurekaServer
- #是否从从 EurekaServer 抓取注册信息,默认为 true, 单节点无所谓,
- #集群必须设置为 true 才能配合 ribbon 使用负载均衡
- fetchRegistry: true
- service-url:
- #表示将自己注册到哪个 eurekaServer
- defaultZone: http://localhost:9001/eureka
- #心断检与续约时间
- #如果你希望保证CP,时间间隔可以短一些,保证服务关闭后注册中心能即使剔除服务 instance
- #Eureka客户端向服务端发送心跳的时间间隔,单位为秒(默认是30秒)
- lease-renewal-interval-in-seconds: 1
- #Eureka服务端在收到最后一次心跳后等待时间上限,单位为种(默认是90秒),超时将剔除服务
- lease-expiration-duration-in-seconds: 2
- mybatis:
- mapperLocations: classpath:mapper/*.xml #后面 mapper 文件的位置
- type-aliases-package: com.wwf.entity #指定POJO扫描包来让mybatis自动扫描到自定义的POJO。


维护机制-注册中心

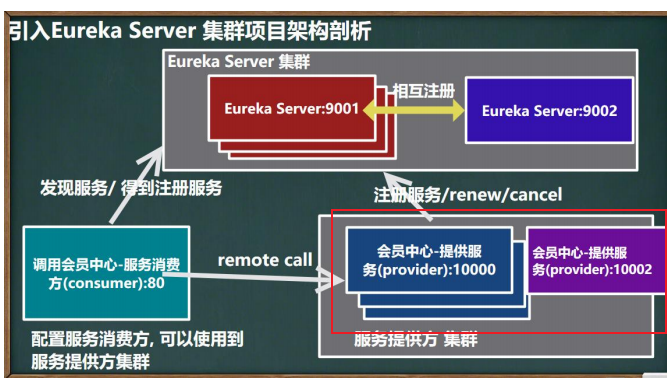
搭建 EurekaServer 集群-实现负载均衡&故障容错


1.新建模块(参考注册 9001)


2.确保父项目中-子模块被引入了

3.引入 Pom 依赖(9002-当前)
如果这里报红-看一下是不是当前父级项目的 groupId 没有引对
该名为,创建模块时的高级设置里面的父级的 groupId


- <!-- 因为是子模块,因此不需要指定 groupId 了,从父工程继承 -->
- <!-- 引入 e_commerce_center-common-api -->
- <dependency>
- <!-- 当前父级项目的groupId-->
- <groupId>com.wwf.springcloud</groupId>
- <!-- 公共模块-项目名-->
- <artifactId>e_commerce_center-common-api</artifactId>
- <version>${project.version}</version>
- </dependency>
- <!-- 引入 eureka-server -->
- <dependency>
- <groupId>org.springframework.cloud</groupId>
- <artifactId>spring-cloud-starter-netflix-eureka-server</artifactId>
- </dependency>
- <dependency>
- <groupId>org.springframework.boot</groupId>
- <artifactId>spring-boot-starter-web</artifactId>
- </dependency>
- <dependency>
- <groupId>org.springframework.boot</groupId>
- <artifactId>spring-boot-starter-actuator</artifactId>
- </dependency>
- <dependency>
- <groupId>org.projectlombok</groupId>
- <artifactId>lombok</artifactId>
- <optional>true</optional>
- </dependency>
- <dependency>
- <groupId>org.springframework.boot</groupId>
- <artifactId>spring-boot-starter-test</artifactId>
- <scope>test</scope>
- </dependency>
- <dependency>
- <groupId>junit</groupId>
- <artifactId>junit</artifactId>
- </dependency>
4.创建 resources/application.yml
这里可以直接参考 9001 端口 的eureka server
- server:
- port: 9002
- eureka:
- instance:
- hostname: eureka9002.com #eureka 服务端的实例名字
- #服务提供者(server)
- # server:
- # enable-self-preservation: false #禁用自我保护
- # eviction-interval-timer-in-ms: 2000 #间隔时间2秒,即2秒收不到心跳就认为超时
- #服务消费者(client)
- client:
- register-with-eureka: false #不向注册中心注册自己
- #表示自己就是注册中心,职责是维护服务实例,并不需要去检索服务
- fetch-registry: false
- service-url:
- #设置与 eureka server 交互的模块,查询服务和注册服务都需要依赖这个地址
- defaultZone: http://eureka9001.com:9001/eureka/ # 相 互 注 册 , 这 里 写eureka9001.com
5.创建主启动类 EurekaApplication9002.java

- package com.wwf.start;
- import org.springframework.boot.SpringApplication;
- import org.springframework.boot.autoconfigure.SpringBootApplication;
- import org.springframework.cloud.netflix.eureka.server.EnableEurekaServer;
- /**
- * @author 卒迹
- * @version 1.0
- */
- //@EnableEurekaServer 表示该程序,作为 Eureka Server
- @EnableEurekaServer
- // 配置注解扫描路径
- @SpringBootApplication(scanBasePackages = {"com.wwf"})
- public class EurekaApplication9002 {
- public static void main(String[] args) {
- SpringApplication.run(EurekaApplication9002.class, args);
- }
- }
6.修改另外的 eureka 的配置文件

- server:
- port: 9001
- eureka:
- instance:
- hostname: eureka9001.com #eureka 服务端的实例名字
- #服务提供者(server)
- # server:
- # enable-self-preservation: false #禁用自我保护
- # eviction-interval-timer-in-ms: 2000 #间隔时间2秒,即2秒收不到心跳就认为超时
- #服务消费者(client)
- client:
- register-with-eureka: false #不向注册中心注册自己
- #表示自己就是注册中心,职责是维护服务实例,并不需要去检索服务
- fetch-registry: false
- service-url:
- #设置与 eureka server 交互的模块,查询服务和注册服务都需要依赖这个地址
- defaultZone: http://eureka9002.com:9002/eureka/
7. 修改主启动类名为 EurekaApplication9001.java

8.修改 Host 文件

- #eureka 主机名和 ip 映射
- 127.0.0.1 eureka9001.com
- 127.0.0.1 eureka9002.com
这里可以直接使用火绒安全软件-工具进行修改


8.完成测试

- 一般实际开发中,不同的服务一般都是搭建在不同的主机服务器上
- http://eureka9001.com:9001/eureka
- http://eureka9002.com:9002/eureka
- 如果上面地址访问不了,
- 我这里是在本地进行的搭建,所有访问本地即可
- localhost:9001
- localhost:9002


此时 9002 与 9001 端口的注册与服务中心 Eureka Server 相互完成了注册
将提供服务 10000 端口的模块,
注册到多个 Eureka 上


9.完成测试


10.总结
80 端口服务只注册了 1 个 Eureka 服务(9001)
80 端口的服务被同步到了相互注册的 Eureka 服务(9002)上

访问 9001 和 9002 的 Erueka,我们可以看到 80 端口这个服务被注册到了 Erueka 集群上
也就是说 Erueka(多个)会把注册的服务,同步到 Erueka 集群上

11.创建 member-service-provider-10002

11-1 新建模块


11-2 引入依赖(10002 端口中的 pom.xml)
直接将 10000 端口 的
依赖导入即可 - <!-- 引入 eureka-client 依赖 -->
- <dependency>
- <groupId>org.springframework.cloud</groupId>
- <artifactId>spring-cloud-starter-netflix-eureka-client</artifactId>
- </dependency>
- <!-- 引入 e_commerce_center-common-api -->
- <dependency>
- <groupId>com.wwf.springcloud</groupId>
- <artifactId>e_commerce_center-common-api</artifactId>
- <version>${project.version}</version>
- </dependency>
- <!--SpringBoot版本与父项目一致-->
- <dependency>
- <groupId>org.springframework.boot</groupId>
- <artifactId>spring-boot-starter-web</artifactId>
- <!-- 如果在子工程/模块指定了 version,则以指定为准 -->
- </dependency>
- <!-- 老师解读
- 1. starter-actuator 是 springboot 程序的监控系统,
- 可以实现健康检查,info 信息等
- 2. 访问 http://localhost:10000/actuator 可以看到相关链接, 还可以做相关设置. -->
- <!-- https://mvnrepository.com/artifact/org.springframework.boot/spring-boot-starter-web
- -->
- <!-- 指定了监控系统版本-->
- <dependency>
- <groupId>org.springframework.boot</groupId>
- <artifactId>spring-boot-starter-actuator</artifactId>
- </dependency>
- <!-- https://mvnrepository.com/artifact/org.springframework.boot/spring-boot-starter-web
- -->
- <!-- mybatis-->
- <dependency>
- <groupId>org.mybatis.spring.boot</groupId>
- <artifactId>mybatis-spring-boot-starter</artifactId>
- </dependency>
- <!-- https://mvnrepository.com/artifact/com.alibaba/druid -->
- <!-- springBoot cloud alibaba-->
- <dependency>
- <groupId>com.alibaba</groupId>
- <artifactId>druid-spring-boot-starter</artifactId>
- <!-- 这里我们重新指定一下 version -->
- <version>1.1.13</version>
- </dependency>
- <!-- mysql-->
- <!-- https://mvnrepository.com/artifact/mysql/mysql-connector-java -->
- <dependency>
- <groupId>mysql</groupId>
- <artifactId>mysql-connector-java</artifactId>
- </dependency>
- <!-- https://mvnrepository.com/artifact/org.springframework.boot/spring-boot-starter-jdbc
- -->
- <!-- jdbc连接池-->
- <dependency>
- <groupId>org.springframework.boot</groupId>
- <artifactId>spring-boot-starter-jdbc</artifactId>
- </dependency>
- <!-- https://mvnrepository.com/artifact/org.projectlombok/lombok -->
- <dependency>
- <!-- lombok-->
- <groupId>org.projectlombok</groupId>
- <artifactId>lombok</artifactId>
- <optional>true</optional>
- </dependency>
- <!-- https://mvnrepository.com/artifact/org.springframework.boot/spring-boot-starter-test -->
- <dependency>
- <groupId>org.springframework.boot</groupId>
- <artifactId>spring-boot-starter-test</artifactId>
- <scope>test</scope>
- </dependency>
- <dependency>
- <groupId>junit</groupId>
- <artifactId>junit</artifactId>
- <version>4.12</version>
- </dependency>
引入后记得刷新

11-3 创建 resources/application.yml
将 10000 端口的application.yml 拷贝过来即可,仅修改端口号

- server:
- port: 10002 #服务端-端口号
- spring:
- application:
- name: member-service-provider #当前模块的项目名称-访问地址必须加上才能够访问
- datasource:
- type: com.alibaba.druid.pool.DruidDataSource
- # driver-class-name: org.gjt.mm.mysql.Driver
- #数据库地址:
- #jdbc:mysql://域名:端口/数据库名称?useUnicode=true&characterEncoding=utf-8&useSSL=false
- url: jdbc:mysql://localhost:3306/e_commerce_center_db?useUnicode=true&characterEncoding=utf-8&useSSL=false
- username: root #数据库名称
- password: abc123 #数据库密码
- #eureka 客户端配置
- eureka:
- client:
- register-with-eureka: true #将自己注册到 EurekaServer
- #是否从从 EurekaServer 抓取注册信息,默认为 true, 单节点无所谓,
- #集群必须设置为 true 才能配合 ribbon 使用负载均衡
- fetchRegistry: true
- service-url:
- #表示将自己注册到哪个 eurekaServer
- defaultZone: http://localhost:9001/eureka
- #心断检与续约时间
- #如果你希望保证CP,时间间隔可以短一些,保证服务关闭后注册中心能即使剔除服务 instance
- #Eureka客户端向服务端发送心跳的时间间隔,单位为秒(默认是30秒)
- # lease-renewal-interval-in-seconds: 1
- #Eureka服务端在收到最后一次心跳后等待时间上限,单位为种(默认是90秒),超时将剔除服务
- # lease-expiration-duration-in-seconds: 2
- mybatis:
- mapperLocations: classpath:mapper/*.xml #后面 mapper 文件的位置
- type-aliases-package: com.wwf.entity #指定POJO扫描包来让mybatis自动扫描到自定义的POJO。
11-4 创建 memberMapper.xml
直接将 10000 端口的memberMapper.xml 拷贝过来即可

11-5 将 10000 端口的 java 源代码拷贝到 10002 即可

11-6 将 10000 与 100002 的启动类-类名进行修改

11-7 完成测试


12.配置服务消费端 member-service-consumer-80 使用会员中心服务集群


修改 MemberConsumerController.java
这里是为了使用负载均衡动态的调用服务-通过 Eureka-使用服务别名


修改 CustomizationBean.java
为了支持负载均衡,还需要加入 1 个注解


目前我们已经指定了访问的服务别名和为 RestTemplate 实现了负载均衡的能力

当我们使用服务别名-访问接口的时候-
会通过负载均衡(默认轮询调用)
为了看到通过负载均衡调用,当前访问哪个服务端口的效果,
我们需要修改一下配置


完成测试


访问 10000 和 10002 端口-确保当前端口的接口服务能够正常的被调用


访问 80 端口-确保当前端口的接口服务能够正常的被调用
默认使用轮询算法(负载均衡)访问
第 1 次请求访问的是 10000 端口服务
第 2 次请求访问的是 10002 端口服务


DiscoveryClient


- @GetMapping(value = "/member/consumer/discovery")
- public Object discovery() {
- List<String> services = discoveryClient.getServices();
- for (String element : services) {
- System.out.println("======== 服 务 名 " + element +
- "=======================");
- List<ServiceInstance> instances = discoveryClient.getInstances(element);
- for (ServiceInstance instance : instances) {
- System.out.println(instance.getServiceId() + "\t" + instance.getHost()
- + "\t" + instance.getPort() + "\t" + instance.getUri());
- }
- }
- return this.discoveryClient;
- }


-
相关阅读:
cvxpy: Python优化库
Python编程:《外星人入侵》
多维时序 | MATLAB实现GWO-LSTM灰狼算法优化长短期记忆神经网络的多变量时间序列预测
2023年,千万别裸辞....
Java代码中如何计算HashMap对象中元素个数呢?
leetcode-两数之和
MySQL之主从复制(双主双从)
什么是腾讯云图数据可视化?它有哪些特性以及应用场景?
小程序实现一个 倒计时组件
北大肖臻老师《区块链技术与应用》系列课程学习笔记[14]以太坊-状态树2
- 原文地址:https://blog.csdn.net/wang115t/article/details/136278597
