-
ELK企业级日志分析平台
目录
一、elasticsearch
Elasticsearch 是一个开源的分布式搜索分析引擎,建立在一个全文搜索引擎库 Apache Lucene基础之上。
Elasticsearch 不仅仅是 Lucene,并且也不仅仅只是一个全文搜索引擎:
- 一个分布式的实时文档存储,每个字段 可以被索引与搜索
- 一个分布式实时分析搜索引擎
- 能胜任上百个服务节点的扩展,并支持 PB 级别的结构化或者非结构化数据
基础模块
- cluster:管理集群状态,维护集群层面的配置信息。
- alloction:封装了分片分配相关的功能和策略。
- discovery:发现集群中的节点,以及选举主节点。
- gateway:对收到master广播下来的集群状态数据的持久化存储。
- indices:管理全局级的索引设置。
- http:允许通过JSON over HTTP的方式访问ES的API。
- transport:用于集群内节点之间的内部通信。
- engine:封装了对Lucene的操作及translog的调用。
elasticsearch应用场景:
- 信息检索
- 日志分析
- 业务数据分析
- 数据库加速
- 运维指标监控
1、集群部署
主机
ip
角色
docker
192.168.67.10
cerebro/elasticsearch-head
elk1
192.168.67.31
elasticsearch
elk2
192.168.67.32
elasticsearch
elk3
192.168.67.33
elasticsearch
elk4
192.168.67.34
logstash
elk5
192.168.67.35
kibana
软件安装
rpm -ivh elasticsearch-7.6.1-x86_64.rpm
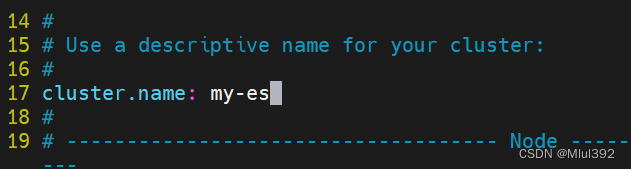
修改配置
- cluster.name: my-es
- path.data: /var/lib/elasticsearch
- path.logs: /var/log/elasticsearch
- bootstrap.memory_lock: true
- network.host: 0.0.0.0
- http.port: 9200
- discovery.seed_hosts: ["server1", "server2", "server3"]
- cluster.initial_master_nodes: ["server1", "server2", "server3"]


系统设置
- vim /etc/security/limits.conf
- elasticsearch soft memlock unlimited
- elasticsearch hard memlock unlimited
- elasticsearch - nofile 65535
- elasticsearch - nproc 4096
- vim /usr/lib/systemd/system/elasticsearch.service
- [service]
- ...
- LimitMEMLOCK=infinity
- systemctl daemon-reload
- swapoff -a
- vim /etc/fstab
- #/dev/mapper/rhel-swap swap swap defaults 0 0
- systemctl daemon-reload
- systemctl enable --now elasticsearch


完成部署:

2、cerebro部署
cerebro官方:https://github.com/lmenezes/cerebro/使用docker启动服务- docker pull lmenezes/cerebro
- docker run -d --name cerebro -p 9000:9000 lmenezes/cerebro
 访问
访问

3、elasticsearch-head插件部署
安装依赖
- yum install -y nodejs-9.11.2-1nodesource.x86 64.rpm
- tar xf phantomjs-2.1.1-linux-x86 64.tar.bz2
- cd phantomjs-2.1.1-linux-x86 64/
- cd bin/
- mv phantomjs /usr/local/bin/
- phantomjs


安装插件
- rpm -ivh nodejs-9.11.2-1nodesource.x86_64.rpm
- unzip elasticsearch-head-master.zip
- cd elasticsearch-head-master/
- npm install --registry=https://registry.npm.taobao.org
- vim _site/app.js


启动服务
- npm run start &
- netstat -antlp|grep :9100


修改es配置
- vim /etc/elasticsearch/elasticsearch.yml
- http.cors.enabled: true
- http.cors.allow-origin: "*"
- systemctl restart elasticsearch.service


创建索引

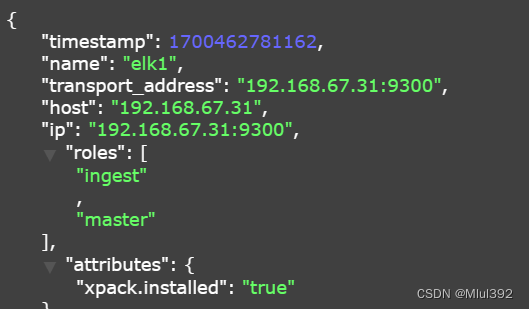
查看ES状态

4、elasticsearch集群角色分类
- Master:
- 主要负责集群中索引的创建、删除以及数据的Rebalance等操作。Master不负责数据的索引和检索,所以负载较轻。当Master节点失联或者挂掉的时候,ES集群会自动从其他Master节点选举出一个Leader。
- Data Node:
- 主要负责集群中数据的索引和检索,一般压力比较大。
- Coordinating Node:
- 原来的Client node的,主要功能是来分发请求和合并结果的。所有节点默认就是Coordinating node,且不能关闭该属性。
- Ingest Node:
- •专门对索引的文档做预处理
- Machine learning node:
- 机器学习节点提供了机器学习功能,该节点运行作业并处理机器学习 API 请求.

- 在生产环境下,如果不修改elasticsearch节点的角色信息,在高数据量,高并发的场景下集群容易出现脑裂等问题。
- 默认情况下,elasticsearch集群中每个节点都有成为主节点的资格,也都存储数据,还可以提供查询服务。
- 节点角色是由以下属性控制:(以下是默认值)
- node.master: true
- node.voting_only: false
- node.data: true
- node.ingest: true
- node.ml: true
- xpack.ml.enabled: true
- search.remote.connect: true
- node.master:这个属性表示节点是否具有成为主节点的资格
注意:此属性的值为true,并不意味着这个节点就是主节点。因为真正的主节点,是由多个具有主节点资格的节点进行选举产生的。
- node.data:这个属性表示节点是否存储数据。
- node.ingest: 是否对文档进行预处理。
- search.remote.connect:是否禁用跨集群查询
- 生产集群中可以对这些节点的职责进行划分
- 建议集群中设置3台以上的节点作为master节点,这些节点只负责成为主节点,维护整个集群的状态。
- 再根据数据量设置一批data节点,这些节点只负责存储数据,后期提供建立索引和查询索引的服务,这样的话如果用户请求比较频繁,这些节点的压力也会比较大。
- 所以在集群中建议再设置一批协调节点,这些节点只负责处理用户请求,实现请求转发,负载均衡等功能。
- 节点需求
- master节点:普通服务器即可(CPU、内存 消耗一般)
- data节点:主要消耗磁盘、内存。
- path.data: data1,data2,data3
这样的配置可能会导致数据写入不均匀,建议只指定一个数据路径,磁盘可以使用raid0阵列,而不需要成本高的ssd。
- Coordinating节点:对cpu、memory要求较高。
- vim /etc/elasticsearch/elasticsearch.yml
- node.master: true
- node.data: false
- node.ingest: true
- node.ml: false
- 等组合 node.ingest: true 至少一个节点要有

如果重启有错误 这个上面有数据需要清理迁移到其他节点


查看:


不同插件查看

二、logstash
- Logstash是一个开源的服务器端数据处理管道。
- logstash拥有200多个插件,能够同时从多个来源采集数据,转换数据,然后将数据发送到您最喜欢的 “存储库” 中。(大多都是 Elasticsearch。)
- Logstash管道有两个必需的元素,输入和输出,以及一个可选元素过滤器。

- 输入:采集各种样式、大小和来源的数据
- Logstash 支持各种输入选择 ,同时从众多常用来源捕捉事件。
- 能够以连续的流式传输方式,轻松地从您的日志、指标、Web 应用、数据存储以及各种 AWS 服务采集数据。

- 过滤器:实时解析和转换数据
- 数据从源传输到存储库的过程中,Logstash 过滤器能够解析各个事件,识别已命名的字段以构建结构,并将它们转换成通用格式,以便更轻松、更快速地分析和实现商业价值。
- 利用 Grok 从非结构化数据中派生出结构
- 从 IP 地址破译出地理坐标
- 将 PII 数据匿名化,完全排除敏感字段
- 简化整体处理,不受数据源、格式或架构的影响
- 输出:选择您的存储库,导出您的数据
- 尽管 Elasticsearch 是我们的首选输出方向,能够为我们的搜索和分析带来无限可能,但它并非唯一选择。
- Logstash 提供众多输出选择,您可以将数据发送到您要指定的地方,并且能够灵活地解锁众多下游用例。

1、部署
新建一台虚拟机elk4部署logstash
- yum install -y jdk-11.0.15_linux-x64_bin.rpm
- yum install -y logstash-7.6.1.rpm


命令方式
/usr/share/logstash/bin/logstash -e 'input { stdin { } } output { stdout {} }'
2、elasticsearch输出插件
- cd /etc/logstash/conf.d
- vim test.conf
- input {
- stdin { }
- }
- output {
- stdout {}
- elasticsearch {
- hosts => "192.168.67.31:9200"
- index => "logstash-%{+YYYY.MM.dd}"
- }
- }
/usr/share/logstash/bin/logstash -f /etc/logstash/conf.d/test.conf


3、file输入插件
- vim fileput.conf
- input {
- file {
- path => "/var/log/messages"
- start_position => "beginning"
- }
- }
- output {
- stdout {}
- elasticsearch {
- hosts => "192.168.67.31:9200"
- index => "syslog-%{+YYYY.MM.dd}"
- }
- }
- /usr/share/logstash/bin/logstash -f /etc/logstash/conf.d/fileput.conf


.sincedb文件保存文件读取进度,避免数据冗余读取
cd /usr/share/logstash/data/plugins/inputs/file/
sincedb文件一共6个字段
- inode编号
- 文件系统的主要设备号
- 文件系统的次要设备号
- 文件中的当前字节偏移量
- 最后一个活动时间戳(浮点数)
- 与此记录匹配的最后一个已知路径
删除后重新读取

4、file输出插件
- vim file.conf
- input {
- stdin { }
- }
- output {
- file {
- path => "/tmp/logstash.txt"
- codec => line { format => "custom format: %{message}"}
- }
- }
- /usr/share/logstash/bin/logstash -f /etc/logstash/conf.d/file.conf


5、syslog 插件
logstash伪装成日志服务器- vim syslog.conf
- input {
- syslog {}
- }
- output {
- stdout {}
- elasticsearch {
- hosts => "192.168.67.31:9200"
- index => "rsyslog-%{+YYYY.MM.dd}"
- }
- }
- /usr/share/logstash/bin/logstash -f /etc/logstash/conf.d/syslog.conf
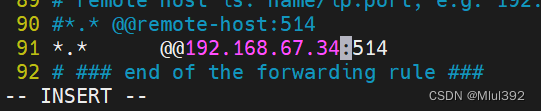
 配置客户端日志输出
- vim /etc/rsyslog.conf
- 去掉以下行的注释
- $ModLoad imudp
- $UDPServerRun 514
- *.* @@192.168.36.34:514


6、多行过滤插件
多行过滤可以把多行日志记录合并为一行事件
从elk1拷贝模板文件- cd /var/log/elasticsearch
- scp my-es.log elk4:/var/log/

在elk4上执行
- vim multiline.conf
- input {
- file {
- path => "/var/log/my-es.log"
- start_position => "beginning"
- codec => multiline {
- pattern => "^\["
- negate => true
- what => previous
- }
- }
- }
- output {
- stdout {}
- elasticsearch {
- hosts => "192.168.67.31:9200"
- index => "myeslog-%{+YYYY.MM.dd}"
- }
- }
- /usr/share/logstash/bin/logstash -f /etc/logstash/conf.d/multiline.conf


7、grok过滤
安装httpd
- yum install -y httpd
- systemctl enablel --now httpd
- echo www.westos.org > /var/www/html/index.html


访问此站点生成日志信息
ab -c1 -n 300 http://192.168.67.34/index.html
编写文件
- vim grok.conf
- input {
- file {
- path => "/var/log/httpd/access_log"
- start_position => "beginning"
- }
- }
- filter {
- grok {
- match => { "message" => "%{HTTPD_COMBINEDLOG}" }
- }
- }
- output {
- stdout {}
- elasticsearch {
- hosts => "192.168.67.31:9200"
- index => "apachelog-%{+YYYY.MM.dd}"
- }
- }
- /usr/share/logstash/bin/logstash -f /etc/logstash/conf.d/grok.conf


三、kibana数据可视化
- Kibana 核心产品搭载了一批经典功能:柱状图、线状图、饼图、旭日图,等等。
- 将地理数据融入任何地图
- 精选的时序性 UI,对您Elasticsearch 中的数据执行高级时间序列分析。
- 利用 Graph 功能分析数据间的关系
1、部署
新建虚拟机elk5,部署kibana
rpm -ivh kibana-7.6.1-x86_64.rpm
修改配置文件
- server.host: "0.0.0.0"
- elasticsearch.hosts: ["http://192.168.67.31:9200"]
- i18n.locale: "zh-CN"


启动
- systemctl enable --now kibana
- netstat -antlp |grep :5601

访问:

创建索引


2、定制数据可视化
(1)网站访问量


(2)访问量排行榜
提前在各个节点 ab -c1 -n 500 http://192.168.67.34/index.html 一下


保存视图

(3)创建dashboard(仪表盘),大屏展示

把上面创建的两个可视化添加到仪表板中


四、ES集群监控
1、启用xpack认证
2、metricbeat监控
3、filebeat日志采集
-
相关阅读:
《我在美国学游戏设计》笔记
一份vue面试考点清单
差点送外卖!双非普本的我刷完P8大佬的性能调优手册,终面进阿里
家居品牌如何在小红书上推广?家居产品推广看这里
数据挖掘-理论与算法 公开课笔记
cad怎么转成pdf文件?3个方法教你实现cad转pdf
深度学习OCR中文识别 - opencv python 计算机竞赛
计算机组成原理---第七章输入输出系统---I/O系统基本概念,外部系统---选择题
Nacos注册中心概述、服务注册、分级存储模型及环境隔离
C++基础知识(十六)--- stack&queue&list
- 原文地址:https://blog.csdn.net/weixin_56744753/article/details/134515179
