-
给openlab搭建web网站
1.作业的要求
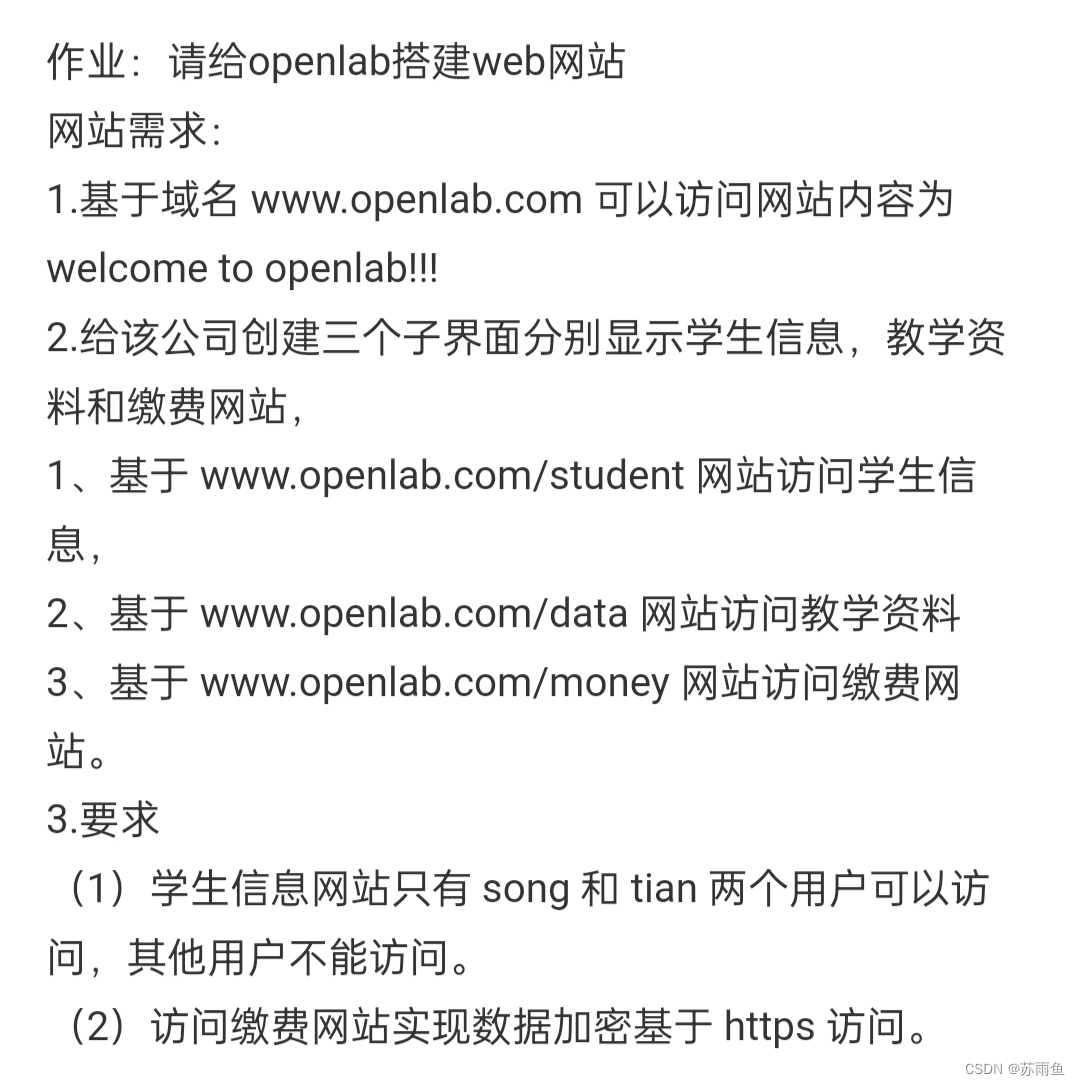
2.访问www.openlab.com网站
2.1先准备好相关的包和关闭防火墙等操作
- mount /dev/sr0 /mnt/ //先挂载
- yum install httpd -y //下载htppd
- systemctl stop firewalld //关闭防火墙
- setenforce 0
2.2然后开始配置文件和仓库
这一步比较关键,之前改了接口什么的的建议改回来不然会一直404找不到服务
- [root@localhost ~]# vim /etc/httpd/conf.d/vhost.conf
- [root@localhost ~]# cat /etc/httpd/conf.d/vhost.conf
- <Directory /www/>
- AllowOverride none
- Require all granted
- </Directory>
- <VirtualHost 192.168.171.129:80>
- Servername www.openlab.com
- DocumentRoot /var/www/openlab
- </VirtualHost>
- [root@localhost ~]# mkdir /var/www/openlab
- [root@localhost ~]# echo 1111 > /var/www/openlab/index.html
- [root@localhost conf.d]# vim /etc/hosts
- [root@localhost conf.d]# cat /etc/hosts
- 127.0.0.1 localhost localhost.localdomain localhost4 localhost4.localdomain4
- ::1 localhost localhost.localdomain localhost6 localhost6.localdomain6
- 192.168.171.129 www.openlab.com
- [root@localhost ~]# systemctl restart httpd
- [root@localhost ~]# curl www.openlab.com
- 1111 //这里是结果
- [root@localhost ~]#
3.openlab下面的三个子页面创建及其配置文件的配置和加密
3.1在刚刚的文件底下创建三个文件并且写入内容
- [root@localhost ~]# mkdir /var/www/openlab/student
- [root@localhost ~]# mkdir /var/www/openlab/data
- [root@localhost ~]# mkdir /var/www/openlab/money
- [root@localhost ~]# echo 1 > /var/www/openlab/student/index.html
- [root@localhost ~]# echo 2 >/var/www/openlab/data/index.html
- [root@localhost ~]# echo 3 >/var/www/openlab/money/index.html
3.2创建两个用户并且在配置文件中加入用户内容
创建song和tian用户密码都设置成redhat
- [root@localhost ~]# htpasswd -c /etc/httpd/yonghu song
- New password:
- Re-type new password:
- Adding password for user song
- [root@localhost ~]# htpasswd -c /etc/httpd/yonghu tian
- New password:
- Re-type new password:
- Adding password for user tian
- [root@localhost ~]# vim /etc/httpd/conf.d/vhost.conf
- [root@localhost ~]# cat /etc/httpd/conf.d/vhost.conf
- <VirtualHost 192.168.171.129:80>
- Servername www.openlab.com
- DocumentRoot /var/www/openlab
- </VirtualHost>
- <Directory /var/www/openlab>
- AllowOverride none
- Require all granted
- </Directory>
- <directory /var/www/openlab/student>
- allowoverride none
- authtype basic
- authname "please login"
- authuserfile /etc/httpd/yonghu
- require user song tian
- </directory>
- [root@localhost ~]# curl www.openlab.com/student/ -u tian
- Enter host password for user 'tian':
- 1 //这里的运行结果
- [root@localhost ~]#
3.3 加密
- [root@localhost ~]# yum install mod_ssl //这里需要下载一个mod_ssl
- [root@server ~]# cd /etc/pki/tls/private/
- [root@server private]# openssl genrsa -aes128 2048 > jiami.key
- [root@localhost certs]# cd /etc/pki/tls/certs/
- [root@localhost certs]# openssl req -utf8 -new -key /etc/pki/tls/private/jiami.key -x509 -days 365 -out jiami.crt

-
相关阅读:
LinkedList源码分析
等保2.0二级内容
淘宝/天猫API:item_sku-获取sku详细信息
vue form设置rules不生效
vue2+three.js实现宇宙(进阶版)
Excel 插入和提取超链接
面试的一些问题关于k8s中,镜像自动化脚本
0开篇-介绍
PyTorch入门之【tensor】
六种最常见的软件供应链攻击
- 原文地址:https://blog.csdn.net/m0_52326740/article/details/134482863
