-
基于opencv+tensorflow+神经网络的智能银行卡卡号识别系统——深度学习算法应用(含python、模型源码)+数据集(二)

前言
本项目基于从网络获取的多种银行卡数据集,采用OpenCV库的函数进行图像处理,并通过神经网络进行模型训练。最终实现对常规银行卡号的智能识别和输出。
首先,通过网络获取了多样化的银行卡数据集,其中包含各种类型和设计的银行卡图像。这些图像数据将作为训练集和测试集,用于训练智能识别模型。
其次,利用OpenCV库的功能,项目对银行卡图像进行处理。包括图像增强、边缘检测、文本定位等技术,以优化图像并提高卡号的提取准确性。
接下来,通过神经网络进行模型训练。神经网络采用深度学习框架TensorFlow,通过学习大量银行卡图像,使模型能够理解和准确识别不同银行卡号的模式和特征。
最终,训练完成的神经网络模型能够智能地识别并输出常规银行卡号。这使得在图像中提取卡号的过程更为自动化和高效。
总体而言,本项目集成了数据采集、图像处理和深度学习技术,为银行卡号的智能识别提供了一种先进的解决方案。这对于自动化银行卡信息提取的场景,如金融服务或身份验证系统,具有潜在的实际应用价值。
总体设计
本部分包括系统整体结构图和系统流程图。
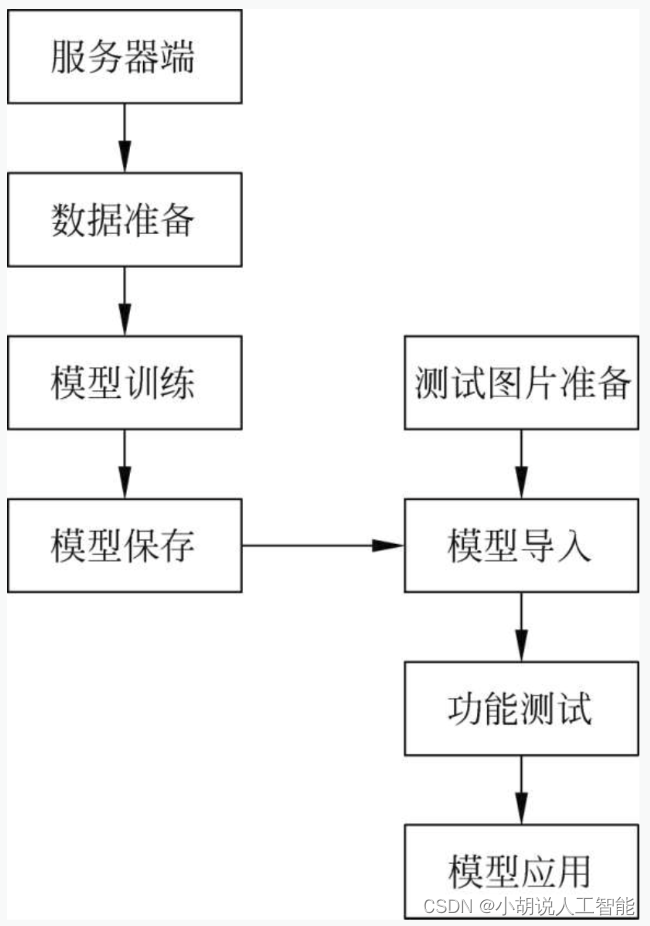
系统整体结构图
系统整体结构如图所示。
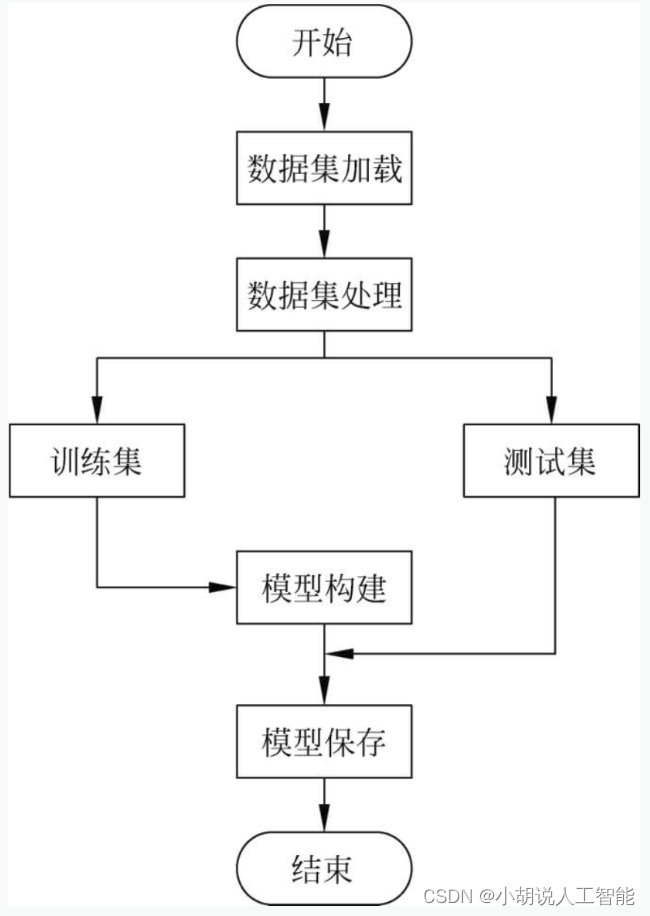
系统流程图
系统流程如图所示。
运行环境
本部分包括Python环境、TensorFlow环境和OpenCV环境。
详见博客。
模块实现
本项目包括4个模块:训练集图片处理、测试图片处理、模型训练及保存、模型测试。下面分别介绍各模块的功能及相关代码。
1. 训练集图片处理
数据集下载网址为http://www.cnsoftbei.com/plus/view.php?aid=348。训练集为1000张人工处理银行卡号截图中选取的120张大小不一、由4个银行卡字符单位组成的图片。这些数据集已打包存放在名为images的文件夹中,如图所示。

1)数据加载
相关代码如下:
def img_handle(): for root, dirs, files in os.walk('./images'): for file in files: img_path = root+'/'+file img = cv2.imread(img_path, 0) get_img(img, file) return data, label- 1
- 2
- 3
- 4
- 5
- 6
- 7
2)图像处理
将图片以灰度图像读入,对其进行高斯模糊、二值化处理。绘制垂直投影直方图,从左到右逐列扫描,本列有多少黑色像素点,对应直方图列就有多高。将直方图按列从左到右扫描,凡遇到直方图高度"由无到有"或者"由有到无"的列做一个标记,根据这些标记对字符分割,单个字符归一化为16×16。分割字符之后,由于数据量较少,通过对训练集做平移、添加噪声处理,进行增强。相关代码如下:
def get_img(img, file): blur = cv2.GaussianBlur(img, (3, 3), 0) #高斯模糊 ret, img = cv2.threshold(blur, 60, 255, cv2.THRESH_BINARY) #二值化 height, width = img.shape v = [0] * width z = [0] * height a = 0 #垂直投影:统计并存储每一列的黑点数 for x in range(0, width): for y in range(0, height): if img[y, x] == 255: continue else: a = a + 1 v[x] = a a = 0 #创建空白图片,绘制垂直投影图 l = len(v) emptyImage = np.full((height, width), 255, dtype=np.uint8) for x in range(0, width): for y in range(0, v[x]): emptyImage[y, x] = 0 #分割字符 Position = [] Wstart = 0 Wend = 0 W_Start = 0 W_End = 0 v[0], v[len(v) - 1] = 0, 0 for j in range(len(v)): if v[j] > 0 and Wstart == 0: W_Start = j Wstart = 1 Wend = 0 if v[j] <= 0 and Wstart == 1: W_End = j Wstart = 0 Wend = 1 if Wend == 1: Position.append([W_Start, 0, W_End, height]) Wend = 0 i = 0 for m in range(len(Position)): if Position[m][3]/(Position[m][2]-Position[m][0]) > 1 and Position[m][3]/(Position[m][2]-Position[m][0]) < 5: temp_img = img[Position[m][1]:Position[m][3], Position[m][0]:Position[m][2]] temp_img = cv2.resize(temp_img, (16, 16)) #大小归一化 #数据增强 blur1 = cv2.GaussianBlur(temp_img, (1, 1), 0) #高斯模糊 blur2 = cv2.GaussianBlur(temp_img, (3, 3), 0) #高斯模糊 noise = sp_noise(temp_img, 0.01) #噪声 h0, w0 = temp_img.shape temp_label = [0.0] * 10 temp_data = [] for hx in range(h0): for wx in range(w0): temp_data.append(float(temp_img[hx, wx])) data.append(temp_data) temp_data = [] for hx in range(h0): for wx in range(w0): temp_data.append(float(blur1[hx, wx])) data.append(temp_data) temp_data = [] for hx in range(h0): for wx in range(w0): temp_data.append(float(blur2[hx, wx])) data.append(temp_data) temp_data = [] for hx in range(h0): for wx in range(w0): temp_data.append(float(noise[hx, wx])) data.append(temp_data) temp_data = [] #左移 for hx in range(h0): for wx in range(w0): if wx < w0-1: temp_data.append(float(temp_img[hx, wx+1])) else: temp_data.append(255.0) data.append(temp_data) temp_data = [] #右移 for hx in range(h0): for wx in range(w0): if wx > 0: temp_data.append(float(temp_img[hx, wx - 1])) else: temp_data.append(255.0) data.append(temp_data) temp_data = [] #上移 for hx in range(h0): if hx < h0-1: for wx in range(w0): temp_data.append(float(temp_img[hx+1, wx])) else: for wx in range(w0): temp_data.append(255.0) data.append(temp_data) temp_data = [] #下移 for hx in range(h0): if hx > 0: for wx in range(w0): temp_data.append(float(temp_img[hx-1, wx])) else: for wx in range(w0): temp_data.append(255.0) data.append(temp_data) temp_label[int(file[i])] = 1.0 for j in range(8): label.append(temp_label) i += 1 #添加噪声 def sp_noise(image,prob): output = np.zeros(image.shape,np.uint8) thres = 1 - prob for i in range(image.shape[0]): for j in range(image.shape[1]): rdn = random.random() if rdn < prob: output[i][j] = 0 elif rdn > thres: output[i][j] = 255 else: output[i][j] = image[i][j] return output- 1
- 2
- 3
- 4
- 5
- 6
- 7
- 8
- 9
- 10
- 11
- 12
- 13
- 14
- 15
- 16
- 17
- 18
- 19
- 20
- 21
- 22
- 23
- 24
- 25
- 26
- 27
- 28
- 29
- 30
- 31
- 32
- 33
- 34
- 35
- 36
- 37
- 38
- 39
- 40
- 41
- 42
- 43
- 44
- 45
- 46
- 47
- 48
- 49
- 50
- 51
- 52
- 53
- 54
- 55
- 56
- 57
- 58
- 59
- 60
- 61
- 62
- 63
- 64
- 65
- 66
- 67
- 68
- 69
- 70
- 71
- 72
- 73
- 74
- 75
- 76
- 77
- 78
- 79
- 80
- 81
- 82
- 83
- 84
- 85
- 86
- 87
- 88
- 89
- 90
- 91
- 92
- 93
- 94
- 95
- 96
- 97
- 98
- 99
- 100
- 101
- 102
- 103
- 104
- 105
- 106
- 107
- 108
- 109
- 110
- 111
- 112
- 113
- 114
- 115
- 116
- 117
- 118
- 119
- 120
- 121
- 122
- 123
- 124
2. 测试图片处理
1)图像读取
拍摄的测试图片已打包放入test_images文件夹,加载代码如下:
def image_process(file_path): file_path = 'test_images/x.jpg' #其中x.jpg为test_images文件夹中的任意图片- 1
- 2
- 3
2)图像处理
与训练集预处理相似,直接将图片以灰度图像读入,对其进行高斯模糊、二值化、膨胀腐蚀处理和字符分割。由于银行卡图像上不仅有卡号,还有其他图形或字符,因此,需要对卡号进行定位。此外,这里不需要再进行数据增强处理。相关代码如下:
#图像处理 def image_process(file_path): img = cv2.imread(file_path, 0) blur = cv2.GaussianBlur(img, (3, 3), 0) #高斯模糊 ret, binary = cv2.threshold(blur, 50, 255, cv2.THRESH_BINARY) #二值化 kernel = np.ones((1, 50), np.uint8) erosion = cv2.erode(binary, kernel) #膨胀 dilation = cv2.dilate(erosion, kernel) #腐蚀 #通过边缘检测得到多条色块,再根据银行卡号分布的特征设定阈值,判定银行卡号的区域 contours, hierarchy = cv2.findContours(dilation, cv2.RETR_TREE, cv2.CHAIN_APPROX_SIMPLE) sp = dilation.shape x, y, w, h = 0, 0, 0, 0 for i in range(0, len(contours)): #矩形边框,返回值x、y是矩阵左上点的坐标,w、h是矩阵的宽和高 x, y, w, h = cv2.boundingRect(contours[i]) #计算矩形是否圈住银行卡号 if h > sp[0]*0.05 and w > sp[1]*0.5 and y > sp[0]*0.2 and y < sp[0]*0.8 and w/h > 5: img = binary[y:y + h, x:x + w] break return num_split(img) #得到卡号区域后,绘制垂直投影直方图,字符分割,再将单个字符归一化为16*16大小的图像 #图像分割 def num_split(img): height, width = img.shape v = [0] * width z = [0] * height a = 0 #垂直投影:统计并存储每一列的黑点数 #逐行存储 for x in range(0, width): for y in range(0, height): if img[y, x] == 255: continue else: a = a + 1 v[x] = a a = 0 #创建空白图片,绘制垂直投影图 l = len(v) emptyImage = np.full((height, width), 255, dtype=np.uint8) for x in range(0, width): for y in range(0, v[x]): emptyImage[y, x] = 0 #分割字符 #将字符坐标及宽度存放到Position Position = [] Wstart = 0 Wend = 0 W_Start = 0 W_End = 0 v[0], v[len(v)-1] = 0, 0 for j in range(len(v)): if v[j] > 0 and Wstart == 0: W_Start = j Wstart = 1 Wend = 0 if v[j] <= 0 and Wstart == 1: W_End = j Wstart = 0 Wend = 1 if Wend == 1: Position.append([W_Start, 0, W_End, height]) Wend = 0 data = [] #对单个字符处理 for m in range(len(Position)): temp_img = img[Position[m][1]:Position[m][3], Position[m][0]:Position[m][2]] #获得单个字符的宽度和高度 h1, w1 = temp_img.shape if w1 > h1: return [] temp_img = cv2.resize(temp_img, (16, 16)) h0, w0 = temp_img.shape temp_data = [] for hx in range(h0): for wx in range(w0): temp_data.append(float(temp_img[hx, wx])) data.append(temp_data) return data- 1
- 2
- 3
- 4
- 5
- 6
- 7
- 8
- 9
- 10
- 11
- 12
- 13
- 14
- 15
- 16
- 17
- 18
- 19
- 20
- 21
- 22
- 23
- 24
- 25
- 26
- 27
- 28
- 29
- 30
- 31
- 32
- 33
- 34
- 35
- 36
- 37
- 38
- 39
- 40
- 41
- 42
- 43
- 44
- 45
- 46
- 47
- 48
- 49
- 50
- 51
- 52
- 53
- 54
- 55
- 56
- 57
- 58
- 59
- 60
- 61
- 62
- 63
- 64
- 65
- 66
- 67
- 68
- 69
- 70
- 71
- 72
- 73
- 74
- 75
- 76
- 77
- 78
- 79
相关其它博客
基于opencv+tensorflow+神经网络的智能银行卡卡号识别系统——深度学习算法应用(含python、模型源码)+数据集(一)
基于opencv+tensorflow+神经网络的智能银行卡卡号识别系统——深度学习算法应用(含python、模型源码)+数据集(三)
工程源代码下载
其它资料下载
如果大家想继续了解人工智能相关学习路线和知识体系,欢迎大家翻阅我的另外一篇博客《重磅 | 完备的人工智能AI 学习——基础知识学习路线,所有资料免关注免套路直接网盘下载》
这篇博客参考了Github知名开源平台,AI技术平台以及相关领域专家:Datawhale,ApacheCN,AI有道和黄海广博士等约有近100G相关资料,希望能帮助到所有小伙伴们。 -
相关阅读:
Day1 数据分析 关系数据库和MySQL【中级】
python经典百题之求奇数个数
services资源+pod详解
`算法题解` `AcWing` 201. 可见的点
Spring框架系列(10) - Spring AOP实现原理详解之AOP代理的创建
别人做跨境电商都月入过万了,真这么好做吗?
VE对环境和社会的贡献
web前端期末大作业——HTML+CSS简单的旅游网页设计与实现
STC51单片机学习笔记3——C语言流水灯
【C++】传递‘类非静态成员函数’用作回调函数
- 原文地址:https://blog.csdn.net/qq_31136513/article/details/134391948
