-
ExoPlayer架构详解与源码分析(7)——SampleQueue
系列文章目录
ExoPlayer架构详解与源码分析(1)——前言
ExoPlayer架构详解与源码分析(2)——Player
ExoPlayer架构详解与源码分析(3)——Timeline
ExoPlayer架构详解与源码分析(4)——整体架构
ExoPlayer架构详解与源码分析(5)——MediaSource
ExoPlayer架构详解与源码分析(6)——MediaPeriod
ExoPlayer架构详解与源码分析(7)——SampleQueue
ExoPlayer架构详解与源码分析(8)——Loader
ExoPlayer架构详解与源码分析(9)——TsExtractor
ExoPlayer架构详解与源码分析(10)——H264Reader
ExoPlayer架构详解与源码分析(11)——DataSource
ExoPlayer架构详解与源码分析(12)——Cache
前言
ProgressiveMediaPeriod中的SampleQueue部分相对其他部分,结构相对完整独立,没有像加载媒体那部分拆分出很多其他的概念,所以优先了解下SampleQueue。本篇主要解答媒体数据是如何在播放器内部缓存的,以及ExoPlayer是如何保证这些数据稳定高效的读写。
ProgressiveMediaPeriod
先预习下上篇的整体结构,本篇主要分析左半部分的SampleQueue:
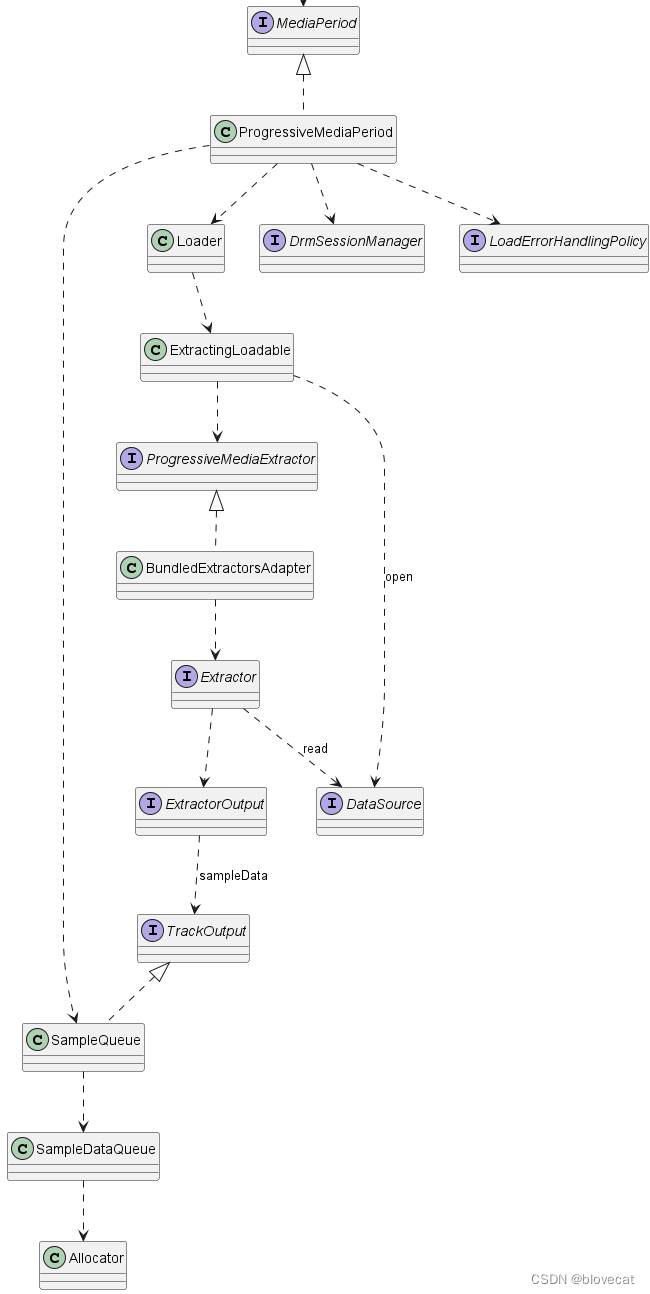
SampleQueue
这是一个保存Sample的队列。MediaoPeriod向外提供的SampleStream其实就是从SampleQueue中读取的数据,一个SampleQueue就对应一个SampleStream。

SampleQueue主要有3大功能:
-
管理 通过内部的一个环形Info数组(包含offsets数组、sizes数等sampleData数据)管理SampleDataQueue和SharedSampleMetadata这2个数据源。SampleQueue实际的数据其实是保存在SampleDataQueue和SharedSampleMetadata中的,数据的管理实现在SampleQueue里。
这部分可以从SampleQueue初始化部分源码看出来:private final SampleDataQueue sampleDataQueue;//用于播放的数据 private final SampleExtrasHolder extrasHolder; private final SpannedData<SharedSampleMetadata> sharedSampleMetadata;//Meta数据 private int capacity;//Info数组的总长度 private long[] offsets;//每段SampleData的数据偏移量 private int[] sizes;//每段SampleData的数据大小 private int[] flags;//每段SampleData flags 数据 private long[] timesUs;//每段SampleData 时间戳 private int length;//有效的(没有被释放且已分配的数据)Info数组数据的长度 private int absoluteFirstIndex;//绝对的开始位置,指向数据段的开始位置,+readPosition就是当前读取的绝对位置 private int relativeFirstIndex;//一个在Info数据上循环的相对位置 private int readPosition;//当前的读取位置,这个值是相对relativeFirstIndex的位置偏移量 protected SampleQueue( Allocator allocator, @Nullable DrmSessionManager drmSessionManager, @Nullable DrmSessionEventListener.EventDispatcher drmEventDispatcher) { ... sampleDataQueue = new SampleDataQueue(allocator);//内存分配器供SampleDataQueue使用 extrasHolder = new SampleExtrasHolder(); capacity = SAMPLE_CAPACITY_INCREMENT;//默认的分段属是1000 sourceIds = new long[capacity]; offsets = new long[capacity]; timesUs = new long[capacity]; flags = new int[capacity]; sizes = new int[capacity]; sharedSampleMetadata = new SpannedData<>(/* removeCallback= */ metadata -> metadata.drmSessionReference.release()); ... }- 1
- 2
- 3
- 4
- 5
- 6
- 7
- 8
- 9
- 10
- 11
- 12
- 13
- 14
- 15
- 16
- 17
- 18
- 19
- 20
- 21
- 22
- 23
- 24
- 25
- 26
- 27
- 28
- 29
- 30
- 31
上面主要是初始化出一个SampleDataQueue和一个sharedSampleMetadata数据集,然后初始化出一个1000个块的Info数组,用于管理这2块数据。这里将offsets、timesUs、sourceIds 、flags、sizes 几个数组统称为 Info数组,因为这里面共同保存着每个Sample的信息。
-
输入 同时SampleQueue实现了TrackOutput接口,对外提供sampleMetadata、format 函数使得调用者可以输入Meta信息,sampleData函数可以输入播放数据。这里的输入调用者主要是后面要说的ProgressiveMediaPeriod另一部分。
下面分析下源码数据是如何输入的://输入Metadata @Override public void sampleMetadata( long timeUs,//与当前数据关联的媒体时间戳 @C.BufferFlags int flags,//是否关键帧 int size,//样本数据大小 int offset,//块间偏移量,距离上一次已经SmapleMeta的SampleData的偏移量,我们知道媒体文件中用于播放数据不一定是连续的,其中可能包含一些其他数据,这些数据可以看成是之间的偏移量 @Nullable CryptoData cryptoData) { if (upstreamFormatAdjustmentRequired) { format(Assertions.checkStateNotNull(unadjustedUpstreamFormat)); } boolean isKeyframe = (flags & C.BUFFER_FLAG_KEY_FRAME) != 0; if (upstreamKeyframeRequired) {//从关键帧开始Sample if (!isKeyframe) { return; } upstreamKeyframeRequired = false; } timeUs += sampleOffsetUs; if (upstreamAllSamplesAreSyncSamples) { if (timeUs < startTimeUs) { // 如果所有轨道都是同步的,那么在当前Smaple点之前的时间数据就可以丢弃了 return; } if ((flags & C.BUFFER_FLAG_KEY_FRAME) == 0) { if (!loggedUnexpectedNonSyncSample) { Log.w(TAG, "Overriding unexpected non-sync sample for format: " + upstreamFormat); loggedUnexpectedNonSyncSample = true; } flags |= C.BUFFER_FLAG_KEY_FRAME;//保证设置为关键帧 } } if (pendingSplice) {//判断是否是拼接数据,如HLS切换流的时候就会用到 if (!isKeyframe || !attemptSplice(timeUs)) { return; } pendingSplice = false; } //当前Info的偏移量=数据总长度-样本数据长度-块间偏移量 long absoluteOffset = sampleDataQueue.getTotalBytesWritten() - size - offset; commitSample(timeUs, flags, absoluteOffset, size, cryptoData); } private synchronized void commitSample( long timeUs, @C.BufferFlags int sampleFlags, long offset, int size, @Nullable CryptoData cryptoData) { if (length > 0) { // 保证最后一个的end位置要小于等于下一个的开始位置 int previousSampleRelativeIndex = getRelativeIndex(length - 1); checkArgument( offsets[previousSampleRelativeIndex] + sizes[previousSampleRelativeIndex] <= offset); } isLastSampleQueued = (sampleFlags & C.BUFFER_FLAG_LAST_SAMPLE) != 0; largestQueuedTimestampUs = max(largestQueuedTimestampUs, timeUs); int relativeEndIndex = getRelativeIndex(length);//获取Info里的下一个位置索引 timesUs[relativeEndIndex] = timeUs;//开始赋值 offsets[relativeEndIndex] = offset; sizes[relativeEndIndex] = size; flags[relativeEndIndex] = sampleFlags; cryptoDatas[relativeEndIndex] = cryptoData; sourceIds[relativeEndIndex] = upstreamSourceId; if (sharedSampleMetadata.isEmpty() || !sharedSampleMetadata.getEndValue().format.equals(upstreamFormat)) { //开始写入Metadata sharedSampleMetadata.appendSpan( getWriteIndex(), new SharedSampleMetadata(checkNotNull(upstreamFormat), drmSessionReference)); } length++;//有效长度++ if (length == capacity) {//如果写入数据已经超过Info的最大长度 // Increase the capacity. int newCapacity = capacity + SAMPLE_CAPACITY_INCREMENT;//则将Info数组长度扩展至2倍 long[] newSourceIds = new long[newCapacity]; long[] newOffsets = new long[newCapacity]; long[] newTimesUs = new long[newCapacity]; int[] newFlags = new int[newCapacity]; int[] newSizes = new int[newCapacity]; CryptoData[] newCryptoDatas = new CryptoData[newCapacity]; //将旧的数据,移入新的数组,将相对开始位置作为新数组的第一个位置 int beforeWrap = capacity - relativeFirstIndex; System.arraycopy(offsets, relativeFirstIndex, newOffsets, 0, beforeWrap); System.arraycopy(timesUs, relativeFirstIndex, newTimesUs, 0, beforeWrap); System.arraycopy(flags, relativeFirstIndex, newFlags, 0, beforeWrap); System.arraycopy(sizes, relativeFirstIndex, newSizes, 0, beforeWrap); System.arraycopy(cryptoDatas, relativeFirstIndex, newCryptoDatas, 0, beforeWrap); System.arraycopy(sourceIds, relativeFirstIndex, newSourceIds, 0, beforeWrap); int afterWrap = relativeFirstIndex; System.arraycopy(offsets, 0, newOffsets, beforeWrap, afterWrap); System.arraycopy(timesUs, 0, newTimesUs, beforeWrap, afterWrap); System.arraycopy(flags, 0, newFlags, beforeWrap, afterWrap); System.arraycopy(sizes, 0, newSizes, beforeWrap, afterWrap); System.arraycopy(cryptoDatas, 0, newCryptoDatas, beforeWrap, afterWrap); System.arraycopy(sourceIds, 0, newSourceIds, beforeWrap, afterWrap); offsets = newOffsets; timesUs = newTimesUs; flags = newFlags; sizes = newSizes; cryptoDatas = newCryptoDatas; sourceIds = newSourceIds; relativeFirstIndex = 0; capacity = newCapacity; } } //获取当前Info数组的相对位置,传入相对第一个位置的偏移量 private int getRelativeIndex(int offset) { int relativeIndex = relativeFirstIndex + offset; return relativeIndex < capacity ? relativeIndex : relativeIndex - capacity;//环形指针 } //获取当前写入MetaData的绝对位置 public final int getWriteIndex() { return absoluteFirstIndex + length;//等于当前绝开始位置+有效的长度 } //输入Format @Override public final void format(Format format) { Format adjustedUpstreamFormat = getAdjustedUpstreamFormat(format); upstreamFormatAdjustmentRequired = false; unadjustedUpstreamFormat = format; boolean upstreamFormatChanged = setUpstreamFormat(adjustedUpstreamFormat); if (upstreamFormatChangeListener != null && upstreamFormatChanged) { upstreamFormatChangeListener.onUpstreamFormatChanged(adjustedUpstreamFormat); } }- 1
- 2
- 3
- 4
- 5
- 6
- 7
- 8
- 9
- 10
- 11
- 12
- 13
- 14
- 15
- 16
- 17
- 18
- 19
- 20
- 21
- 22
- 23
- 24
- 25
- 26
- 27
- 28
- 29
- 30
- 31
- 32
- 33
- 34
- 35
- 36
- 37
- 38
- 39
- 40
- 41
- 42
- 43
- 44
- 45
- 46
- 47
- 48
- 49
- 50
- 51
- 52
- 53
- 54
- 55
- 56
- 57
- 58
- 59
- 60
- 61
- 62
- 63
- 64
- 65
- 66
- 67
- 68
- 69
- 70
- 71
- 72
- 73
- 74
- 75
- 76
- 77
- 78
- 79
- 80
- 81
- 82
- 83
- 84
- 85
- 86
- 87
- 88
- 89
- 90
- 91
- 92
- 93
- 94
- 95
- 96
- 97
- 98
- 99
- 100
- 101
- 102
- 103
- 104
- 105
- 106
- 107
- 108
- 109
- 110
- 111
- 112
- 113
- 114
- 115
- 116
- 117
- 118
- 119
- 120
- 121
- 122
- 123
- 124
- 125
- 126
- 127
- 128
- 129
- 130
- 131
- 132
- 133
- 134
- 135
Metadata输入主要分3部分:
- 确保当前为关键帧。
- 获取Info环形数组的下一个索引,将当前Sampledata的数据保存到Info数组并记录Meta信息。
- 确保Info数组足够大可以容纳足够多的数据。
下面看下sampleData部分
@Override public final void sampleData( ParsableByteArray data, int length, @SampleDataPart int sampleDataPart) { sampleDataQueue.sampleData(data, length); }- 1
- 2
- 3
- 4
- 5
没了就这么多。😂,你只管告诉sampleDataQueue数据的大小和长度,sampleDataQueue来添加,具体sampleDataQueue是怎么有效管理数据的后面会讲到,现在不是重点
通过sampleDataQueue和sampleMetadata对比你会发现sampleMetadata比sampleDataQueue复杂多个,而且sampleMetadata方法添加了synchronized 同步块,多线程的时候会阻塞,而sampleDataQueue没有任何同步代码包括到sampleDataQueue里也一样。这样做是因为sampleMetadata的数据量很少,即使阻塞也能很高效的执行。而sampleData数据量往往比较大,写入的时间也比较长,所以不能阻塞。那么为什么要这么做呢,后面我们看到数据的读取部分就能理解了。
-
输出 SampleQueue提供了read方法输出数据
分析下对应源码:public int read( FormatHolder formatHolder, DecoderInputBuffer buffer, @ReadFlags int readFlags, boolean loadingFinished) { //首先读取Metadata int result = peekSampleMetadata( formatHolder, buffer, /* formatRequired= */ (readFlags & FLAG_REQUIRE_FORMAT) != 0, loadingFinished, extrasHolder); if (result == C.RESULT_BUFFER_READ && !buffer.isEndOfStream()) { boolean peek = (readFlags & FLAG_PEEK) != 0; if ((readFlags & FLAG_OMIT_SAMPLE_DATA) == 0) { if (peek) { sampleDataQueue.peekToBuffer(buffer, extrasHolder); } else { sampleDataQueue.readToBuffer(buffer, extrasHolder);//将sampleData的位置信息通过extrasHolder传递给sampleDataQueue读取数据 } } if (!peek) { readPosition++;//读取位置++ } } return result; } //读取Metadata private synchronized int peekSampleMetadata( FormatHolder formatHolder, DecoderInputBuffer buffer, boolean formatRequired, boolean loadingFinished, SampleExtrasHolder extrasHolder) { ... Format format = sharedSampleMetadata.get(getReadIndex()).format; //用绝对开始位置+读取位置(absoluteFirstIndex + readPosition)获取读取的绝对位置 ... int relativeReadIndex = getRelativeIndex(readPosition);//获取当前Info数组的相对位置 ... extrasHolder.size = sizes[relativeReadIndex];//取出Info数据 extrasHolder.offset = offsets[relativeReadIndex]; extrasHolder.cryptoData = cryptoDatas[relativeReadIndex]; return C.RESULT_BUFFER_READ; } //获取读取的绝对位置 public final int getReadIndex() { return absoluteFirstIndex + readPosition; }- 1
- 2
- 3
- 4
- 5
- 6
- 7
- 8
- 9
- 10
- 11
- 12
- 13
- 14
- 15
- 16
- 17
- 18
- 19
- 20
- 21
- 22
- 23
- 24
- 25
- 26
- 27
- 28
- 29
- 30
- 31
- 32
- 33
- 34
- 35
- 36
- 37
- 38
- 39
- 40
- 41
- 42
- 43
- 44
- 45
- 46
- 47
- 48
- 49
- 50
- 51
要读取sampleData和sampleMetadata的数据,首先要确定当前读取点的Info的位置,然后通过Info数组才能知道读取的位置和长度,最后读取sampleData,同样sampleMetadata读取是加锁的,而sampleData没有。可以看出sampleData的读写是不受线程限制的,通过SampleQueue内部维护的Info数组来维护sampleData,可以最大化保证多线程下sampleData读写的效率。
-
释放 通过discardSamples等释放不需要的数据
分析下对应源码:public final void discardTo(long timeUs, boolean toKeyframe, boolean stopAtReadPosition) { sampleDataQueue.discardDownstreamTo( discardSampleMetadataTo(timeUs, toKeyframe, stopAtReadPosition));//先释放Metadata } private synchronized long discardSampleMetadataTo( long timeUs, boolean toKeyframe, boolean stopAtReadPosition) { if (length == 0 || timeUs < timesUs[relativeFirstIndex]) { return C.INDEX_UNSET; } int searchLength = stopAtReadPosition && readPosition != length ? readPosition + 1 : length; //根据时间戳来确定要释放数据块的数量 int discardCount = findSampleBefore(relativeFirstIndex, searchLength, timeUs, toKeyframe); if (discardCount == -1) { return C.INDEX_UNSET; } return discardSamples(discardCount); } private long discardSamples(int discardCount) { largestDiscardedTimestampUs = max(largestDiscardedTimestampUs, getLargestTimestamp(discardCount)); length -= discardCount;//有效长度=有效长度-释放数量 absoluteFirstIndex += discardCount;//绝对开始位置后移 relativeFirstIndex += discardCount;//相对开始位置后移 if (relativeFirstIndex >= capacity) {//环形数组 relativeFirstIndex -= capacity; } readPosition -= discardCount;//因为relativeFirstIndex后移,相对它的位置在缩小 if (readPosition < 0) { readPosition = 0; } sharedSampleMetadata.discardTo(absoluteFirstIndex);//释放Metadata if (length == 0) { int relativeLastDiscardIndex = (relativeFirstIndex == 0 ? capacity : relativeFirstIndex) - 1; return offsets[relativeLastDiscardIndex] + sizes[relativeLastDiscardIndex]; } else { return offsets[relativeFirstIndex];//返回SampleData的释放偏移量 } }- 1
- 2
- 3
- 4
- 5
- 6
- 7
- 8
- 9
- 10
- 11
- 12
- 13
- 14
- 15
- 16
- 17
- 18
- 19
- 20
- 21
- 22
- 23
- 24
- 25
- 26
- 27
- 28
- 29
- 30
- 31
- 32
- 33
- 34
- 35
- 36
- 37
- 38
- 39
- 40
- 41
同样数据的释放和读写一样,通过内部的Info来管理,释放后会更新Info上的相关位置。
SampleQueue动态分析
上面一直在说环形数组,静态的看代码可能感受不到这点,下面我们通过几个图来动态分析下SampleQueue的运作原理,这部分需要结合上面的源码一起看才好理解。
首先为了方便分析假设数组最大长度为capacity=6,当前已经写入了4段sampleData对应图中的sample0-3,同时也写入了4个数据到Info数组对应图中的0-2的size、offset、time结构,每个结构的size、offset、time在图的最下方都有标记,这里可以看下加深下对这个结构数值的含义的理解,所以此时有效长度length=4,由于是刚开始读写这个时候的relativeFirstIndex=absoluteFirstIndex=0处于开始位置,当前的读取位置相对于relativeFirstIndex也就是和relativeFirstIndex差值,readPosition=2。接下来sample会从右侧箭头处不断写入。同样上方的Info数组随着读取也会不断变化。

好了,此时先向Sample队列写入一个Sample length+1,然后同时读取2个Sample readPosition+2=4

随着数据被使用(已经播放)之前的数据需要丢弃,以便下次写入,释放3个Sample,可以看到relativeFirstIndex和absoluteFirstIndex同时前移,虽然readPosiition的位置没有移动,也就是没有读取新的数据,但是readPosiition的值变小,有效长度缩小为2。到这里relativeFirstIndex还是和absoluteFirstIndex相等的还看不出环形的特性。

此时开始写入3个Sample,这个时候就可以看出Info环形特性,之前释放的0号和1号会重新指向数据队列的最前端,同时更新offset,size相关数据,有效数据长度增加到5,length=5。

这个时候再读取3个Sample时,readPosiition的值增加3此时指向Info数组的下标1,readPosiition=4。
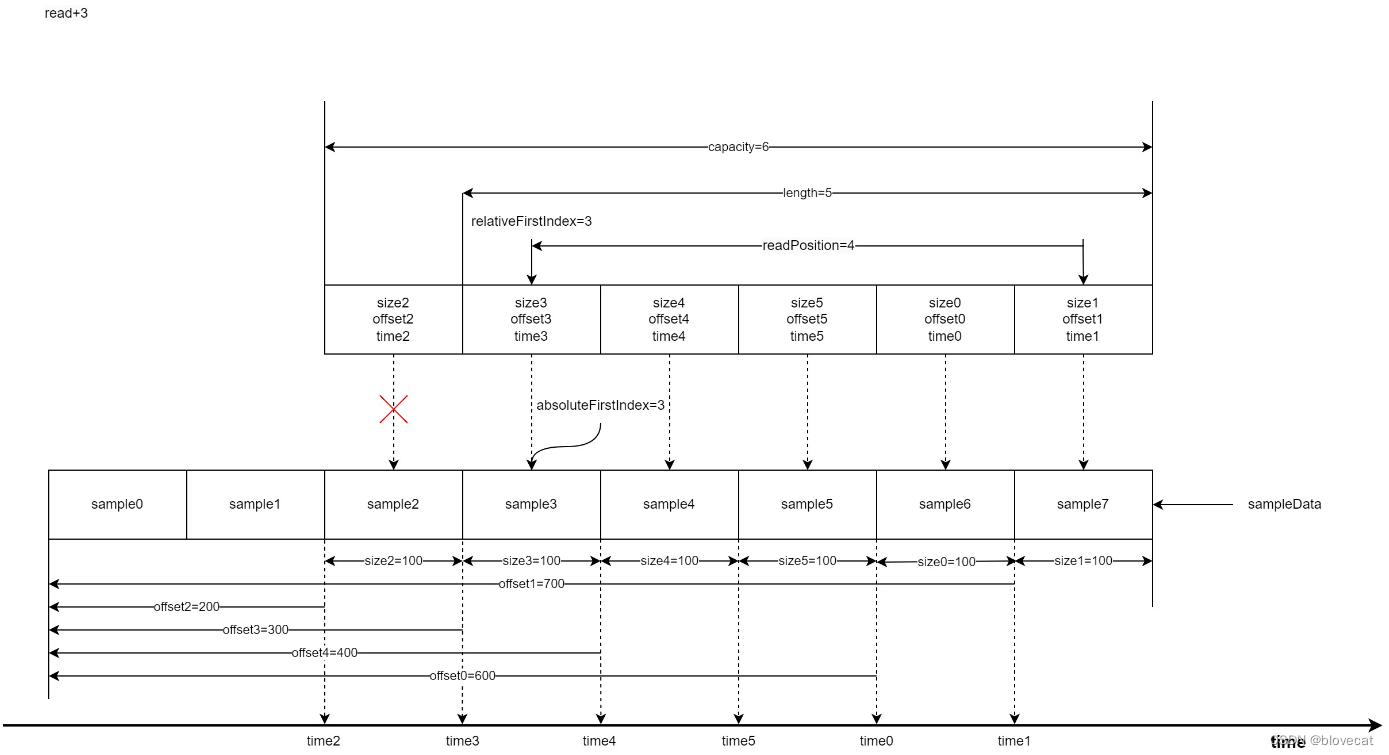
好了我们继续释放数据,这次再次释放3个,可以看到relativeFirstIndex和absoluteFirstIndex值开始不一样了,由于又回到了Info数组的开始位置所以relativeFirstIndex=0,readPosiition缩短为1,有效长度length=2,而absoluteFirstIndex是相对于Smaple的绝对位置,这个时候absoluteFirstIndex继续后移到6号位置的sample6。

把上面的图连续不断的执行,可以想象出,Info数组像一个不断前行的履带行驶在sample铺平的道路上(读取)。被履带压过的道路(已经读取过的数据)就会被释放,此时路还在不断的向前铺设(新的sample数据在不断的写入到SampleQueen中),整个过程中如果新增数据比释放数据快,履带的大小会动态的扩充变长,图中为了方便理解并没有体现这点。至此我们可以总结出几个规律:
- 当前写入数据的绝对位置永远等于absoluteFirstIndex+length
- 当前读取数据的绝对位置永远等于absoluteFirstIndex + readPosition
- Info数组可以理解成一个首尾相连的环形数组,数组最后一个位置的下个位置就是数组的开始位置
这几个规律在源码中经常被用到,感兴趣的同学可以深入阅读下。
下面来分析下实际存储数据的2个结构
SpannedData< SharedSampleMetadata >
本质是一个Android里实现SparseArray的map,通过int 类型key可以快速向指定key存入数据或者取出数据,这里数据跟随SampleQueue里的Info来管理,添加或者释放指定位置的Metadata数据。
SampleDataQueue
重点来说下SampleDataQueue,由于SampleData的数据量要远远大于Metadata,而且还需要频繁的读写释放,所以向SpannedData
那样简单粗暴的管理数据,效率会非常低,因为JVM要频繁的申请内存GC释放内存。为了解决这个问题SampleDataQueue内部维护了一个链表,同时维护了链表中3个重要的节点,firstAllocationNode,readAllocationNode,writeAllocationNode,用于快速获取读写点。 private AllocationNode firstAllocationNode;//第一个节点位置 private AllocationNode readAllocationNode;//当前读取节点位置 private AllocationNode writeAllocationNode;//当前写入节点位置- 1
- 2
- 3
这里顺带提下AllocationNode的数据结构,主要就是封装了Allocation,allocation才是实际存储数据的部分,同时提供了next AllocationNode 提供下一个AllocationNode 的指针,形成一个链表结构。
private static final class AllocationNode implements Allocator.AllocationNode { public long startPosition;//此段allocation的开始位置 public long endPosition;//此段allocation的结束位置 public Allocation allocation;//实际缓存数据部分 public AllocationNode next;//指向下一个 ... public void initialize(Allocation allocation, AllocationNode next) { this.allocation = allocation; this.next = next; } ...- 1
- 2
- 3
- 4
- 5
- 6
- 7
- 8
- 9
- 10
- 11
回到SampleDataQueue中,调用sampleData循环写入数据时,每次循环写入主要分为3步:
- 调用preAppend初始化通过writeAllocationNode,同时也初始化出了下个writeAllocationNode。重点看下allocator.allocate(),这里才是初始化了AllocationNode的实际内存数据allocation的地方,后面会详细分析。
- 将数据循环写入writeAllocationNode的实际缓存位置allocation.data中。
- 调用preAppend更新SampleDataQueue已写入总长度,如果总长度已经超过当前写入节点的结束位置,将当前写入节点,更新为下一写入节点。
private int preAppend(int length) { if (writeAllocationNode.allocation == null) { writeAllocationNode.initialize( allocator.allocate(),//分配内存 new AllocationNode(writeAllocationNode.endPosition, allocationLength)); } return min(length, (int) (writeAllocationNode.endPosition - totalBytesWritten)); } public void sampleData(ParsableByteArray buffer, int length) { while (length > 0) { int bytesAppended = preAppend(length); buffer.readBytes( writeAllocationNode.allocation.data, writeAllocationNode.translateOffset(totalBytesWritten), bytesAppended); length -= bytesAppended; postAppend(bytesAppended); } } private void postAppend(int length) { totalBytesWritten += length;//增加总长度 if (totalBytesWritten == writeAllocationNode.endPosition) {//总长度已经超过当前写入节点的结束位置 writeAllocationNode = writeAllocationNode.next;//将当前写入节点,更新为下一写入节点 } }- 1
- 2
- 3
- 4
- 5
- 6
- 7
- 8
- 9
- 10
- 11
- 12
- 13
- 14
- 15
- 16
- 17
- 18
- 19
- 20
- 21
- 22
- 23
- 24
- 25
- 26
- 27
- 28
读取和写入类似,直接看下释放数据的地方,首先释放指定位置之前的链表数据,其次重置开始节点和读取节点。
public void discardDownstreamTo(long absolutePosition) { if (absolutePosition == C.INDEX_UNSET) { return; } while (absolutePosition >= firstAllocationNode.endPosition) { //从第一个节点开始依次取出下一个节点通过allocator释放内存,并清除AllocationNode,一直到指定的absolutePosition allocator.release(firstAllocationNode.allocation); firstAllocationNode = firstAllocationNode.clear(); } if (readAllocationNode.startPosition < firstAllocationNode.startPosition) { //保证当前的读取位置在开始节点之后 readAllocationNode = firstAllocationNode; } }- 1
- 2
- 3
- 4
- 5
- 6
- 7
- 8
- 9
- 10
- 11
- 12
- 13
- 14
看完是不是发现目前也没没有解决上面说的内存问题,内存感觉是在不断新增的。注意看下上面源码实际获取内存的地方allocator.allocate(),原来这些都交给了Allocator,通过Allocator实现内存的循环高效利用。
Allocator
这是一个接口用于媒体数据的内存分配,默认有一个DefaultAllocator实现。
先看下主要的源码public final class DefaultAllocator implements Allocator { private static final int AVAILABLE_EXTRA_CAPACITY = 100;//额外的初始化Allocation数量 private final boolean trimOnReset; private final int individualAllocationSize; @Nullable private final byte[] initialAllocationBlock;//初始化的一个连续的数组,指向默认数量的的Allocations,参考下图 private int targetBufferSize; private int allocatedCount;//已分配的Allocation数量,参考下图 private int availableCount;//可用的Allocation数量,参考下图 private @NullableType Allocation[] availableAllocations;//可用的Allocations,参考下图 public DefaultAllocator( boolean trimOnReset, int individualAllocationSize, int initialAllocationCount) { this.trimOnReset = trimOnReset; this.individualAllocationSize = individualAllocationSize; this.availableCount = initialAllocationCount; this.availableAllocations = new Allocation[initialAllocationCount + AVAILABLE_EXTRA_CAPACITY];//添加了部分冗余 if (initialAllocationCount > 0) {//将初始化的Allocations通过指定offset分配initialAllocationBlock initialAllocationBlock = new byte[initialAllocationCount * individualAllocationSize]; for (int i = 0; i < initialAllocationCount; i++) { int allocationOffset = i * individualAllocationSize; availableAllocations[i] = new Allocation(initialAllocationBlock, allocationOffset); } } else { initialAllocationBlock = null; } } //这个方法用于获取一个Allocation,注意在调用此方法后必须调用release方法将分配Allocation返还 @Override public synchronized Allocation allocate() { allocatedCount++;//已分配数量+1 Allocation allocation; if (availableCount > 0) { allocation = Assertions.checkNotNull(availableAllocations[--availableCount]);//从尾部取出,可用数量-1 availableAllocations[availableCount] = null;//清空 } else { allocation = new Allocation(new byte[individualAllocationSize], 0);//不够用了,创建新的Allocation,直接初始化出一段新的数组分配给它 if (allocatedCount > availableAllocations.length) {//可用Allocations扩充2倍 availableAllocations = Arrays.copyOf(availableAllocations, availableAllocations.length * 2); } } return allocation; } //返还分配的Allocation @Override public synchronized void release(Allocation allocation) { availableAllocations[availableCount++] = allocation;//可用数量加1 allocatedCount--;//已分配数量减1 } ... } @Override//释无用的空块 public synchronized void trim() { //如果重新定义了缓存区大小,计算需要的Allocation块总数量 int targetAllocationCount = Util.ceilDivide(targetBufferSize, individualAllocationSize); int targetAvailableCount = max(0, targetAllocationCount - allocatedCount);//减去目前空余的块,则为剩余需要的块数量 //不存在冗余,无需trim if (targetAvailableCount >= availableCount) { return; } if (initialAllocationBlock != null) { // 从头尾查找第一个不是空的块,将其位置向前 int lowIndex = 0; int highIndex = availableCount - 1; while (lowIndex <= highIndex) { //未分配出的Allocation 不可能为null Allocation lowAllocation = Assertions.checkNotNull(availableAllocations[lowIndex]); if (lowAllocation.data == initialAllocationBlock) {//当前低位为初始值,从未被分配过 lowIndex++;//lowIndex后移 } else {//当前低位Allocation已分配过 //未分配出的Allocation 不可能为null Allocation highAllocation = Assertions.checkNotNull(availableAllocations[highIndex]); if (highAllocation.data != initialAllocationBlock) {//当前高位Allocation已分配过 highIndex--;//highIndex前移 } else {//当前高位Allocation未分配过 //将当前未分配过高位和已分配过的低位交换位置,未分配过的放到数组低位 availableAllocations[lowIndex++] = highAllocation; availableAllocations[highIndex--] = lowAllocation; } } } //到这里lowIndex之前的所有Allocation都是未分配过的初始initialAllocationBlock // 获取他们的最大值,也就是最大可释放 targetAvailableCount = max(targetAvailableCount, lowIndex); //只有一种情况lowIndex正好等于availableCount,也就是当前未分配块都是初始值,从未被分配,当前可能为初始状态跳过trim if (targetAvailableCount >= availableCount) { return; } } // 释放空块 Arrays.fill(availableAllocations, targetAvailableCount, availableCount, null); availableCount = targetAvailableCount; }- 1
- 2
- 3
- 4
- 5
- 6
- 7
- 8
- 9
- 10
- 11
- 12
- 13
- 14
- 15
- 16
- 17
- 18
- 19
- 20
- 21
- 22
- 23
- 24
- 25
- 26
- 27
- 28
- 29
- 30
- 31
- 32
- 33
- 34
- 35
- 36
- 37
- 38
- 39
- 40
- 41
- 42
- 43
- 44
- 45
- 46
- 47
- 48
- 49
- 50
- 51
- 52
- 53
- 54
- 55
- 56
- 57
- 58
- 59
- 60
- 61
- 62
- 63
- 64
- 65
- 66
- 67
- 68
- 69
- 70
- 71
- 72
- 73
- 74
- 75
- 76
- 77
- 78
- 79
- 80
- 81
- 82
- 83
- 84
- 85
- 86
- 87
- 88
- 89
- 90
- 91
- 92
- 93
- 94
- 95
- 96
- 97
- 98
Allocator保存了一组Allocation列表,和一个默认的字节数组,每个Allocation对于数据块的长度由individualAllocationSize决定,通过offset确定在数组中的起始位置。同时维护着可用数量和已分配数量,当外部需要新的Allocation时会调用allocate获取,使用完毕后调用release将Allocation返还。可以看到这种设计特别适合播放器的缓冲数据,开始播放时分配一个默认的缓冲区域大小,随着播放进度,当前播放位置前会不断获取新Allocation用于提前缓冲,当这些数据已被渲染播放,离开了缓冲区域,这个时候又会将之前获取Allocation返还,依次循环,滚动的循环利用已分配的内存,整个过程只要不超最大值,就不会再分配新的内存,效率非常高。
下面用一张图来解释下整个过程:

如上图,是一个有着6个Allocation的Allocator,单个Allocation包含2个block(individualAllocationSize=2),initialAllocationBlock也就是block数组总长度为initialAllocationCountindividualAllocationSize=62=12。初始化时会将每个Allocation依次指向initialAllocationBlock中的Block,通过Offset记录位置,当前已经分配出2个Allocation(上图表示为null),空余4个Allocation可分配,此时如果外部再需要获取Allocation时,也就是调用allocate,会将Allocation4,分配出去同时置为null,这个时候Allocation4的指向的Block并没有变化,外部调用者会向Block中填充数据用于缓存。
如果外部释放Allocation时,也就是调用release,会将Allocation填充至Allocation4后面一个位置,记为Allocation5,此过程Allocation5一直都是指向initialAllocationBlock的某段Block的。这两个过程availableCount和allocatedCount也会相应增加或者减少,如果一个Allocation从来没有被分配过,则Block为初始值initialAllocationBlock,如上图的Allocation1,可以通过判断当前的Allocation的data是否等于initialAllocationBlock判断当前Allocation是否被分配过。
整个过程会让人不禁联想到 Android MediaCodec缓冲区,这里部分应该在Renderer部分提到,这里先提前贴下Android MediaCodec缓冲区使用的图,看看是不是很相似呢。

总结
SampleQueue只对Info数组这种小数据量的读写操作做多线程加锁操作,通过短时间阻塞读取Info数组的方式,查询读取关联的sampleData的数据,保证对sampleData这种大数据量耗时的读写不会阻塞,保证了数据的读写效率。
同时SampleQueue的环形数组的数据管理方式令人印象深刻,这种结构特别适合媒体播放这种场景,完美的平衡了性能与内存使用之间的矛盾。
有了SampleQueue这个数据大总管,ProgressiveMediaPeriod就可以随心所欲的写入数据并将媒体数据提供给上游读取。
到这里算是讲完了ProgressiveMediaPeriod的SampleQueue部分。后面将会讲到数据是如何加载到SampleQueue的,也就是首图的右半部分。
版权声明 ©
本文为CSDN作者山雨楼原创文章
转载请注明出处
原创不易,觉得有用的话,收藏转发点赞支持 -
-
相关阅读:
代理IP与Socks5代理:跨界电商时代的网络安全与数据引擎
C++继承
uniPush实战操作详细教程步骤
【深度学习】详解 BEiT
nodejs+npm的安装与配置
01-API概述和使用
一文带你弄懂 CDN 技术的原理
「MySQL高级篇」MySQL日志、事务原理 -- undolog、redolog、binlog、两阶段提交
解决kotlin写Android项目编译报Execution failed for task ‘:app:kaptDebugKotlin‘.异常
MATLAB - 用命令行设计 MPC 控制器
- 原文地址:https://blog.csdn.net/blovecat/article/details/132142057
