码农知识堂 - 1000bd
  •   Python
  •   PHP
  •   JS/TS
  •   JAVA
  •   C/C++
  •   C#
  •   GO
  •   Kotlin
  •   Swift
  • Python OpenCV剪裁图片并修改对应的Labelme标注文件


    Python OpenCV剪裁图片并修改对应的Labelme标注文件

    • 前言
    • 前提条件
    • 相关介绍
    • 实验环境
    • 剪裁图片并修改对应的Labelme标注文件
      • 代码实现

    在这里插入图片描述
    在这里插入图片描述
    在这里插入图片描述
    在这里插入图片描述

    前言

    • 由于本人水平有限,难免出现错漏,敬请批评改正。
    • 更多精彩内容,可点击进入Python日常小操作专栏、OpenCV-Python小应用专栏、YOLO系列专栏、自然语言处理专栏或我的个人主页查看
    • 基于DETR的人脸伪装检测
    • YOLOv7训练自己的数据集(口罩检测)
    • YOLOv8训练自己的数据集(足球检测)
    • YOLOv5:TensorRT加速YOLOv5模型推理
    • YOLOv5:IoU、GIoU、DIoU、CIoU、EIoU
    • 玩转Jetson Nano(五):TensorRT加速YOLOv5目标检测
    • YOLOv5:添加SE、CBAM、CoordAtt、ECA注意力机制
    • YOLOv5:yolov5s.yaml配置文件解读、增加小目标检测层
    • Python将COCO格式实例分割数据集转换为YOLO格式实例分割数据集
    • YOLOv5:使用7.0版本训练自己的实例分割模型(车辆、行人、路标、车道线等实例分割)
    • 使用Kaggle GPU资源免费体验Stable Diffusion开源项目

    前提条件

    • 熟悉Python

    相关介绍

    • Python是一种跨平台的计算机程序设计语言。是一个高层次的结合了解释性、编译性、互动性和面向对象的脚本语言。最初被设计用于编写自动化脚本(shell),随着版本的不断更新和语言新功能的添加,越多被用于独立的、大型项目的开发。
    • OpenCV是一个基于Apache2.0许可(开源)发行的跨平台计算机视觉和机器学习软件库,可以运行在Linux、Windows、Android和Mac OS操作系统上。它轻量级而且高效——由一系列C函数和少量C++类构成,同时提供了Python、Ruby、MATLAB等语言的接口,实现了图像处理和计算机视觉方面的很多通用算法。
    • OpenCV用C++语言编写,它具有C++、Python、Java和MATLAB接口,并支持Windows、Linux、Android和Mac OS,OpenCV主要倾向于实时视觉应用,并在可用时利用MMX和SSE指令。

    实验环境

    • Python 3.x (面向对象的高级语言)

    剪裁图片并修改对应的Labelme标注文件

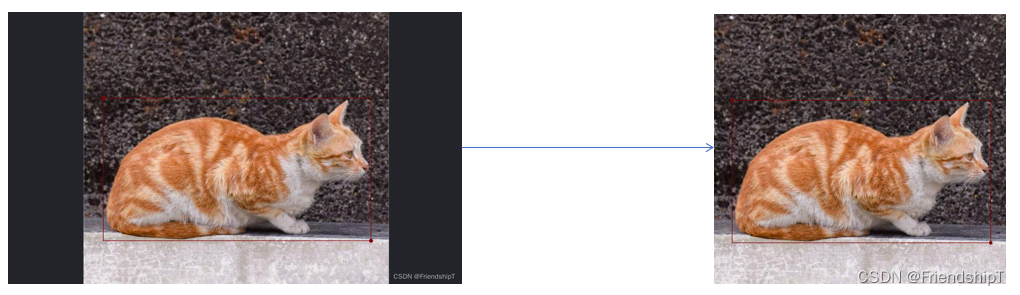
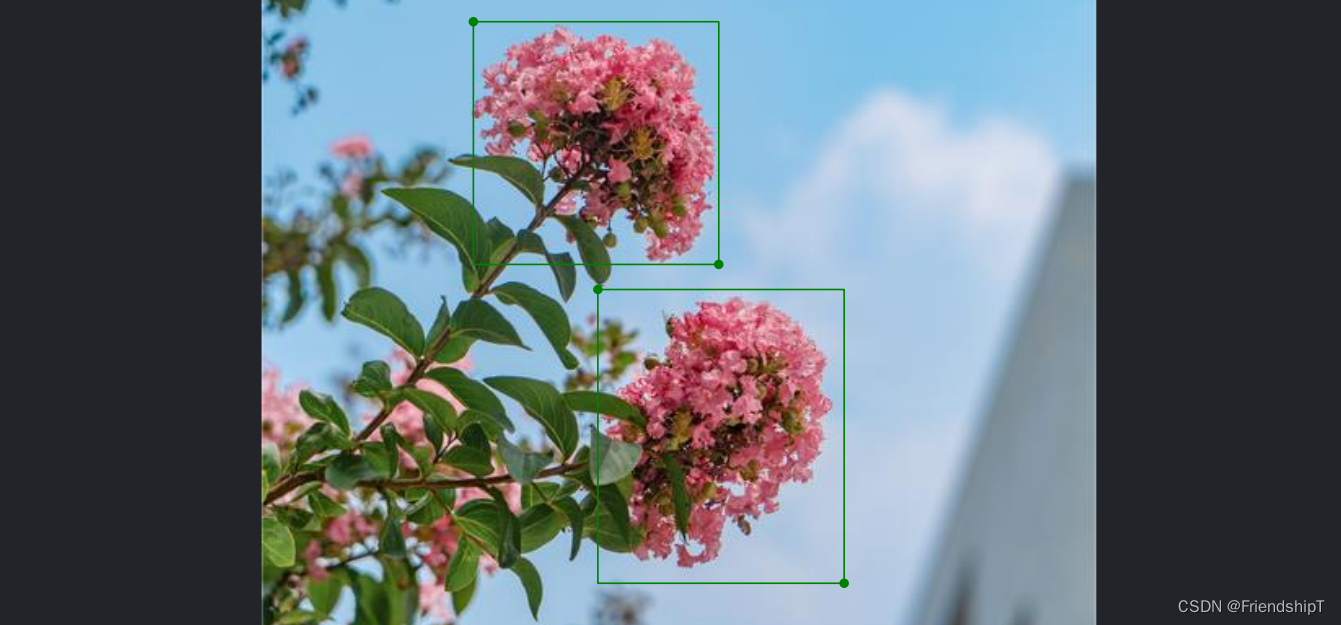
    • 背景:某些场景下,获取到的已经标注的图片数据,有黑色边框,本文目的则是,将图片数据的黑色边框剔除掉,并同步修改已标注的图片数据对应的Labelme标注文件,方便后续使用。
    • 项目结构
      这里是引用

    在这里插入图片描述
    在这里插入图片描述

    在这里插入图片描述

    代码实现

    import os
    import cv2
    import json
    import numpy as np
    
    def xyxy2xywh(rect):
        '''
        (x1,y1,x2,y2) -> (x,y,w,h)
        '''
        return [rect[0],rect[1],rect[2]-rect[0],rect[3]-rect[1]]
    
    def xywh2xyxy(rect):
        '''
        (x,y,w,h) -> (x1,y1,x2,y2)
        '''
        return [rect[0],rect[1],rect[0]+rect[2],rect[1]+rect[3]]
    
    def xyxy2xminyminxmaxymax(rect):
        xmin = min(rect[0],rect[2])
        ymin = min(rect[1],rect[3])
        xmax = max(rect[0],rect[2])
        ymax = max(rect[1],rect[3])
        return [xmin,ymin,xmax,ymax]
    
    def alter_json(img_name,in_json_path,out_json_path,crop_x,crop_y,crop_height,crop_width,pad):
        '''
        in_json_path: json文件输入路径
        out_json_path: json文件保存路径
        crop_x : 剪裁矩阵坐标的x
        crop_y : 剪裁矩阵坐标的y
        crop_height: 剪裁后的高
        crop_width: 剪裁后的宽
        pad: 图片填充数
        '''
        file_in = open(in_json_path, "r", encoding='utf-8')
        # json.load数据到变量json_data
        json_data = json.load(file_in)
        # 修改json中的内容
        json_data["imageHeight"] = crop_height
        json_data["imageWidth"] = crop_width + 2*pad
        json_data["imagePath"] = img_name
        json_data["imageData"] = None
        # 读取原始jsons的 [[x1,y1],[x2,y2]]
        for LabelBox in json_data['shapes']:
            points = LabelBox['points']
            points[0][0] = points[0][0] - crop_x + pad
            points[0][1] =points[0][1] - crop_y 
            points[1][0] = points[1][0] - crop_x + pad
            points[1][1] = points[1][1] - crop_y 
        file_in.close()
    
        # 创建一个写文件
        file_out = open(out_json_path, "w", encoding='utf-8')
        # 将修改后的数据写入文件
        file_out.write(json.dumps(json_data))
        file_out.close()
    
    # 图像显示函数
    def show(name, img):
        cv2.namedWindow(name, 0)  # 用来创建指定名称的窗口,0表示CV_WINDOW_NORMAL
        # cv2.resizeWindow(name, img.shape[1], img.shape[0]); # 设置宽高大小为640*480
        cv2.imshow(name, img)
        cv2.waitKey(0)
        cv2.destroyAllWindows()
    
    def crop_largest_img(image):
        '''
        参数:
            image 是彩色图像数组。
        '''
        # 转换为灰度图像
        gray = cv2.cvtColor(image, cv2.COLOR_BGR2GRAY)
    
        # 二值化
        _, binary = cv2.threshold(gray, 50, 255, cv2.THRESH_BINARY)
        # show('binary',binary)
    
        # 查找轮廓
        contours, hierarchy = cv2.findContours(binary,cv2.RETR_LIST,cv2.CHAIN_APPROX_SIMPLE)
        '''
        retval = cv2.boundingRect( cnt )
    
        参数:
            cnt 是灰度图像或轮廓。
        返回值:
            retval 表示返回的矩形边界的左上角顶点的坐标值及矩形边界的宽度和高度,即x,y,w,h
        '''
        for cnt in contours:
            x,y,w,h = cv2.boundingRect(cnt) # 获取轮廓顶点及边长
            if w*h<600*600: # 过滤掉小于600*600的矩形框
                continue
            # print(x,y,w,h) # 570 126 1039 728 左上角x 左上角y 框宽 框高
            # cv2.rectangle(image,(x,y),(x+w,y+h),(255,0,0),10) # xmin,ymin,xmax,ymax
        # show('image',image)
        return x,y,w,h
    
    
    if __name__=="__main__":
        # 输出图片所在文件夹
        out_imgs_dir  = 'out_images/'
        # 输出jsons所在文件夹
        out_jsons_dir = 'out_jsons/'
        if not os.path.exists(out_imgs_dir):
            os.mkdir(out_imgs_dir)
        if not os.path.exists(out_jsons_dir):
            os.mkdir(out_jsons_dir)
    
        # 输入图片所在文件夹
        in_imgs_dir  = 'images/'
        # 输入jsons所在文件夹
        in_jsons_dir = 'jsons/'
        # 输入图片名列表
        file_name_list = os.listdir(in_imgs_dir)
        img_name_list = [i for i in file_name_list if i.endswith('.png')]
        # 输入jsons文件名列表
        file_name_list = os.listdir(in_jsons_dir)
        json_name_list = [i for i in file_name_list if i.endswith('.json')]
        # print(img_name_list,json_name_list)
    
        # 定义剪裁图片的左右填充数
        pad = 0
    
        for img_name,json_name in zip(img_name_list,json_name_list):
            in_img_path = os.path.join(in_imgs_dir,img_name)
            out_img_path = os.path.join(out_imgs_dir,img_name)
            in_json_path = os.path.join(in_jsons_dir,json_name)
            out_jsons_path = os.path.join(out_jsons_dir,json_name)
            # print(in_img_path,in_json_path)
            # 读取图片
            image = cv2.imread(in_img_path)
            # 获得最大剪裁矩形坐标(x,y,w,h)
            x,y,w,h = crop_largest_img(image)
            # print(x,y,w,h)
            # 读取并修改json文件
            alter_json(img_name,in_json_path,out_jsons_path,x,y,h,w,pad=pad)
            # 保存剪裁图片
            crop_img = image[y:y+h,x-pad:x+w+pad] # h,w
    
            cv2.imwrite(out_img_path,crop_img)
    
    • 1
    • 2
    • 3
    • 4
    • 5
    • 6
    • 7
    • 8
    • 9
    • 10
    • 11
    • 12
    • 13
    • 14
    • 15
    • 16
    • 17
    • 18
    • 19
    • 20
    • 21
    • 22
    • 23
    • 24
    • 25
    • 26
    • 27
    • 28
    • 29
    • 30
    • 31
    • 32
    • 33
    • 34
    • 35
    • 36
    • 37
    • 38
    • 39
    • 40
    • 41
    • 42
    • 43
    • 44
    • 45
    • 46
    • 47
    • 48
    • 49
    • 50
    • 51
    • 52
    • 53
    • 54
    • 55
    • 56
    • 57
    • 58
    • 59
    • 60
    • 61
    • 62
    • 63
    • 64
    • 65
    • 66
    • 67
    • 68
    • 69
    • 70
    • 71
    • 72
    • 73
    • 74
    • 75
    • 76
    • 77
    • 78
    • 79
    • 80
    • 81
    • 82
    • 83
    • 84
    • 85
    • 86
    • 87
    • 88
    • 89
    • 90
    • 91
    • 92
    • 93
    • 94
    • 95
    • 96
    • 97
    • 98
    • 99
    • 100
    • 101
    • 102
    • 103
    • 104
    • 105
    • 106
    • 107
    • 108
    • 109
    • 110
    • 111
    • 112
    • 113
    • 114
    • 115
    • 116
    • 117
    • 118
    • 119
    • 120
    • 121
    • 122
    • 123
    • 124
    • 125
    • 126
    • 127
    • 128
    • 129
    • 130
    • 131
    • 132
    • 133
    • 134
    • 135
    • 136
    • 137
    • 138
    • 139

    在这里插入图片描述
    在这里插入图片描述
    在这里插入图片描述
    在这里插入图片描述

    • 由于本人水平有限,难免出现错漏,敬请批评改正。
    • 更多精彩内容,可点击进入Python日常小操作专栏、OpenCV-Python小应用专栏、YOLO系列专栏、自然语言处理专栏或我的个人主页查看
    • 基于DETR的人脸伪装检测
    • YOLOv7训练自己的数据集(口罩检测)
    • YOLOv8训练自己的数据集(足球检测)
    • YOLOv5:TensorRT加速YOLOv5模型推理
    • YOLOv5:IoU、GIoU、DIoU、CIoU、EIoU
    • 玩转Jetson Nano(五):TensorRT加速YOLOv5目标检测
    • YOLOv5:添加SE、CBAM、CoordAtt、ECA注意力机制
    • YOLOv5:yolov5s.yaml配置文件解读、增加小目标检测层
    • Python将COCO格式实例分割数据集转换为YOLO格式实例分割数据集
    • YOLOv5:使用7.0版本训练自己的实例分割模型(车辆、行人、路标、车道线等实例分割)
    • 使用Kaggle GPU资源免费体验Stable Diffusion开源项目
  • 相关阅读:
    Java.lang.Character类中isSpaceChar()方法具有什么功能呢?
    简单介绍Map中的getOrDefault
    如何实现一个状态机?
    C#__简单使用TCP/UDP发送消息
    Disney验厂要求、验厂流程及审核注意事项
    PACP学习笔记一:使用 PCAP 编程
    Python 列表推导式:简洁、高效的数据操作艺术
    Pycharm初次创建项目时页面环境变量选择
    分布式任务调度平台XXL-JOB安装及使用
    做实景三维项目后的一些感想
  • 原文地址:https://blog.csdn.net/FriendshipTang/article/details/134043302
  • 最新文章
  • 攻防演习之三天拿下官网站群
    数据安全治理学习——前期安全规划和安全管理体系建设
    企业安全 | 企业内一次钓鱼演练准备过程
    内网渗透测试 | Kerberos协议及其部分攻击手法
    0day的产生 | 不懂代码的"代码审计"
    安装scrcpy-client模块av模块异常,环境问题解决方案
    leetcode hot100【LeetCode 279. 完全平方数】java实现
    OpenWrt下安装Mosquitto
    AnatoMask论文汇总
    【AI日记】24.11.01 LangChain、openai api和github copilot
  • 热门文章
  • 十款代码表白小特效 一个比一个浪漫 赶紧收藏起来吧!!!
    奉劝各位学弟学妹们,该打造你的技术影响力了!
    五年了,我在 CSDN 的两个一百万。
    Java俄罗斯方块,老程序员花了一个周末,连接中学年代!
    面试官都震惊,你这网络基础可以啊!
    你真的会用百度吗?我不信 — 那些不为人知的搜索引擎语法
    心情不好的时候,用 Python 画棵樱花树送给自己吧
    通宵一晚做出来的一款类似CS的第一人称射击游戏Demo!原来做游戏也不是很难,连憨憨学妹都学会了!
    13 万字 C 语言从入门到精通保姆级教程2021 年版
    10行代码集2000张美女图,Python爬虫120例,再上征途
Copyright © 2022 侵权请联系2656653265@qq.com    京ICP备2022015340号-1
正则表达式工具 cron表达式工具 密码生成工具

京公网安备 11010502049817号