-
JavaScript设计模式
✨JavaScript设计模式
🎀设计模式
在 面向对象软件设计中针对特定问题的简洁而优雅的解决方案
🎐常见的设计模式
🎄1. 工厂模式
在JavaScript中,工厂模式的表现形式就是一个调用即可返回新对象的函数
// ------------- 工厂模式 ------------- // 工厂模式 function FoodFactory(name, color) { return { name, color } } const f1 = FoodFactory('西兰花', '黄绿色') // ------------- 构造函数 ------------- // 构造函数 function Food(name, color) { this.name = name this.color = color } const f3 = new Food('西兰花', '黄绿色')- 1
- 2
- 3
- 4
- 5
- 6
- 7
- 8
- 9
- 10
- 11
- 12
- 13
- 14
- 15
- 16
- 17
- 18
🎏工厂模式的实际运用
🎡Vue3的createApp
避免在测试期间,全局配置污染其他测试用例
将全局改变Vue实例的行为,移动到Vue实例上

🎶axios-create
可以使用自定义配置新建一个新的实例,如果我们在项目中使用多个不同的请求对象,我们就可以调用对应次数的create即可,这样我们就能给每个请求示例设置独一无二的配置
const instance=axios.create({ baseURL:'www.baidu.com', timeout:1000, headers:{...} }- 1
- 2
- 3
- 4
- 5
🍧2. 单例模式
在使用这个模式时,单例对象对整个系统而言需要保证只有一个存在
🎉单例方法
🍿1.自己实现
需求:调用 方法 获取单例对象,如果重复调用回去的是相同对象
要实现的就是下面这个效果 getInstance是SingleTon类的静态方法,不管调用多少次 返回的对象都是同一个
const s1=SingleTon.getInstance() const s2=SingleTon.getInstance() console.log(s1===s2)//true- 1
- 2
- 3
手写一个单例方法
// 1. 定义类 class SingleTon { // 2. 添加私有属性(staic) static #instance //通过静态私有属性保存一个单例对象 // 3. 添加静态方法 static getInstance() { // 4. 判断并返回对象 if (this.#instance === undefined) { this.#instance = new SingleTon() }// 如果这个属性为undefined就给他new一个实例对象 如果不是undefined直接返回这个实例对象 return this.#instance } } //测试 const s1=SingleTon.getInstance() const s2=SingleTon.getInstance() console.log(s1===s2)//true- 1
- 2
- 3
- 4
- 5
- 6
- 7
- 8
- 9
- 10
- 11
- 12
- 13
- 14
- 15
- 16
- 17
- 18

🎊2.vant中的toast和notify组件
vant中Toast是弹出一个轻提醒,它默认采用单例模式,即同一时间只会存在一个Toast,如果需要在同一时间弹出多个Toast,可以使用allowMultipleToast()
toast的源码(其中allowMultiple默认值是fasle)实现方式和上述手写方法基本一致
第一次调用的时候 queue里面没值会执行if里面的逻辑 新创建一个实例,并push到queue里面,再次调用queue的length不等于0了,就不执行if逻辑,直接返回queue的最后一个值了
 vant中的Notify是消息通知,它默认是单例模式,而且不允许调整


如果instance没值就调用initInstance() 创建组件,如果有值了就跳过了。可见也是采用的单例模式的思想✨单例思想
❤️1.vue2中的use方法
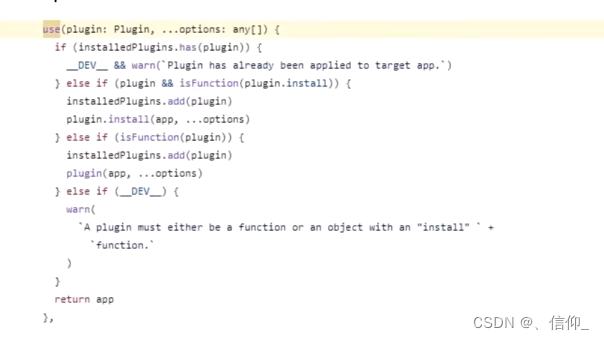
下图是vue2 use方法的源码

首先在Vue上添加了use方法,use方法可以传入一个插件,installedPlugins是一个数组,通过indexOf方法判断传入的插件是不是注册过了,如果大于-1的话,说明里面已经有个这个同名的插件,直接return掉,使用单例的思想使得使用use使用插件是同名的插件只能注册一次🎀2.vue3中的use方法
installedPlugins是一个Set,用来保存我们注册过的所有的插件,使用has()进行判断,如果已经存在了想要注册的插件直接报异常🎐3. 观察者模式
在对象之间定义一个 一对多的依赖,当一个对象状态改变的时候,所有依赖的对象都会自动收到通知


🍿4. 发布订阅模式
发布订阅模式和观察者模式类似,区别是:一个有中间商(发布订阅模式)一个没有中间商(观察者模式)
当发布者的状态发生改变,所以的订阅者都会触发对应的事件,但是发布者和订阅者两者是互不认识的,需要通过事件总线这个中间商进行交流

🎏发布订阅模式应用场景
🎄Vue中的EventBus
-
Vue2:直接使用实例方法( $on(注册事件),$emit(触发事件),$off(移除事件),$once(注册一次性事件:注册的事件触发一次自动移除))
-
vue3 中彻底移除了( $on ,$off ,$once ),如果想要使用事件总线可以被替换为使用外部的,实现了事假触发器接口的库,例如mitt或tiny-emitter
示例:
import emitter from 'tiny-emitter/instance' export default { $on: (...args) => emitter.on(...args), $once: (...args) => emitter.once(...args), $off: (...args) => emitter.off(...args), $emit: (...args) => emitter.emit(...args), }- 1
- 2
- 3
- 4
- 5
- 6
- 7
- 8
🎡发布订阅模式-手写事件总线
<!DOCTYPE html> <html lang="zh-CN"> <head> <meta charset="UTF-8"> <meta name="viewport" content="width=device-width, initial-scale=1.0"> <title>设计模式</title> </head> <body> <h2>发布订阅模式</h2> <button class="on">注册事件</button> <button class="emit">触发事件</button> <button class="off">移除事件</button> <button class="once-on">一次性事件注册</button> <button class="once-emit">一次性事件触发</button> <script> class HMEmmiter { // 1.1 添加私有属性 #handlers = { // 事件名:[callback1,callback2] } /** * 添加事件监听: * 1.1 添加私有属性 * 1.2 保存事件 */ $on(event, callback) { // 1.2 保存事件 如果这个事件还没注册过 先给这个事件的值初始化为空数组 if (this.#handlers[event] === undefined) { this.#handlers[event] = [] } this.#handlers[event].push(callback) } /** * 触发事件: * 2.1 接收不定长参数 * 2.2 循环触发事件 * */ // 2.1 接收不定长参数 $emit(event, ...args) { // 2.2 循环触发事件 const funcs = this.#handlers[event] || [] //如果这个事件还没有注册 返回一个空数组防止下面forEach报错 || 短路运算符 前面为false时执行后面逻辑 funcs.forEach(callback => { callback(...args) }) } /** * 移除事件: * 3.1 清空事件 * */ $off(event) { // 3.1 清空事件 this.#handlers[event] = undefined } /** * 一次性事件 * 4.1 调用$on注册事件 * 4.2 事件内调用$off * */ $once(event, callback) { // 4.1 调用$on注册事件 this.$on(event, (...args) => { callback(...args) // 4.2 事件内调用$off this.$off(event) }) } } const bus = new HMEmmiter() // // 注册事件 同一个事件名可以传入多个回调函数,触发时多个回调函数都会执行 // bus.$on('事件名1',回调函数) // bus.$on('事件名1',回调函数) // // 触发事件 // bus.$emit('事件名',参数1,...,参数n) //传入的参数个数是不确定的,具体需要几个,需要看回调函数需要接受几个 // // 移除事件 // bus.$off('事件名') // 移除指定事件名的事件 // //一次性事件 // bus.$once('事件名',回调函数) //注册的事件只要触发一次就会被移除 // 注册事件 document.querySelector('.on').addEventListener('click', () => { bus.$on('event1', () => { console.log('回调函数1') }) bus.$on('event2', (name, info) => { console.log(name, info) }) bus.$on('event2', (name, info) => { console.log('event2的第二个回调函数', name, info) }) }) // 触发事件 document.querySelector('.emit').addEventListener('click', () => { bus.$emit('event1') bus.$emit('event2', 'zhangsan', '666') }) // 移除事件 document.querySelector('.off').addEventListener('click', () => { bus.$off('event2') }) // 一次性事件注册 document.querySelector('.once-on').addEventListener('click', () => { bus.$once('once-event', (name, info) => { console.log(name, info) }) }) // 一次性事件触发 document.querySelector('.once-emit').addEventListener('click', () => { bus.$emit('once-event', 'zhangsan', '666') }) </script> </body> </html>- 1
- 2
- 3
- 4
- 5
- 6
- 7
- 8
- 9
- 10
- 11
- 12
- 13
- 14
- 15
- 16
- 17
- 18
- 19
- 20
- 21
- 22
- 23
- 24
- 25
- 26
- 27
- 28
- 29
- 30
- 31
- 32
- 33
- 34
- 35
- 36
- 37
- 38
- 39
- 40
- 41
- 42
- 43
- 44
- 45
- 46
- 47
- 48
- 49
- 50
- 51
- 52
- 53
- 54
- 55
- 56
- 57
- 58
- 59
- 60
- 61
- 62
- 63
- 64
- 65
- 66
- 67
- 68
- 69
- 70
- 71
- 72
- 73
- 74
- 75
- 76
- 77
- 78
- 79
- 80
- 81
- 82
- 83
- 84
- 85
- 86
- 87
- 88
- 89
- 90
- 91
- 92
- 93
- 94
- 95
- 96
- 97
- 98
- 99
- 100
- 101
- 102
- 103
- 104
- 105
- 106
- 107
- 108
- 109
- 110
- 111
- 112
- 113
- 114
- 115
- 116
- 117

🎉5. 原型模式
原型模式时创建型模式的一种,其特点在于通过 复制 一个已经存在的实例来返回新的实例,而不是新建实例
🍧原型模式的是应用
🍿1.Object.create:将对象作为原型,创建新对象
通过create创建一个nFood实例,nFood可以访问到food的属性和方法,但是nFood是一个新对象和food并不相等
const food = { name: '西兰花炒蛋', eat() { console.log('好好吃') }, } // ------------- Object.create ------------- const nFood = Object.create(food)- 1
- 2
- 3
- 4
- 5
- 6
- 7
- 8
- 9
- 10

🎶2.Vue2中的数组方法
🎊1. Vue2源码

✨Vue2 数组的源码
通过create基于Array.prototype创建一个新的能使用数组原型方法和属性的对象arrayMethods ,遍历数组方法中更改原数组的七个方法,给他们增加更改触发视图更新的逻辑,这样既能保证数组原来的逻辑能正常执行,又能使用数组的方法import { TriggerOpTypes } from '../../v3' import { def } from '../util/index' const arrayProto = Array.prototype export const arrayMethods = Object.create(arrayProto) const methodsToPatch = [ 'push', 'pop', 'shift', 'unshift', 'splice', 'sort', 'reverse' ] /** * Intercept mutating methods and emit events */ methodsToPatch.forEach(function (method) { // cache original method const original = arrayProto[method] def(arrayMethods, method, function mutator(...args) { const result = original.apply(this, args) const ob = this.__ob__ let inserted switch (method) { case 'push': case 'unshift': inserted = args break case 'splice': inserted = args.slice(2) break } if (inserted) ob.observeArray(inserted) // notify change if (__DEV__) { ob.dep.notify({ type: TriggerOpTypes.ARRAY_MUTATION, target: this, key: method }) } else { ob.dep.notify() } return result }) })- 1
- 2
- 3
- 4
- 5
- 6
- 7
- 8
- 9
- 10
- 11
- 12
- 13
- 14
- 15
- 16
- 17
- 18
- 19
- 20
- 21
- 22
- 23
- 24
- 25
- 26
- 27
- 28
- 29
- 30
- 31
- 32
- 33
- 34
- 35
- 36
- 37
- 38
- 39
- 40
- 41
- 42
- 43
- 44
- 45
- 46
- 47
- 48
- 49
- 50
🎉6. 代理模式
代理模式是为一个对象提供一个代用品或占位符,以便控制对它的访问
🎀代理模式的应用-缓存代理
需求:第一次查询的数据通过接口获取,重复查询通过缓存获取

用户调用接口,首先访问缓存代理,查看缓存中是否已经有了要查询的数据,如果没有数据则调用接口获取,获取完成之后在缓存内存一份,如果有数据,直接读取缓存中的数据即可由于省份和地市的关系是长期不变的获取过一次直接读取缓存的数据有利于优化性能
<!DOCTYPE html> <html lang="zh-CN"> <head> <meta charset="UTF-8"> <meta name="viewport" content="width=device-width, initial-scale=1.0"> <title>设计模式</title> </head> <body> <h2>代理模式</h2> <input type="text" class="query" placeholder="请输入查询的省份"> <script src="https://cdn.bootcdn.net/ajax/libs/axios/1.3.6/axios.min.js"></script> <script> /** * 缓存代理 * 1. 创建对象缓存数据 * 2. 判断是否缓存数据 * 2.1 没有:查询,缓存,并返回 * 2.2 有:直接返回 * */ // 1. 创建对象缓存数据 const cache = {} async function searchCity(pname) { // 2. 判断是否缓存数据 if (!cache[pname]) { // 2.1 没有:查询,缓存,并返回 const res = await axios({ url: 'http://hmajax.itheima.net/api/city', params: { pname } }) cache[pname] = res.data.list } // 2.2 有:直接返回 return cache[pname] } document.querySelector('.query').addEventListener('keyup', async function (e) { if (e.keyCode === 13) { const city = await searchCity(this.value) console.log(city) } }) </script> </body> </html>- 1
- 2
- 3
- 4
- 5
- 6
- 7
- 8
- 9
- 10
- 11
- 12
- 13
- 14
- 15
- 16
- 17
- 18
- 19
- 20
- 21
- 22
- 23
- 24
- 25
- 26
- 27
- 28
- 29
- 30
- 31
- 32
- 33
- 34
- 35
- 36
- 37
- 38
- 39
- 40
- 41
- 42
- 43
- 44
- 45
- 46
- 47
- 48
- 49
- 50
- 51
🍿7. 迭代器模式
可以让用户透过特定的接口巡访容器中的每一个元素而不用了解底层的实现(遍历)
❤️for in / for of
for … in 语句以任意顺序迭代一个对象的除Symbol意外的可枚举属性,包括继承的可枚举属性
Object.prototype.objFunc = function () { } Array.prototype.arrFunc = function () { } const foods = ['西兰花', '花菜', '西葫芦'] /** * for in语句可以遍历一个对象的除[Symbol]以外的[可枚举]属性,包括继承的可枚举属性。 * 1. 遍历的是索引 * 2. 继承而来的也可以遍历出来(原型链上动态增加的也可以遍历) * */ for (const key in foods) { console.log('key:', key) }- 1
- 2
- 3
- 4
- 5
- 6
- 7
- 8
- 9
- 10
- 11
- 12
- 13
for … in 可以遍历对象
const obj = { name: '西兰花炒蛋' } for (const key in obj) { console.log('key:', key) }- 1
- 2
- 3
- 4
- 5
- 6
- 7

for …of语句在可迭代对象(包括Array,Map,Set,String,TyoeArray,argument对象等等)上创建一个迭代循环,调用自定义迭代钩子,并为每个不同属性的值执行语句
Object.prototype.objFunc = function () { } Array.prototype.arrFunc = function () { } const foods = ['西兰花', '花菜', '西葫芦'] /** * for of语句可以遍历 可迭代对象 * 包括 Array,Map,Set,String,TypedArray,arguments 对象等等 * 1. 遍历的是值 * 2. 继承而来的无法遍历 * */ for (const iterator of foods) { console.log('iterator:', iterator) }- 1
- 2
- 3
- 4
- 5
- 6
- 7
- 8
- 9
- 10
- 11
- 12
- 13

for…of不能遍历对象
const obj = { name: '西兰花炒蛋' } for (const iterator of obj) { }- 1
- 2
- 3
- 4
- 5
- 6
- 7

🎐迭代协议
迭代协议并不是新的内置实现或语法,而是协议。这些协议可以被任何遵循某些约定的对象来实现。迭代协议具体分为两个协议:可迭代协议 和 迭代器协议
// ------------- 迭代协议 ------------- /** * 迭代协议可以定制对象的迭代行为 分为2个协议: * 1. 可迭代协议: 增加方法[Symbol.iterator](){} 返回符合 迭代器协议 的对象 * 2. 迭代器协议: * 有next方法的对象,next方法返回: * 已结束: {done:true} * 继续迭代: {done:false,value:'x'} * 使用Generator * 自己实现 对象,next * */ const obj = { // Symbol.iterator 内置的常量 // [属性名表达式] [Symbol.iterator]() { // ------------- 自己实现 ------------- const arr = ['北京', '上海', '广州', '深圳'] let index = 0 return { next() { if (index < arr.length) { // 可以继续迭代 return { done: false, value: arr[index++] } } // 迭代完毕 return { done: true } } } // ------------- 使用Generator ------------- // function* foodGenerator() { // yield '西兰花' // yield '花菜' // yield '西兰花炒蛋' // } // const food = foodGenerator() // return food } } for (const iterator of obj) { console.log('iterator:', iterator) }- 1
- 2
- 3
- 4
- 5
- 6
- 7
- 8
- 9
- 10
- 11
- 12
- 13
- 14
- 15
- 16
- 17
- 18
- 19
- 20
- 21
- 22
- 23
- 24
- 25
- 26
- 27
- 28
- 29
- 30
- 31
- 32
- 33
- 34
- 35
- 36
- 37
- 38
- 39
- 40
- 41
- 42
- 43
- 44
- 45
- 46
- 47
-
相关阅读:
Java并发编程学习八:ThreadLocal
nginx和feign负载均衡并不冲突
染色法判断二分图
10个全球最佳免费土地覆被/土地利用数据资源
Jenkins-Pipline实现原理
react(子传父、父传子)
化妆品展示网页设计作业 静态HTML化妆品网站 DW美妆网站模板下载 大学生简单网页作品代码 个人网页制作 学生个人网页设计作业
除了增删改查你对MySQL还了解多少?
推荐计划里何时使用经常性与一次性推荐奖励?
网络规划设计师上午真题及解析(2019)
- 原文地址:https://blog.csdn.net/sinat_51673411/article/details/133443173
