-
latex技巧
前言
若想学习Markdown,请参见我的另一篇博客:Markdown详细教程+技巧总结 。
若想直接学习LaTeX数学公式,请参见我的另一篇博客:LaTeX数学公式-详细教程 。本篇文章介绍LaTeX的基本用法,并有自己的经验和总结。另外,可以从LaTeX的官方文档进行学习,官方文档大部分是英文文档,链接:LaTeX在线文档 ,LaTex宏包文档。
本篇文章内容包含LaTeX工具,LaTeX模板,LaTeX技巧,LaTeX基础,文章架构,字体、大小和颜色,链接,列表,图片,表格,数学公式,算法(伪代码),代码块,论文写作,等等。
LaTeX工具
介绍
LaTeX工具分为在线工具和本地工具,本地工具又分为前台和后台。在线工具推荐Overleaf,本地工具推荐前台使用TeXStudio,后台推荐使用TeXLive(后台工具有TeXLive,MikTeX,CTeX等)。
各个后台的比较:TeXLive有跨平台的性质,适用于Linux、Mac以及Windows系统;TeXLive是完全安装,大小大概为5G左右;每年有一次更新。TeXStudio只适用于Windows系统;它只安装基本的东西,其他任何需要的东西可以动态安装;只有发生重大变化时才会更新。CTeX只适用于Windows系统;默认编码不是UTF-8;已经不再维护,不再更新了,容易出Bug。
可以根据需求选择合适的本地后台,若觉得安装配置比较麻烦,则可以使用Overleaf在线工具,有网络即可使用,更重要的是国内也可以使用,并支持中文界面。详细使用方法在下文介绍。
Overleaf(推荐)
网址:Overleaf 。
注册账户并登录后即可使用。使用流程
点击
New Project后还可以使用Templates模板,如下图:

新建项目后,左边为源代码视图,右边为预览视图。可以点击左上角的Menu下载源文件,PDF文件,或设置编译器,如下图:

展开Recompile按钮可以设置自动编译,并忽略语法检查,如下图:

切换界面语言
方法1
点击Overleaf界面左下角的国旗标志可以切换界面语言,切换成中文的操作如下图:

方法2
直接更改网址如下:
https://cn.overleaf.com/project
即可切换界面语言为中文。更改编译器
在项目
菜单的设置中可以更改,如下图:

文档定位
在项目中线顶部有2个箭头样式的按钮,可以使tex文档和PDF文档相互定位,如下图:

补充:
左键双击PDF文档的特定位置,tex文档会跳转到对应位置。快捷键
Overleaf内置了很多快捷键,本人分类为常用快捷键和全部快捷键如下:
常用快捷键
Ctrl+B:粗体
Ctrl+I:斜体
Ctrl+/:注释
Ctrl+Z:撤销
Ctrl+Y:重做
Ctrl+F:查找和替换
Ctrl+Home:到文档顶部
Ctrl+End:到文档底部
Ctrl+S:重新编译
Ctrl+Enter:重新编译全部快捷键
可以在Overleaf项目中点击菜单中的快捷键选项查看,如下图:2021年5月

TeXLive和TeXStudio
安装及配置详情可参见其他人的博客:LaTeX新手入门以及TeXlive和TeXstudio的安装使用 。
本人一般使用在线工具Overleaf,因此个人教程暂略,后期若安装本地环境再进行完善。
LaTeX模板
LaTeX有很多模板,可以直接使用,方便用户排版。
Overleaf中一些常用模板,包含Project,Resume,Homework,Letter,Memo,Poster,Book,Journal,Thesis。
用户可以直接在Overleaf中使用,也可以下载到本地进行使用。
LaTeX技巧
LaTeX
LaTeX编辑器中,内置了一个语句,用来展现LaTeX的Logo,代码和效果如下:
代码:
\LaTex- 1
- 1
显示:

中文支持
无论是在线工具还是本地工具,LaTeX默认都是不支持中文的,因此需要在源代码和配置上稍作修改才可以让LaTeX支持中文,步骤如下:
- 编译器配置:
XeLaTeX,可在Overleaf的菜单 - 编译器处修改。 tex文件编码:utf-8,一般默认为utf-8编码,无需修改。- 代码开头添加:
方式1(推荐):添加宏包\usepackage[UTF8]{ctex}- 1
- 1
\documentclass[UTF8]{ctexart}- 1
- 1
首行缩进
进行缩进
若LaTeX默认没有段首缩进,因此要首行缩进需要进行修改。在导言区加入如下代码(距离单位一般为
pt或em,pt是绝对单位;em是相对单位,表示1个中文字符宽度;本人比较喜欢em):% 使用indentfirst宏包 \usepackage{indentfirst} % 设置首行缩进距离 \setlength{\parindent}{2em}- 1
- 2
- 3
- 4
- 1
- 2
- 3
- 4
不进行缩进
若LaTeX已经是段首缩进的,因此要段首不进行缩进需要进行修改。
方式1(推荐): 单段取消缩进,放在段首即可。
\noindent- 1
- 1
方式2: 全局取消缩进,在想缩进的段落再进行缩进。
放在导言区:\setlength{\parindent}{0pt}- 1
- 1
放在想要缩进的段落:
\hspace*{2em}段落\\- 1
- 1
显示下划线
方法1
使用转义字符:\_方法2
使用LaTeX命令:\textunderscore方法3
导入宏包:\usepackage{underscore}例子1(方法1和2):
a\_b- 1
a\textunderscore b
- 1
- 2
- 3
显示:

例子2(方法3):
\usepackage{underscore}- 1
a_b
- 1
- 2
- 3
显示:

LaTeX基础
导言区与正文区
在
begin{document}和end{document}之间的就是正文区,而在这之前的就是导言区。文档类型
\documentclass{article}是确定了文档类型为article,一般LaTeX提供三种基本文档,此外两种是report和book。三者分别用来写小篇幅的文章、中篇幅的报告和长篇幅的书籍。宏包
LaTeX导言区可以导入各种宏包,以使用相应宏包的功能,一条语句中可以导入多个宏包,语法如下:
\usepackage{宏包1, 宏包2}- 1
- 1
常用的宏包:
ctex:中文支持
amsmath:latex数学公式支持
graphicx:插入图片
algorithm和algorithmic:算法排版
listings:插入代码块
等等编译器
LaTeX的编译器有
pdfLaTeX,LaTeX,XeLaTeX,LuaLaTeX,在设置中可以进行更改。Overleaf默认的编译器为pdfLaTeX,因此要使其支持中文需要改为XeLaTeX。注释
Overleaf等工具中可以使用快捷键
Ctrl+/来批量注释或批量取消注释。单行注释
% 注释内容- 1
- 1
多行注释
方式1(推荐):
\iffalse 注释内容 \fi- 1
- 2
- 3
- 1
- 2
- 3
方式2:
使用\usepackage{verbatim}宏包\begin{comment} 注释内容 \end{comment}- 1
- 2
- 3
- 1
- 2
- 3
英文引号
在LaTeX中输入英文引号时,导出的PDF显示的是顺撇的,如下:
代码:
'English'- 1
‘‘English’’
- 1
- 2
- 3
显示:

要想正确输入英文引号,把左侧的引号用 ` 代替即可,如下:代码:
`English'- 1
``English’’
- 1
- 2
- 3
显示:

空格
LaTeX支持
空格方式 源代码 显示 宽度 quad空格 a \quad b a b a \quad b ab1个中文字符的宽度 qquad空格 a \qquad b a b a \qquad b ab 2个中文字符的宽度 大空格 a\ b a b a\ b a b 1/3字符宽度 没有空格 ab a b ab ab - 1
- 2
- 3
- 4
- 5
- 6
- 7
- 8
- 9
- 10
- 11
- 12
- 13
- 14
- 15
- 16
- 17
- 18
- 19
- 20
- 21
- 22
- 23
- 24
- 25
- 26
- 27
- 28
- 29
- 30
- 31
- 32
- 33
- 34
- 35
- 36
- 37
- 38
- 39
- 40
- 41
- 42
- 43
- 44
- 45
- 46
- 47
- 48
- 49
- 50
- 51
- 52
- 53
- 54
- 55
- 56
- 57
- 58
- 59
- 60
- 61
LaTeX数学公式支持
除上述空格以外,还支持如下空格:
空格方式 源代码 显示 宽度 中等空格 $a\;b$a b a\;b ab2/7字符宽度 小空格 $a\,b$a b a\,b ab 1/6字符宽度 紧贴 $a\!b$a b a\!b ab 缩进1/6字符宽度 - 1
- 2
- 3
- 4
- 5
- 6
- 7
- 8
- 9
- 10
- 11
- 12
- 13
- 14
- 15
- 16
- 17
- 18
- 19
- 20
- 21
- 22
- 23
- 24
- 25
- 26
- 27
- 28
- 29
- 30
- 31
- 32
- 33
- 34
- 35
- 36
- 37
- 38
- 39
- 40
- 41
换行
\\:换行,一般在一行的最后写。
\\[offset]:换行,并且与下一行的行间距为原来行间距+offset,offset单位一般是em或pt。注意:
若要在表格单元格内换行,无法使用\\进行换行,需要在导言区导入\usepackage{makecell}宏包进行换行,详情见表格章节。换段
源代码空一行即可进行换段(推荐)。
也可以使用代码\par进行换段,一般在一段的最后写。新页
使用
\newpage进行换页,一般在一页的最后写。转义字符
写法:
\+字符用途:当某些特殊字符与LaTeX语法冲突时,使用转义字符可以使字符强制显示。
示例:
\%,可以显示出百分号,而不是注释的含义;\_,显示下划线,而不是下标;\^显示符号本身,而不是上标。例子:
\%home\_name\%=honor- 1
- 1
显示:

补充:若想不使用转义字符显示下划线,有2种方法,详情请见 LaTeX技巧-显示下划线 章节。可选参数[htbp]
LaTeX插入图片、表格等元素时,第一行后面有一个可选参数
[htbp],例如,\begin{figure}[htbp]。[htbp]是个可选参数项,允许用户指定图片、表格等元素被放置的位置。这一可选参数项可以是下列字母的任意组合。h(here): 当前位置;将图形放置在 正文文本中给出该图形环境的地方。如果本页所剩的页面不够, 这一参数将不起作用。
t(top): 顶部;将图形放置在页面的顶部。
b(bottom): 底部;将图形放置在页面的底部。
p(page): 浮动页;将图形放置在一只允许有浮动对象的页面上。注意:在使用这些参数时:
- 如果在图形环境中没有给出上述任一参数,则缺省为
[tbp]。 - 给出参数的顺序不会影响到最后的结果。因为在考虑这些参数时LaTeX总是尝试以
h-t-b-p的顺序来确定图形的位置。所以[hb]和[bh]都以h-b的顺序来排版。 - 给出的参数越多,LaTeX的排版结果就会越好。
[htbp], [tbp], [htp], [tp]这些组合得到的效果不错,[h]也是常用的选择。
文章架构
纸张布局
% 设置页面的环境,a4纸张大小,左右上下边距信息 \usepackage[a4paper,left=10mm,right=10mm,top=15mm,bottom=15mm]{geometry}- 1
- 2
- 1
- 2
标题级别
例子:
\section{一级标题} \subsection{二级标题} \subsubsection{二级标题}- 1
- 2
- 3
- 1
- 2
- 3
显示:

标题、作者、时间
注意:
\maketitle这一行一定要在\begin{document}的后面,否则LaTeX会判定为语法错误。例子:
\documentclass{article} % article 文档 \usepackage[UTF8]{ctex} % 使用宏包(为了能够显示汉字) % 设置页面的环境,a4纸张大小,左右上下边距信息 \usepackage[a4paper,left=10mm,right=10mm,top=15mm,bottom=15mm]{geometry}- 1
- 2
- 3
- 4
\title{NSJim的文章} % 文章标题
\author{NSJim} % 作者的名称
\date{\today} % 当天日期% 正文开始
\begin{document}\maketitle % 添加这一句才能够显示标题等信息
% 正文结束
\end{document}- 1
- 2
- 3
- 4
- 5
- 6
- 7
- 8
- 9
- 10
- 11
- 12
- 13
- 14
- 15
- 16
显示:

摘要
在
\maketitle下添加内容,如下:\maketitle %添加这一句才能够显示标题等信息 %摘要开始部分 \begin{abstract} 该部分内容是放置摘要信息的。该部分内容是放置摘要信息的。该部分内容是放置摘要信息的。该部分内容是放置摘要信息的。该部分内容是放置摘要信息的。 \end{abstract}- 1
- 2
- 3
- 4
- 5
- 1
- 2
- 3
- 4
- 5
显示:

引用、脚注
引用:写在
\begin{quote}和\end{quote}之间。
脚注:在需要添加脚注的文字后添加\footnote{脚注内容}即可。例子:
西游记\footnote{中国古典四大名著之一}小说开头写道: \begin{quote} {\kaishu 东胜神洲有一花果山,山顶一石,受日月精华,生出一石猴。之后因为成功闯入水帘洞,被花果山诸猴拜为“美猴王”。} \end{quote}- 1
- 2
- 3
- 4
- 1
- 2
- 3
- 4
显示


架构
标题设置:一级标题
\section{},耳机标题\subsection{},三级标题\subsubsection{};
段落设置:在一段的最后添加\par代表一段的结束;
目录设置:在\begin{document}内容中添加:\tableofcontents以下为一个示例:
\documentclass{article} % article 文档 \usepackage[UTF8]{ctex} % 使用宏包(为了能够显示汉字) % 设置页面的环境,a4纸张大小,左右上下边距信息 \usepackage[a4paper,left=10mm,right=10mm,top=15mm,bottom=15mm]{geometry}- 1
- 2
- 3
- 4
\title{NSJim的文章} % 文章标题
\author{NSJim} % 作者的名称
\date{\today} % 当天日期% 正文开始
\begin{document}\maketitle % 添加这一句才能够显示标题等信息
% 生成目录设置
\renewcommand{\contentsname}{目录} %将content转为目录
\tableofcontents% 摘要开始部分
\begin{abstract}
该部分内容是放置摘要信息的。该部分内容是放置摘要信息的。该部分内容是放置摘要信息的。该部分内容是放置摘要信息的。该部分内容是放置摘要信息的。
\end{abstract}% 标题开始
\section{一级标题1}
第一段一级标题下的内容,一级标题下的内容,一级标题下的内容,一级标题下的内容,一级标题下的内容,一级标题下的内容,一级标题下的内容,一级标题下的内容。\par
第二段一级标题下的内容,一级标题下的内容,一级标题下的内容,一级标题下的内容,一级标题下的内容,一级标题下的内容,一级标题下的内容,一级标题下的内容。\subsection{二级标题1.1}
二级标题下的内容。\subsubsection{三级标题下的内容1.1.1}
三级标题下的内容。\section{一级标题2}
一级标题2中的内容% 正文结束
\end{document}- 1
- 2
- 3
- 4
- 5
- 6
- 7
- 8
- 9
- 10
- 11
- 12
- 13
- 14
- 15
- 16
- 17
- 18
- 19
- 20
- 21
- 22
- 23
- 24
- 25
- 26
- 27
- 28
- 29
- 30
- 31
- 32
- 33
- 34
- 35
- 36
- 37
- 38
- 39
显示:

字体,大小,颜色
字体
使用代码:
{\字体 内容}(推荐),有时可使用\字体{内容}(不推荐,容易出问题)。例子:
{\songti 宋体} {\heiti 黑体} {\fangsong 仿宋} {\kaishu 楷书}- 1
- 2
- 3
- 4
{\bf 粗体}
{\it 斜体}
{\sl 斜体}\textbf{粗体}
\textit{斜体}
\textsl{斜体}- 1
- 2
- 3
- 4
- 5
- 6
- 7
- 8
- 9
- 10
- 11
- 12
显示:

大小
例子:
{\tiny Hello} \\ {\scriptsize Hello} \\ {\footnotesize Hello} \\ {\small Hello} \\ {\normalsize Hello} \\ {\large Hello} \\- 1
- 2
- 3
- 4
- 5
- 6
- 1
- 2
- 3
- 4
- 5
- 6
显示:

颜色需要导入宏包
\usepackage{xcolor}\documentclass{article} \usepackage[UTF8]{ctex} \usepackage{color,xcolor}- 1
- 2
- 3
\setlength{\parindent}{0pt}
% 预先定义好的颜色: red, green, blue, white, black, yellow, gray, darkgray, lightgray, brown, cyan, lime, magenta, olive, orange, pink, purple, teal, violet.
% 定义颜色的5种方式
\definecolor{light-gray}{gray}{0.95} % 1.灰度
\definecolor{orange}{rgb}{1,0.5,0} % 2.rgb
\definecolor{orange}{RGB}{255,127,0} % 3.RGB
\definecolor{orange}{HTML}{FF7F00} % 4.HTML
\definecolor{orange}{cmyk}{0,0.5,1,0} % 5.cmyk\begin{document}
% \pagecolor{yellow} %设置背景色为黄色
% 使用颜色的常用方式
\textcolor{green}{绿色} % textcolor+颜色
\color{orange}{橙色} % color+颜色
\textcolor[rgb]{0,1,0}{绿色} % textcolor+rgb
\color[rgb]{1,0,0}{红色} % color+rgb% 使用底色
\colorbox{red}{\color{black}红底黑字}
\fcolorbox{red}{green}{红框绿底} % 框色+背景色\end{document}
- 1
- 2
- 3
- 4
- 5
- 6
- 7
- 8
- 9
- 10
- 11
- 12
- 13
- 14
- 15
- 16
- 17
- 18
- 19
- 20
- 21
- 22
- 23
- 24
- 25
- 26
- 27
- 28
- 29
- 30
显示:
链接
导入宏包:
\usepackage{url}
插入超链接:\url{www.baidu.com}列表
未完,待续。
图片
可选参数[htbp]
LaTeX插入图片、表格等元素时,第一行后面有一个可选参数
[htbp],例如,\begin{figure}[htbp]。[htbp]是个可选参数项,允许用户指定图片、表格等元素被放置的位置。这一可选参数项可以是下列字母的任意组合。h(here): 当前位置;将图形放置在 正文文本中给出该图形环境的地方。如果本页所剩的页面不够, 这一参数将不起作用。
t(top): 顶部;将图形放置在页面的顶部。
b(bottom): 底部;将图形放置在页面的底部。
p(page): 浮动页;将图形放置在允许有浮动对象的页面上。注意:在使用这些参数时:
- 如果在图形环境中没有给出上述任一参数,则缺省为
[tbp]。 - 给出参数的顺序不会影响到最后的结果。因为在考虑这些参数时LaTeX总是尝试以
h-t-b-p的顺序来确定图形的位置。所以[hb]和[bh]都以h-b的顺序来排版。 - 给出的参数越多,LaTeX的排版结果就会越好。
[htbp], [tbp], [htp], [tp]这些组合得到的效果不错,[h]也是常用的选择。
单张图片
需要导入宏包:
\usepackage{graphicx}例子:
%开始插入图片 \begin{figure}[htbp] % htbp代表图片插入位置的设置 \centering %图片居中 %添加图片;[]中为可选参数,可以设置图片的宽高;{}中为图片的相对位置 \includegraphics[width=6cm]{image.jpg} \caption{达尔文游戏} % 图片标题 \label{pic1} % 图片标签 \end{figure}- 1
- 2
- 3
- 4
- 5
- 6
- 7
- 8
- 1
- 2
- 3
- 4
- 5
- 6
- 7
- 8
显示:

多张图片
并排插入两张图片
方式1:图片编号增加1
两张图片公用一个大的图题,图片的编号只增加一个。\begin{figure}[ht] \centering \subfigure[11-1]{ %小图题的名称 \includegraphics[width=4cm]{11-1}} \hspace{10pt} %2张图片的水平距离 \subfigure[11-2]{ \includegraphics[width=4cm]{11-2}} \caption{两张图片公用的图题} \end{figure}- 1
- 2
- 3
- 4
- 5
- 6
- 7
- 8
- 9
- 1
- 2
- 3
- 4
- 5
- 6
- 7
- 8
- 9
方式2:图片编号增加2
每张图片有自己的图题,这种方法会使LaTeX中图片的编号顺序向后增加。\begin{figure}[h] \begin{minipage}[t]{0.45\linewidth} \centering \includegraphics[width=5.5cm,height=3.5cm]{10} \caption{第一张图片的图题.} \end{minipage} \begin{minipage}[t]{0.45\linewidth} %图片占用一行宽度的45% \hspace{10pt} \includegraphics[width=5.5cm,height=3.5cm]{11} \caption{第二章图片的图题.} \end{minipage} \end{figure}- 1
- 2
- 3
- 4
- 5
- 6
- 7
- 8
- 9
- 10
- 11
- 12
- 1
- 2
- 3
- 4
- 5
- 6
- 7
- 8
- 9
- 10
- 11
- 12
并排插入多张图片
\begin{figure} \centering { \includegraphics[width=2.5cm]{10-1}} \hspace{10pt} %每张图片水平距离 { \includegraphics[width=2.5cm]{10-2}} \hspace{10pt} { \includegraphics[width=2.5cm]{10-3}} \hspace{10pt} { \includegraphics[width=2.5cm]{10-4}} \hspace{10pt} \caption{并排插入4张图片} \end{figure}- 1
- 2
- 3
- 4
- 5
- 6
- 7
- 8
- 9
- 10
- 11
- 12
- 13
- 14
- 15
- 16
- 1
- 2
- 3
- 4
- 5
- 6
- 7
- 8
- 9
- 10
- 11
- 12
- 13
- 14
- 15
- 16
竖排插入多张图片
\begin{figure}[h] \centering \subfigure[场景1]{ \begin{minipage}[t]{0.45\textwidth} \centering \includegraphics[width=0.8\textwidth]{wolf2} \\ \vspace{10pt} %2张图片的垂直距离 \includegraphics[width=0.8\textwidth]{wolf3} \end{minipage} \end{figure} }- 1
- 2
- 3
- 4
- 5
- 6
- 7
- 8
- 9
- 10
- 11
- 1
- 2
- 3
- 4
- 5
- 6
- 7
- 8
- 9
- 10
- 11
表格
技巧:若不想手动输入LaTeX语法生成表格,可以使用在线生成LaTeX表格的网站。可以从Excel里面粘贴或导入,可以实现单元格合并,而且会在合并行或合并列的时候提醒要引入对应的宏包。
网址:https://www.tablesgenerator.com/当然,也可以使用LaTeX语法生成表格,示例如下:
例子:
\begin{table}[htbp] % htbp代表表格浮动位置 % 表格居中 \centering % 添加表头 \caption{变量表} % 创建table环境 \begin{tabular}{|cc|c|} % 3个c代表3列都居中,也可以设置l或r,|代表竖线位置 % 表格的输入 \hline % 一条水平线 x & y & z \\ % \\为换行符 \hline 11 & 22 & 33 \\ \hline \end{tabular} \end{table}- 1
- 2
- 3
- 4
- 5
- 6
- 7
- 8
- 9
- 10
- 11
- 12
- 13
- 14
- 15
- 1
- 2
- 3
- 4
- 5
- 6
- 7
- 8
- 9
- 10
- 11
- 12
- 13
- 14
- 15
显示:

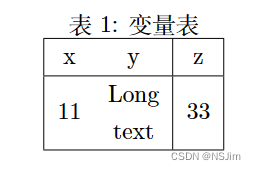
表格单元格内换行
需要使用\usepackage{makecell}宏包。将单元格的内容替换为\makecell{XX\\XXXX},\makecell{}中的\\可以在单元格内换行。例子:
\begin{table}[htbp] % htbp代表表格浮动位置 \centering \caption{变量表} \begin{tabular}{|cc|c|} \hline x & y & z \\ \hline 11 & \makecell{Long\\text} & 33 \\ \hline \end{tabular} \end{table}- 1
- 2
- 3
- 4
- 5
- 6
- 7
- 8
- 9
- 10
- 11
- 1
- 2
- 3
- 4
- 5
- 6
- 7
- 8
- 9
- 10
- 11
显示:
数学公式
公式支持
LaTeX要输入数学公式需要导入宏包
\usepackage{amsmath};若要对公式的字体进行修改,还需要引入宏包\usepackage{amsfonts}。LaTeX数学公式的各种细节请参见我的另一篇博客:LaTeX数学公式-详细教程 。
- 官方文档:
传送门:官方文档
网址:https://math.meta.stackexchange.com/questions/5020/mathjax-basic-tutorial-and-quick-reference - 中文教程:
传送门:中文教程
网址:https://www.jianshu.com/p/25f0139637b7 - 技巧:使用在线LaTeX公式编辑器,来生成LaTeX公式代码,然后复制到Markdown编辑器中,并在两边加上
$或$$即可。
在线LaTeX公式编辑器网址:https://private.codecogs.com/latex/eqneditor.php - 插入公式
左对齐公式(行中公式):$数学公式$
居中公式(独立公式):$$数学公式$$
注意:使用$行中公式时,数学公式与$连接处不要有空格,否则公式不会显示;使用$$居中公式时,数学公式与$$连接处可以有空格。即$ 数学公式 $不显示公式。 - 注释:
%为单行注释,例子详见后文。 - 细节:请参见我的另一篇博客:LaTeX数学公式-详细教程 。
注意事项
- 使用
$,即行中公式时,数学公式与$连接处不要有空格,否则公式不会显示。 - 使用
$$,即居中公式时,数学公式与$$连接处可以有空格。即$ 数学公式 $不显示公式。 - 使用
$$时,上方要空一行。 =不要单独打一行,否则可能会出错。+ - * / = ( ) | , . '等符号直接在$或$$之间输入即可识别。
公式编号
自动编号
使用
\begin{equation}和\end{equation}进行公式输入,要同时使用,且编号不能够修改。例子:
\begin{equation} a^2+b^2=c^2 \end{equation}- 1
- 2
- 3
- 1
- 2
- 3
显示:

手动编号
在公式末尾使用
\tag{编号}来实现公式手动编号,大括号内的内容可以自定义。需要使用\usepackage{amsmath}宏包,不能写在$或$$中,会报错。例子:
\begin{equation} a^2+b^2=c^2 \tag{2} \end{equation}- 1
- 2
- 3
- 4
- 1
- 2
- 3
- 4
显示:

自定义标题样式
在导言区使用
\newtheorem{example}{Example}[section]可以自定义标题样式,例子如下。例子:
\newtheorem{example}{Example}[section] % 自定义example样式- 1
\begin{document}
\maketitle
\section{Introduction}
\begin{example}{Test1}
Hello world!
\end{example}
\begin{example}{Test2}
Hello world!
\end{example}
\end{document}
- 1
- 2
- 3
- 4
- 5
- 6
- 7
- 8
- 9
- 10
- 11
- 12
- 13
- 14
- 15
- 16
- 17
- 18
- 19
- 20
- 21
显示:

算法(伪代码)
需要使用
\usepackage{algorithm}和\usepackage{algorithmic}宏包,if、for等关键字要按照规范书写,如\IF \ENDIF。例子:
\documentclass{article} \usepackage[UTF8]{ctex} \usepackage{algorithm} % 排版算法 \usepackage{algorithmic} % 排版算法- 1
- 2
- 3
- 4
\title{Algorithm}
\author{NSJim Green}
\date{October 2020}\begin{document}
\maketitle
\section{Algorithm 1}
\begin{algorithm}
\caption{CheckSum(A,x)} %算法标题
\label{alg2} %标签
\begin{algorithmic} %算法开始
\STATE {\bf Input:} An array A and a value x %也可以用\textbf{Input:}
\STATE {\bf Output:} A bool value show if there is two elements in A whose sum is x
\STATE A ← \gets ← SORT(A)
\STATE n ← \gets ← length(n)
\FOR{i ← \gets ← 0 to n}
\IF{Binary-search(A,x-A[i],1,n)}
\STATE return true
\ENDIF
\ENDFOR
\STATE return false
\end{algorithmic}
\end{algorithm}\end{document}
- 1
- 2
- 3
- 4
- 5
- 6
- 7
- 8
- 9
- 10
- 11
- 12
- 13
- 14
- 15
- 16
- 17
- 18
- 19
- 20
- 21
- 22
- 23
- 24
- 25
- 26
- 27
- 28
- 29
- 30
- 31
- 32
- 33
显示:

代码块
基础用法
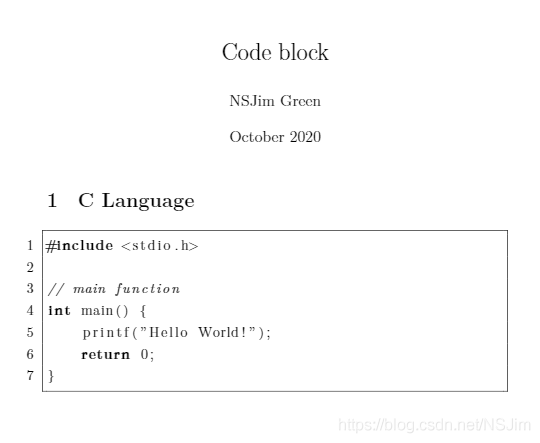
使用
\usepackage{listings}宏包,并使用\lstset{}进行基础设置,然后使用\begin{lstlisting}[language=xxx]和\end{lstlisting}插入代码块。基础设置包括行号,不显示字符串空格,代码块边框,不包含颜色等设置,要设置颜色和字体请见下文的高级用法。
例子:
\documentclass{article} \usepackage[UTF8]{ctex} \usepackage{listings}- 1
- 2
- 3
% 代码块基础设置
\lstset{
numbers=left, % 在左侧显示行号
showstringspaces=false, % 不显示字符串中的空格
frame=single, % 设置代码块边框
}\title{Code block}
\author{NSJim Green}
\date{October 2020}\begin{document}
\maketitle
\section{C Language}
\begin{lstlisting}[language=c]
#include// main function
int main() {
printf(“Hello World!”);
return 0;
}
\end{lstlisting}\end{document}
- 1
- 2
- 3
- 4
- 5
- 6
- 7
- 8
- 9
- 10
- 11
- 12
- 13
- 14
- 15
- 16
- 17
- 18
- 19
- 20
- 21
- 22
- 23
- 24
- 25
- 26
- 27
- 28
- 29
- 30
- 31
- 32
显示:
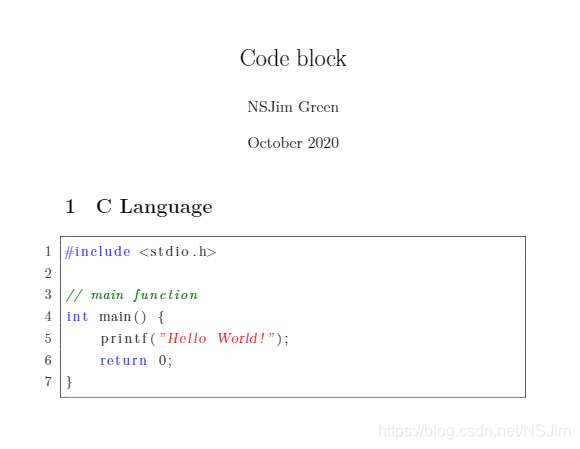
高级用法
使用
\usepackage{listings}和\usepackage{xcolor}宏包,并使用\lstset{}进行高级设置,然后使用\begin{lstlisting}[language=xxx]和\end{lstlisting}插入代码块。高级设置除基础设置外,还包括关键字格式,字符串格式等设置。
例子:
\documentclass{article} \usepackage[UTF8]{ctex} \usepackage{listings} \usepackage{xcolor}- 1
- 2
- 3
- 4
% 代码块高级设置
\lstset{
% basicstyle=\footnotesize, % 设置整体的字体大小
showstringspaces=false, % 不显示字符串中的空格
frame=single, % 设置代码块边框
numbers=left, % 在左侧显示行号
% numberstyle=\footnotesize\color{gray}, % 设置行号格式
numberstyle=\color{darkgray}, % 设置行号格式
backgroundcolor=\color{white}, % 设置背景颜色
keywordstyle=\color{blue}, % 设置关键字颜色
commentstyle=\it\color[RGB]{0,100,0}, % 设置代码注释的格式
stringstyle=\sl\color{red}, % 设置字符串格式
}\title{Code block}
\author{NSJim Green}
\date{October 2020}\begin{document}
\maketitle
\section{C Language}
\begin{lstlisting}[language=c]
#include// main function
int main() {
printf(“Hello World!”);
return 0;
}
\end{lstlisting}\end{document}
- 1
- 2
- 3
- 4
- 5
- 6
- 7
- 8
- 9
- 10
- 11
- 12
- 13
- 14
- 15
- 16
- 17
- 18
- 19
- 20
- 21
- 22
- 23
- 24
- 25
- 26
- 27
- 28
- 29
- 30
- 31
- 32
- 33
- 34
- 35
- 36
- 37
- 38
- 39
- 40
显示:
论文写作
模板
论文写作可以使用合适的模板,例如
IEEE的模板,只需在文档类型处修改即可,代码如下:\documentclass[conference]{IEEEtran}- 1
- 1
双栏
更改文档的单双栏模式,只需更改文档类型处的选项即可,代码如下:
单栏:\documentclass[onecolumn]{article}- 1
- 1
双栏:
\documentclass[twocolumn]{article}- 1
- 1
跨栏图表
在双栏编辑模式下,图片只能在一栏中显示,而且如果图片的宽度超过单栏文本宽度,则只能显示其中一部分,剩下的部分会溢出。
若想在双栏模式下插入跨栏图表可将环境替换为带
*的figure或table环境,代码如下:\begin{figure*} …… \end{figure*} 或 \begin{talbe*} …… \end{table*}- 1
- 2
- 3
- 4
- 5
- 6
- 7
- 1
- 2
- 3
- 4
- 5
- 6
- 7
无自动编号的标题
LaTeX中的标题都是自动编号的,若想使用无编号的标题,可使用带
*的section代码,如下:\section*{References}- 1
- 1
引用
LaTeX中的公式,图表,参考文献都是自动编号的,添加
\label语句后可以进行引用,还可以设置引用格式,使用方法如下:公式引用
需导入
amsmath宏包,代码为\usepackage{amsmath}。公式
\begin{equation} z=x+y \label{eq1} \end{equation}- 1
- 2
- 3
- 4
- 1
- 2
- 3
- 4
引用
Eq. (\ref{eq1}) 或导入amsmath宏包,使用如下代码(推荐): Eq. \eqref{eq1}- 1
- 2
- 3
- 1
- 2
- 3
图片引用
需导入
graphicx宏包,代码为\usepackage{graphicx}。图片
\begin{figure}[htbp] \centering \includegraphics[width=8cm]{image/fig01-network model.png} \caption{Network model.} \label{fig1} \end{figure}- 1
- 2
- 3
- 4
- 5
- 6
- 1
- 2
- 3
- 4
- 5
- 6
引用
Fig. \ref{fig1}- 1
- 1
表格引用
表格
\begin{table}[htbp] \caption{Parameters for simulation} \begin{center} \begin{tabular}{|c|c|c|c|} \hline \textbf{Parameters}&\textbf{Values} \\ \hline Count of Nodes & 2 to 160 \\ Simulation time & 60s \\ Layer used & Logical Link Layer \\ Type of Antenna & Omni Directional \\ Queue type & Drop tail \\ MAC & 802.11 \\ \hline \end{tabular} \label{tab1} \end{center} \end{table}- 1
- 2
- 3
- 4
- 5
- 6
- 7
- 8
- 9
- 10
- 11
- 12
- 13
- 14
- 15
- 16
- 17
- 18
- 1
- 2
- 3
- 4
- 5
- 6
- 7
- 8
- 9
- 10
- 11
- 12
- 13
- 14
- 15
- 16
- 17
- 18
引用
Table. \ref{tab1}- 1
- 1
页面内参考文献引用
参考文献
\begin{thebibliography}{00} \bibitem{b1} Ben-Othman J, Yahya B. Energy efficient and QoS based routing protocol for wireless sensor networks. J Parallel Distrib Comput 2010;2010(70):849–57. \bibitem{b2} Younis M, Youssef M, Arisha K. Energy-aware routing in cluster-based sensor networks. In: Proceedings of the IEEE 20th international symposium on modeling, analysis and simulation of computer and telecommunication systems; 2012. p. 0129. https://doi.org/10.1109/MASCOT.2002.1167069. \bibitem{b3} Al-Karaki JN, Kamal AE. Routing techniques in wireless sensor networks: a survey. IEEE J Wirel Commun 2004;11(6):6–28. 2004. \end{thebibliography}- 1
- 2
- 3
- 4
- 5
- 1
- 2
- 3
- 4
- 5
引用
\cite{b1} \cite{b2} \cite{b3}- 1
- 2
- 3
- 1
- 2
- 3
bib参考文献引用
流程
- 在论文投稿官方网站上获取论文LaTeX模板,其中包含bib文件,可对bib文件重命名。
- 在tex文件中找到bib文件声明位置,进行修改,若没有bib文件声明,则添加声明。
- 在谷歌学术等文献检索网站上检索参考文献,在引用中复制
BibTeX格式的代码,粘贴到bib文件的末尾。 - 在tex文件中需要引用参考文献的位置使用
\cite{BibTexName}语法进行引用,其中BibTeXName为BibTeX代码中的第一行的名称。
bib声明
在tex文件中,结尾处,\end{document}之前,找到如下代码:\bibliographystyle{FormatName} \bibliography{BibName}- 1
- 2
- 1
- 2
可进行修改,其中,
FormatName为格式名称,BibName为bib文件名称。示例:
\bibliographystyle{ACM-Reference-Format} \bibliography{ref}- 1
- 2
- 1
- 2
BibTeX代码
在谷歌学术等文献检索软件中检索需要的参考文献,以Conditional generative adversarial nets为例,在文献处点击引用,选择BibTeX格式,如下图:

复制
BibTeX代码,示例如下。将其粘贴到bib文件的末尾。@article{mirza2014conditional, title={Conditional generative adversarial nets}, author={Mirza, Mehdi and Osindero, Simon}, journal={arXiv preprint arXiv:1411.1784}, year={2014} }- 1
- 2
- 3
- 4
- 5
- 6
- 1
- 2
- 3
- 4
- 5
- 6
引用
在tex文件中,要引用参考文献时,使用\cite{}语法进行引用,中括号的内容为BibTeX代码的第一行内容。以上文的
BibTeX为例,进行引用:Conditional GAN (CGAN) \cite{mirza2014conditional}.- 1
- 1
显示:

改变引用颜色
改变引用颜色前最好在导言区导入
xcolor宏包,代码为\usepackage{xcolor}。
改变引用颜色需要在导言区添加如下代码:\usepackage[colorlinks,bookmarksopen,bookmarksnumbered,citecolor=green, linkcolor=red, urlcolor=blue]{hyperref}- 1
- 1
citecolor为参考文献颜色,linkcolor为图表和公式引用的颜色,urlcolor为超链接颜色。各颜色可根据偏好或要求自行更改。显示效果如下:


Linux学习第34天:Linux LCD 驱动实验(一):星星之火可以燎原
就在刚刚,雷军又做了个10亿的公司
nodejs+vue+elementui图书馆销售网上书城管理系统express228
react-native 找不到符号问题的解决方案
信息收集分类
AI服务器,深度学习英特尔服务器主板和超微服务器主板哪个牌子好?
图像质量评价指标pytorch库函数 FID FSIM SSIM LIPIPS...
LeetCode707:设计链表
Android毕业论文选题基于Uniapp实现的在线投票App问卷调查