-
【自学记录】深度学习入门——基于Python的理论与实现(第3章 神经网络)
3.4.3 3层神经网络Python实现
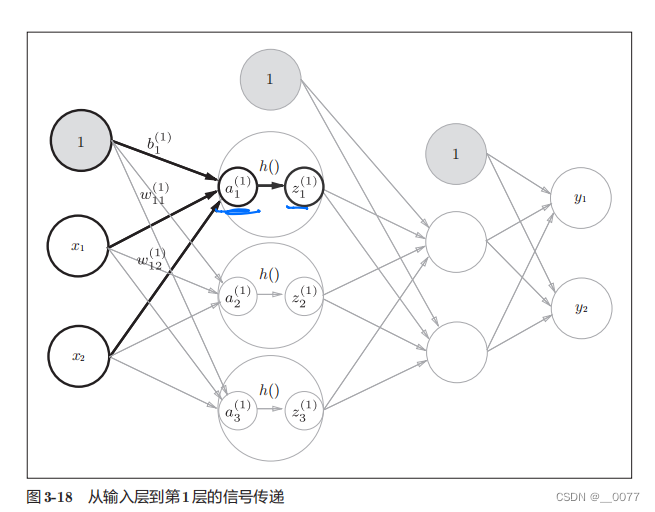
实现的是这个网络
**init_network()**函数会进行权重和偏置的初始化,并将它们保存在字典变量network中。这个字典变量network中保存了每一层所需的参数(权重和偏置)。
**forward()**函数中则封装了将输入信号转换为输出信号的处理过程。
另外,这里出现了forward (前向)一词,它表示的是从输入到输出方向的传递处理。后面在进行神经网络的训练时,我们将介绍后向(backward,从输出到输入方向)的处理。#阶跃函数 import numpy as np import matplotlib.pylab as plt def step_function(x):#阶跃函数 y=x>0 y=y.astype(np.int64)#True转换成1,False转换成0 return y def sigmoid(x):#sigmoid激活函数 return 1/(1+np.exp(-x)) def ReLU(x): return np.maximum(0,x) def identity_function(x):#恒等函数,原样输出 return x ''' x=np.arange(-5.0,5.0,0.1) y=step_function(x) y2=sigmoid(x) plt.plot(x,y2) plt.ylim(-0.1,1.1) plt.show() ''' def init_network(): #权重偏置初始化,并建立字典 network={} network['W1']=np.array([[0.1,0.3,0.5],[0.2,0.4,0.6]]) network['b1']=np.array([0.1,0.2,0.3]) network['W2'] = np.array([[0.1, 0.4], [0.2, 0.5], [0.3, 0.6]]) network['b2'] = np.array([0.1, 0.2]) network['W3'] = np.array([[0.1, 0.3], [0.2, 0.4]]) network['b3'] = np.array([0.1, 0.2]) return network def forward(network,x):#向前传播 W1,W2,W3=network['W1'],network['W2'],network['W3'] b1,b2,b3=network['b1'],network['b2'],network['b3'] a1=np.dot(x,W1)+b1 #矩阵点乘 z1=sigmoid(a1) a2=np.dot(z1,W2)+b2 z2=sigmoid(a2) a3=np.dot(z2,W3)+b3 y=identity_function(a3) return y network=init_network() x=np.array([1.0,0.5])# X=【1*2】矩阵 W1=【2*3】矩阵=>Z1=【1*3】 W2=【3*2】=>Z2=【1*2】 y=forward(network,x) print(y)- 1
- 2
- 3
- 4
- 5
- 6
- 7
- 8
- 9
- 10
- 11
- 12
- 13
- 14
- 15
- 16
- 17
- 18
- 19
- 20
- 21
- 22
- 23
- 24
- 25
- 26
- 27
- 28
- 29
- 30
- 31
- 32
- 33
- 34
- 35
- 36
- 37
- 38
- 39
- 40
- 41
- 42
- 43
- 44
- 45
3.6.1 MNIST数据集
PS:遇到了些许BUG,ModuleNotFoundError: No module named ‘dataset’ 解决方法
FileNotFoundError: [Errno 2] No such file or directory: 'sample_weight.pkl’解决方法# coding: utf-8 import sys, os sys.path.append(os.pardir) # 为了导入父目录的文件而进行的设定 sys.path.append('E:\python\Lib\site-packages') import numpy as np from dataset.mnist import load_mnist #导入mnist函数 from PIL import Image def img_show(img): pil_img = Image.fromarray(np.uint8(img)) pil_img.show() #第1个参数normalize设置是否将输入图像正规化为0.0~1.0的值。如果将该参数设置为False,则输人图像的像素会保持原来的0~255。 #第2个参数flatten设置是否展开输入图像(变成一维数组)。若为False,则为(1*28*28),若为True,则变成由784个元素构成的一维数组 #第3个参数one_hot_label设置是否将标签保存为one-hot表示(one-hot representation)。one-hot表示是仅正确解标签为1,其余背为0的数组,就像〔0,0,1,0,0,0,0,0,0,0]这样 (x_train, t_train), (x_test, t_test) = load_mnist(flatten=True, normalize=False)#调用mnist方法读入MNIST数据集 img = x_train[0]#60000个训练数据 label = t_train[0] print(label) # 5 print(img.shape) # (784,) img = img.reshape(28, 28) # 把图像的形状变为原来的尺寸 print(img.shape) # (28, 28) img_show(img)- 1
- 2
- 3
- 4
- 5
- 6
- 7
- 8
- 9
- 10
- 11
- 12
- 13
- 14
- 15
- 16
- 17
- 18
- 19
- 20
- 21
- 22
- 23
- 24
- 25
- 26
3.6.2 神经网络
# coding: utf-8 import sys, os sys.path.append(os.pardir) # 为了导入父目录的文件而进行的设定 sys.path.append('E:\python\Lib\site-packages') import numpy as np import pickle from dataset.mnist import load_mnist from common.functions import sigmoid, softmax def get_data(): #展开图像、正规化图像 (x_train, t_train), (x_test, t_test) = load_mnist(normalize=True, flatten=True, one_hot_label=False) return x_test, t_test #读取权重参数 def init_network(): with open(r"F:\自学\DeepLearningFromScratch-master\ch03\sample_weight.pkl", 'rb') as f: network = pickle.load(f) return network def predict(network, x): w1, w2, w3 = network['W1'], network['W2'], network['W3'] b1, b2, b3 = network['b1'], network['b2'], network['b3'] a1 = np.dot(x, w1) + b1 z1 = sigmoid(a1) a2 = np.dot(z1, w2) + b2 z2 = sigmoid(a2) a3 = np.dot(z2, w3) + b3 y = softmax(a3) return y x, t = get_data()#返回的是10000张的测试数据 network = init_network() batch_size = 100 # 批数量 accuracy_cnt = 0 # 记录正确标签数量 for i in range(0, len(x), batch_size): x_batch = x[i:i+batch_size]#一批100个 【100,784】 y_batch = predict(network, x_batch)#输出每张图片是0-9的概率 【100,10】 #返回沿轴的最大索引 通过argmax()获取值最大的元素的索引。不过这里需要注意的是,我们给定了参数axis=1。这指定了在100 × 10的数组中,沿着第1维方向(以第1维为轴)找到值最大的元素的索引(第0维对应第1个维度)。 p = np.argmax(y_batch, axis=1)#【100,】 accuracy_cnt += np.sum(p == t[i:i+batch_size]) print(x_batch.shape) print(y_batch.shape) print(p.shape) print("Accuracy:" + str(float(accuracy_cnt) / len(x)))- 1
- 2
- 3
- 4
- 5
- 6
- 7
- 8
- 9
- 10
- 11
- 12
- 13
- 14
- 15
- 16
- 17
- 18
- 19
- 20
- 21
- 22
- 23
- 24
- 25
- 26
- 27
- 28
- 29
- 30
- 31
- 32
- 33
- 34
- 35
- 36
- 37
- 38
- 39
- 40
- 41
- 42
- 43
- 44
- 45
- 46
- 47
- 48
- 49
- 50
- 51
- 52
- 53
- 54
-
相关阅读:
《Java并发编程的艺术》读书笔记 - 第四章 - Java并发编程基础
Kafka与MySQL的组合使用
天龙八部TLBB系列 - 关于包裹掉落的物品
此芯科技加入百度飞桨硬件生态共创计划,加速端侧AI生态布局
Linux下通过service服务管理用户进程
【离散数学】代数结构
负载均衡(DR)
LLM 构建Data Muti-Agents 赋能数据分析平台的实践之①:数据采集
SLAM——Eigen函数库之矩阵块运算,高阶操作middleCols与segment用法
大数据基础:Hadoop之MapReduce重点架构原理
- 原文地址:https://blog.csdn.net/weixin_43502713/article/details/133203666
