-
Python灰帽子编程————网页信息爬取
爬取图片,问题分解:
- 获取网页内容;
- 从网页内容中提取图片地址;
- 通过图片地址,将图片下载到本地。
1. 相关模块
1.1 requests 模块
获取网页内容。
requests 模块:主要是用来模拟浏览器行为,发送HTTP 请求,并处理HTTP 响应的功能。
import requests # 被认为,最贴近与人的操作的模块 import urllib import urllib2 import urllib3- 1
- 2
- 3
- 4
requests 模块处理网页内容的基本逻辑:
- 定义一个URL 地址;
- 发送HTTP 请求;
- 处理HTTP 响应。
1.1.1 模块中的请求方法
请求方法 说明 requests.get() GET 方法,常规请求方法 requests.post() POST方法,带有请求正文的方法 requests.head() 只返回响应头部,没有响应正文。 requests.options() 测试服务器所支持的方法 requests.put() 向服务器写入文件 requests.delete() 请求删除服务器端文件 1.1.2 请求方法中的参数
参数名字 参数含义 url 请求URL 地址 headers 自定义请求头部 params 发送GET 参数 data 发送POST 参数 timeout 请求延时 files 文件上传数据流 1.1.3 响应对象中属性
方法名 解释 response.text 响应正文(文本方式) response.content 响应正文(二进制) response.status_code 响应状态码 response.url 发送请求的URL 地址 response.headers 响应头部 response.request.headers 请求头部 response.cookies cookie 相关信息 1.2 re 模块
从网页内容中提取图片地址。
正则表达式(RE),是一些由字符和特殊符号组成的字符串,它们能按某种模式匹配一系列有相似特征的字符串。
- 从哪一个字符串中搜索什么内容;
- 规则是什么(模式问题)。
>>> import re >>> s = "I say food not Good" >>> re.findall('ood',s) #使用re模块的finsdall方法在s中查找符合ood的子串 ['ood', 'ood'] >>> re.findall(r"[fG]ood", s) #r表示正则匹配,匹配中括号中所有的字符 ['food', 'Good'] >>> re.findall(r"[a-z]ood", s) ['food'] >>> re.findall(r"[A-Z]ood", s) ['Good'] >>> re.findall(r"[0-9a-zA-Z]ood", s) #可以使用\w来代替此代码中[0-9a-zA-Z],因为\w表示任意单个字符数字下划线 ['food', 'Good'] >>> re.findall(r"[^a-z]ood",s) #取反,不在中括号的都取 ['Good'] >>> re.findall('.ood',s) #任意字符出现一次 ['food', 'Good'] >>> re.findall(r'food|Good|not',s) ['food', 'not', 'Good'] >>> re.findall(r".o{1,2}.", s) ['food', 'not', 'Good'] >>> re.findall('o*',s) ['', '', '', '', '', '', '', 'oo', '', '', '', 'o', '', '', '', 'oo', '', ''] >>> >>> s = "How old are you? I'm 24!" >>> re.findall(r"[0-9][0-9]", s) >>> s = "How old are you? I'm 24!" >>> re.findall(r"[0-9]{1,2}", s) ['24'] >>> re.findall(r"\d{1,2}", s) ['24'] >>> re.findall(r"\w", s) ['H', 'o', 'w', 'o', 'l', 'd', 'a', 'r', 'e', 'y', 'o', 'u', 'I', 'm', '2', '4'] >>> >>> s = 'I like google not ggle goooogle and gogle' >>> re.findall('o+',s) ['oo', 'o', 'oooo', 'o'] >>> re.findall('go+',s) ['goo', 'goooo', 'go'] >>> re.findall('go+gle',s) ['google', 'goooogle', 'gogle'] >>> re.findall('go?gle',s) ['ggle', 'gogle'] >>> re.findall('go{1,2}gle',s) ['google', 'gogle'] >>>- 1
- 2
- 3
- 4
- 5
- 6
- 7
- 8
- 9
- 10
- 11
- 12
- 13
- 14
- 15
- 16
- 17
- 18
- 19
- 20
- 21
- 22
- 23
- 24
- 25
- 26
- 27
- 28
- 29
- 30
- 31
- 32
- 33
- 34
- 35
- 36
- 37
- 38
- 39
- 40
- 41
- 42
- 43
- 44
- 45
- 46
- 47
1.2.1 匹配单个字符
记号 说明 . 匹配任意单个字符(换行符除外). 表示真正的. […x-y…] 匹配字符集合里的任意单个字符 [^…x-y…] 匹配不在字符组里的任意单个字符 \d 匹配任意单个数字,与[0-9] 同义 \w 匹配任意单个数字、字母、下划线,与[0-9a-zA-Z_] 同义 \s 匹配任意单个空白字符,与[\r\v\f\t\n] 同义 1.2.2 匹配一组字符
记号 说明 字符串 匹配字符串值 字符串1|字符串2 匹配字符串1或字符串2 * 左邻第一个字符出现0 次或无穷次 + 左邻第一个字符最少出现1 次或无穷次 ? 左邻第一个字符出现0 次或1 次 {m,n} 左邻第一个字符出现最少m 次最多n 次 1.2.3 其他元字符
记号 说明 ^ 匹配字符串的开始 集合取反 $ 匹配字符串的结尾 \b 匹配单词的边界,单词包括\w 中的内容 () 对字符串分组,只显示匹配到括号中内的字符 \数字 匹配已保存的子组 1.2.4 核心函数
核心函数 说明 re.findall() 在字符串中查找正则表达式的所有(非覆盖)出现;返回一个匹配对象的列表。 re.match() 尝试用正则表达式模式从字符串的开头匹配 如果匹配成功,则返回一个匹配对象 否则返回None re.search() 在字符串中查找正则表达式模式的第一次出现 如果匹配成,则返回一个匹配对象 否则返回None re.group() 使用match 或者search 匹配成功后,返回的匹配对象 可以通过group() 方法获取得匹配内容 re.finditer() 和findall() 函数有相同的功能,但返回的不是列表而是迭代器 对于每个匹配,该迭代器返回一个匹配对象 re.split() 根据正则表达式中的分隔符把字符分割为一个列表,并返回成功匹配的列表字符串也有类似的方法,但是正则表达式更加灵活 re.sub() 把字符串中所有匹配正则表达式的地方换成新的字符串 >>> m = re.match('goo','I like google not ggle goooogle and gogle') >>> type(m) <class 'NoneType'> >>> m = re.match('I','I like google not ggle goooogle and gogle') >>> type(m) <class 're.Match'> >>> m.group() 'I' >>> m = re.search('go{3,}','I like google not ggle goooogle and gogle') >>> m.group() 'goooo' >>> m = re.finditer('go*','I like google not ggle goooogle and gogle') >>> list(m) [<re.Match object; span=(7, 10), match='goo'>, <re.Match object; span=(10, 11), match='g'>, <re.Match object; span=(18, 19), match='g'>, <re.Match object; span=(19, 20), match='g'>, <re.Match object; span=(23, 28), match='goooo'>, <re.Match object; span=(28, 29), match='g'>, <re.Match object; span=(36, 38), match='go'>, <re.Match object; span=(38, 39), match='g'>] >>> m = re.split('\.|-','hello-world.ajest') >>> m ['hello', 'world', 'ajest'] >>> s = "hi x.Nice to meet you, x." >>> s = re.sub('x','AJEST',s) >>> s 'hi AJEST.Nice to meet you, AJEST.' >>>- 1
- 2
- 3
- 4
- 5
- 6
- 7
- 8
- 9
- 10
- 11
- 12
- 13
- 14
- 15
- 16
- 17
- 18
- 19
- 20
- 21
- 22
在Python的正则表达式中,贪婪匹配是指尽可能多地匹配输入字符串。有时候,贪婪匹配可能导致出现意想不到的结果。解决贪婪匹配的问题有几种方法:
-
使用非贪婪模式:在正则表达式中通过在量词后面加上问号(?)来实现非贪婪匹配。例如,把
*改为*?,+改为+?,{n,m}改为{n,m}?等。这样,正则表达式就会尽量少地匹配。 -
使用具体限定符:如果你知道待匹配的文本中的某些特征,可以使用具体限定符来避免贪婪匹配。例如,使用
\d+代替.来匹配数字,使用[a-z]+代替.来匹配小写字母等。 -
使用断言:断言用于指定匹配的位置,而不是匹配的内容。正向断言(
(?=pattern))用于匹配紧接着指定模式的位置,否定断言((?!pattern))用于匹配不紧接着指定模式的位置。通过使用断言,你可以更精确地指定匹配的内容,避免贪婪匹配。 -
使用边界限定符:在正则表达式中使用边界限定符来确保匹配发生在特定位置。例如,使用
^来匹配字符串的开头,使用$来匹配字符串的结尾,使用\b来匹配单词的边界等。
通过使用这些方法,你可以解决Python正则表达式中的贪婪匹配问题,并获得预期的匹配结果。
2. 网页信息爬取
通过python 脚本爬取网页图片:
- 获取整个页面所有源码;
- 筛选出源码中图片地址;
- 将图片下载到本地。
2.1 获取网页HTML 源代码
将方法封装成函数。
# 01 - 获取网页源代码.py import requests url = "http://192.168.16.177/python-Spider/index.html" def get_html(url): res = requests.get(url = url) return res.content #显示网页信息的二进制形式 html = get_html(url = url) print (html.decode("utf8")) #将二进制的信息进行解码为正常的信息- 1
- 2
- 3
- 4
- 5
- 6
- 7
- 8
- 9
- 10
- 11
2.2 提取图片地址
# 02 - 提权图片地址.py import requests import re url = "http://192.168.16.177/python-Spider/index.html" def get_image_path_list(html): image_path_list = re.findall(r"style/\w*\.jpg",html) #在html中找到以style开头内容任意多个字母,数字,下划线以.jpg结尾的字符串;\w:人以字母数字下划线,*:匹配字符出现零次或无数次 return image_path_list def get_html(url): res = requests.get(url = url) return res.content html = get_html(url = url) image_path_list = get_image_path_list(html.decode()) for image_path in image_path_list: print(image_path)- 1
- 2
- 3
- 4
- 5
- 6
- 7
- 8
- 9
- 10
- 11
- 12
- 13
- 14
- 15
- 16
- 17
- 18
- 19
- 20
- 21
2.3 下载图片
# 03 - 下载图片.py import requests import re import time url = "http://192.168.16.177/python-Spider/index.html" def download_image(image_path): img_url = url[0:url.rfind('/')+1]+ image_path res = requests.get(url = img_url) img_save_path = f"./img/{time.time()}.jpg" with open(img_save_path,"wb") as f: f.write(res.content) def get_image_path_list(html): image_path_list = re.findall(r"style/\w*\.jpg",html) #在html中找到以style开头内容任意多个字母,数字,下划线以.jpg结尾的字符串;\w:人以字母数字下划线,*:匹配字符出现零次或无数次 return image_path_list def get_html(url): res = requests.get(url = url) return res.content html = get_html(url = url) image_path_list = get_image_path_list(html.decode()) for image_path in image_path_list: print(image_path) download_image(image_path = image_path)- 1
- 2
- 3
- 4
- 5
- 6
- 7
- 8
- 9
- 10
- 11
- 12
- 13
- 14
- 15
- 16
- 17
- 18
- 19
- 20
- 21
- 22
- 23
- 24
- 25
- 26
- 27
- 28
- 29
2.4 完整脚本
# 04 - 网页信息爬取.py import requests import re #正则 import time url = "http://192.168.16.177/python-Spider/index.html" def get_html(url): res = requests.get(url = url) #发送get请求,返回值赋给res return res.content #返回个请求返回值的二进制信息 def get_img_path_list(html): img_path_list = re.findall(r"style/\w*\.jpg",html) #re.findall()在字符串中查找正则表达式的所有(非覆盖)出现;返回一个匹配对象的列表。r"style/\w*\.jpg"中r表示证则表达式,style/\w*\.jpg表示以style/开头,\.jpg结尾,中间内容任意字符出现零次或无数次 return img_path_list def download_image(img_path): image_url = url[0:url.rfind("/")+1]+img_path #拼接一个图片链接 res = requests.get(url = image_url) #向图片链接发送一个get请求,将图片信息的返回值赋值给res img_save_path = f"./img/{time.time()}.jpg" #创建一个存储图片的链接 with open(img_save_path,"wb") as f: #使用 with 语句来打开一个文件,并创建一个文件对象 f,并且设置文件的打开方式为二进制写 f.write(res.content) #将图片信息的二进制内容写入文件 html = get_html(url= url) #调用get_html函数获得网页的信息 img_path_list = get_img_path_list(html= html.decode()) #通过get_img_path_list函数获得图片路径,因为html返回的是二进制信息,所以将内容进行解码。获得的内容是一个列表 for img_path in img_path_list: #遍历图片路径列表 print(img_path) download_image(img_path= img_path) #遍历图片列表的时候将每个图片的路径通过传参调用download_image函数进行存储- 1
- 2
- 3
- 4
- 5
- 6
- 7
- 8
- 9
- 10
- 11
- 12
- 13
- 14
- 15
- 16
- 17
- 18
- 19
- 20
- 21
- 22
- 23
- 24
- 25
- 26
- 27
- 28
- 29
- 30
3. requests 模块基本用法
3.1 模拟浏览器
# 05 - 自定义浏览器指纹.py import requests url = "http://192.168.16.177/python-Spider/" headers = {"User-Agent":"Mozilla/5.0 (Windows NT 10.0; Win64; x64) AppleWebKit/537.36 (KHTML, like Gecko) Chrome/117.0.0.0 Safari/537.36 Edg/117.0.2045.31"} #构造http头,User-Agent:Mozilla req = requests.Session() #保持会话状态,保持请求的一致性 res = requests.get(url = url,headers = headers) #get请求的地址和头 # print(res.url) #响应的url地址;向谁请求,他的url地址 # print(res.text) #响应的内容;向谁请求,他的内容 # print(res.headers) #响应的头部;向谁请求,他的头部 print(res.request.headers) #响应的请求的头部;我的头部- 1
- 2
- 3
- 4
- 5
- 6
- 7
- 8
- 9
- 10
- 11
- 12
- 13
- 14
- 15
- 16
3.2 发送GET 参数
# 06 - 发送GET 参数.py import requests url = "http://192.168.16.177/python-Spider/" headers = { "User-Agent":"Mozilla/5.0 (Windows NT 10.0; Win64; x64) AppleWebKit/537.36 (KHTML, like Gecko) Chrome/117.0.0.0 Safari/537.36 Edg/117.0.2045.31" } #构造http头,User-Agent:Mozilla字典 params= { "username": "xujie", "password" : "123456" } #构造get请求参数字典,不管是GET请求还是POST请求都需要定义字典 req = requests.Session() #保持会话状态,保持请求的一致性 res = requests.get(url = url,headers = headers,params=params) #get请求传递请求的url,我的头部和传递的内容 # print(res.url) #响应的url地址;向谁请求,他的url地址 # print(res.text) #响应的内容;向谁请求,他的内容 print(res.headers) #响应的头部;向谁请求,他的头部 # print(res.request.headers) #响应的请求的头部;我的头部- 1
- 2
- 3
- 4
- 5
- 6
- 7
- 8
- 9
- 10
- 11
- 12
- 13
- 14
- 15
- 16
- 17
- 18
- 19
- 20
- 21
- 22
3.3 发送POST 参数
# 07 - 发送POST 参数.py import requests url = "http://192.168.16.177/python-Spider/" headers = { "User-Agent":"Mozilla/5.0 (Windows NT 10.0; Win64; x64) AppleWebKit/537.36 (KHTML, like Gecko) Chrome/117.0.0.0 Safari/537.36 Edg/117.0.2045.31" } #构造http头,User-Agent:Mozilla字典 data = { "username":"xujie", "password":"123456" } #POST传递的参数 req = requests.Session() ##保持会话状态,保持请求的一致性 res = requests.post(url= url,headers= headers,data= data) #post请求传递请求的url,我的头部和传递的内容 # print(res.url) #响应的url地址;向谁请求,他的url地址 # print(res.text) #响应的内容;向谁请求,他的内容 # print(res.headers) #响应的头部;向谁请求,他的头部 # print(res.request.headers) #响应的请求的头部;我的头部 # print(res.request.url) #响应的请求的头部;我的url print(res.request.body) #响应的请求的头部;我的body- 1
- 2
- 3
- 4
- 5
- 6
- 7
- 8
- 9
- 10
- 11
- 12
- 13
- 14
- 15
- 16
- 17
- 18
- 19
- 20
- 21
- 22
- 23
- 24
3.4 文件上传
向DVWA进行文件上传 ,
 使用bp抓包查看数据包,

文件上传的时候分为三部分,所以使用python模拟的时候也需要将所有的内容都进行提交
使用python模拟数据包
关键三问:
- 当前请求数据包的原始报文中是什么请求方法
- 访问的那个页面
- 传递的哪些参数
import requests req = requests.Session() url = "http://192.168.16.177/dvwa_2.0.1/vulnerabilities/upload/" headers = { "User-Agent":"Mozilla/5.0 (Windows NT 10.0; Win64; x64) AppleWebKit/537.36 (KHTML, like Gecko) Chrome/108.0.5359.125 Safari/537.36" } data = { "MAX_FILE_SIZE":100000, "Upload":"Upload" #数据包中文件上传时,总共有三部分,下面已经将文件域的名字,文件的名字,文件的类型,文件的内容,都放到file这个字典中,这里将其他两个内容编写为字典 } files = { "uploaded":("2.php","image/png",b"") #文件域的名字是键,因为文件是定好的是不可以修改的,那么就定义为元组的类型,文件内容前加小写的b表示是二进制的 } #做文件上传的话有几个信息是需要掌握的,文件是通过表单上传的,表单上传需要文件域.文件域的名字,文件的名字,文件的类型,文件的内容,都需要放到file这个字典中 res = req.post(url= url,headers= headers,data= data,files= files) print(res.text)- 1
- 2
- 3
- 4
- 5
- 6
- 7
- 8
- 9
- 10
- 11
- 12
- 13
- 14
- 15
- 16
- 17
- 18
- 19
- 20
- 21
- 22
使用python模拟数据包提交数据时会跳转到登录页面,是因为没有cookie,DVWA中提交文件的前提是进行登录,需要通过验证cookie查看是否在登录状态,如果没有cookie就会跳转到登录页面进行登录。
cookie放在headers中
提取文件路径
import requests import bs4 req = requests.Session() url = "http://192.168.16.177/dvwa_2.0.1/vulnerabilities/upload/" headers = { "User-Agent":"Mozilla/5.0 (Windows NT 10.0; Win64; x64) AppleWebKit/537.36 (KHTML, like Gecko) Chrome/108.0.5359.125 Safari/537.36", "Cookie":"security=low; PHPSESSID=on6vot2agme34ppnbj9h1drs65" } #User-Agent和Cookie信息 data = { "MAX_FILE_SIZE":100000, "Upload":"Upload" #数据包中文件上传时,总共有三部分,下面已经将文件域的名字,文件的名字,文件的类型,文件的内容,都放到file这个字典中,这里将其他两个内容编写为字典 } files = { "uploaded":("2.php","image/png",b"") #文件域的名字是键,因为文件是定好的是不可以修改的,那么就定义为元组的类型,文件内容前加小写的b表示是二进制的 } #做文件上传的话有几个信息是需要掌握的,文件是通过表单上传的,表单上传需要文件域.文件域的名字,文件的名字,文件的类型,文件的内容,都需要放到file这个字典中 res = req.post(url= url,headers= headers,data= data,files= files) html = res.text html = bs4.BeautifulSoup(html,"lxml") #使用 BeautifulSoup 类将 HTML 内容解析为具有结构化表示的 BeautifulSoup 对象,以便更轻松地对 HTML 进行操作和提取数据。 pre = html.find_all("pre") #从html中找到所有pre标签将内容复制给pre pre = pre[0].text #将pre转换为文本格式,去掉标签 shell_path = pre[0:pre.find(" ")] #将pre文本下标0到第一个空格复制给shell_path print(f"[+] shellpath: {url}{shell_path}")- 1
- 2
- 3
- 4
- 5
- 6
- 7
- 8
- 9
- 10
- 11
- 12
- 13
- 14
- 15
- 16
- 17
- 18
- 19
- 20
- 21
- 22
- 23
- 24
- 25
- 26
- 27
- 28
- 29
- 30
- 31
访问给出的链接,结果有问题是因为构造的file字典内容顺序应该是:文件名,文件内容,文件类型
import requests import bs4 req = requests.Session() url = "http://192.168.16.177/dvwa_2.0.1/vulnerabilities/upload/" headers = { "User-Agent":"Mozilla/5.0 (Windows NT 10.0; Win64; x64) AppleWebKit/537.36 (KHTML, like Gecko) Chrome/108.0.5359.125 Safari/537.36", "Cookie":"security=low; PHPSESSID=on6vot2agme34ppnbj9h1drs65" } #User-Agent和Cookie信息 data = { "MAX_FILE_SIZE":100000, "Upload":"Upload" #数据包中文件上传时,总共有三部分,下面已经将文件域的名字,文件的名字,文件的类型,文件的内容,都放到file这个字典中,这里将其他两个内容编写为字典 } files = { "uploaded":("2.php",b","image/png"") #文件域的名字是键,因为文件是定好的是不可以修改的,那么就定义为元组的类型,文件内容前加小写的b表示是二进制的 } #做文件上传的话有几个信息是需要掌握的,文件是通过表单上传的,表单上传需要文件域.文件域的名字,文件的名字,文件的类型,文件的内容,都需要放到file这个字典中 res = req.post(url= url,headers= headers,data= data,files= files) html = res.text html = bs4.BeautifulSoup(html,"lxml") #使用 BeautifulSoup 类将 HTML 内容解析为具有结构化表示的 BeautifulSoup 对象,以便更轻松地对 HTML 进行操作和提取数据。 pre = html.find_all("pre") #从html中找到所有pre标签将内容复制给pre pre = pre[0].text #将pre转换为文本格式,去掉标签 shell_path = pre[0:pre.find(" ")] #将pre文本下标0到第一个空格复制给shell_path print(f"[+] shellpath: {url}{shell_path}")- 1
- 2
- 3
- 4
- 5
- 6
- 7
- 8
- 9
- 10
- 11
- 12
- 13
- 14
- 15
- 16
- 17
- 18
- 19
- 20
- 21
- 22
- 23
- 24
- 25
- 26
- 27
- 28
- 29
- 30
- 31
注意:
如果出现错误
bs4.FeatureNotFound: Couldn't find a tree builder with the features you requested: lxml意味着在您的环境中没有找到所需的解析器库lxml。要解决这个问题,您可以尝试以下方法之一:
-
安装
lxml库:首先,确保您已经安装了lxml库。您可以使用以下命令在终端或命令提示符中安装它:pip install lxml- 1
-
使用其他解析器:如果您无法安装
lxml库,您可以考虑使用其他可用的解析器。BeautifulSoup支持多种解析器,如 Python 的内置解析器html.parser、html5lib等。您可以在代码中将解析器更改为其他可用的解析器之一,例如:html = bs4.BeautifulSoup(html, "html.parser")- 1
或者
html = bs4.BeautifulSoup(html, "html5lib")- 1
-
检查
lxml库版本:如果您已经安装了lxml库,但仍然遇到问题,可能是因为lxml版本与BeautifulSoup不兼容。尝试升级lxml到最新版本,或者降低BeautifulSoup的版本,以确保它们之间的兼容性。


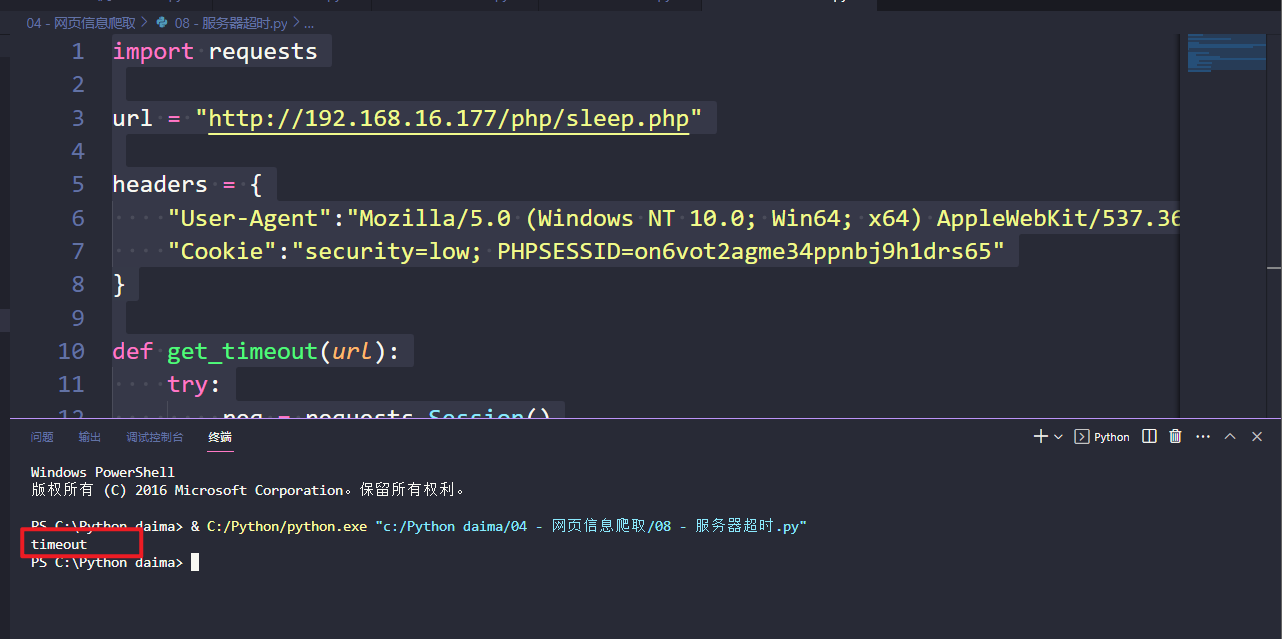
3.5 服务器超时
创建一个php文件sleep.php
sleep(10); echo "My name is xujie"; ?>- 1
- 2
- 3
- 4
import requests url = "http://192.168.16.177/php/sleep.php" headers = { "User-Agent":"Mozilla/5.0 (Windows NT 10.0; Win64; x64) AppleWebKit/537.36 (KHTML, like Gecko) Chrome/108.0.5359.125 Safari/537.36", "Cookie":"security=low; PHPSESSID=on6vot2agme34ppnbj9h1drs65" } def get_timeout(url): try: req = requests.Session() res = req.get(url= url,headers= headers,timeout= 5) #等待超过5秒就不等了 except: return "timeout" else: return res.text print(get_timeout(url))- 1
- 2
- 3
- 4
- 5
- 6
- 7
- 8
- 9
- 10
- 11
- 12
- 13
- 14
- 15
- 16
- 17
- 18
- 19
echo "My name is xujie";- 1
?>
```python import requests url = "http://192.168.16.177/php/sleep.php" headers = { "User-Agent":"Mozilla/5.0 (Windows NT 10.0; Win64; x64) AppleWebKit/537.36 (KHTML, like Gecko) Chrome/108.0.5359.125 Safari/537.36", "Cookie":"security=low; PHPSESSID=on6vot2agme34ppnbj9h1drs65" } def get_timeout(url): try: req = requests.Session() res = req.get(url= url,headers= headers,timeout= 5) #等待超过5秒就不等了 except: return "timeout" else: return res.text print(get_timeout(url))- 1
- 2
- 3
- 4
- 5
- 6
- 7
- 8
- 9
- 10
- 11
- 12
- 13
- 14
- 15
- 16
- 17
- 18
- 19
- 20
- 21
- 22
- 23
-
相关阅读:
2.1、物理层的基本概念
自知则知之做做做做做做做做做做做做做
【Try to Hack】vulhub靶场搭建
仿牛客网项目---消息队列的实现
java计算机毕业设计基于安卓Android/微信小程序的在线装修预定系统APP
贪心算法|45.跳跃游戏II
信息系统项目管理师考试重点汇总,看完这篇再拿十分!
Git记录 上传至Gitee
Unity 灯光组件Light
函数、函数的傅里叶级数展开、傅里叶级数的和函数之间的关系
- 原文地址:https://blog.csdn.net/weixin_58954236/article/details/133150112
