-
Spring6.1之RestClient分析
1 RestClient、WebClient、HTTP Interface
1.1 介绍
1.1.1 简介
Spring框架一直提供了两种不同的客户端来执行http请求:RestTemplate:它在Spring 3中被引入,提供同步的阻塞式通信。
点击了解 Spring之RestTemplate详解WebClient:它在Spring 5的Spring WebFlux库中作为一部分被发布。它提供了流式API,遵循响应式模型。
由于
RestTemplate的方法暴露了太多的HTTP特性,导致了大量重载的方法,使用成本较高。WebClient是RestTemplate的替代品,支持同步和异步调用。它是Spring Web Reactive项目的一部分。现在
Spring 6.1 M1版本引入了RestClient。一个新的同步http客户端,其工作方式与WebClient类似,使用与RestTemplate相同的基础设施。HTTP Interface:Spring 6的第一个GA版本发布了,其中带来了一个新的特性——HTTP Interface。这个新特性,可以让开发者将HTTP服务,定义成一个包含特定注解标记的方法的Java接口,然后通过对接口方法的调用,完成HTTP请求。看起来很像使用Feign来完成远程服务调用1.1.2 WebClient与RestTemplate
WebClient优于RestTemplate的原因有几个:- 非阻塞 I/O:
WebClient构建在Reactor之上,它提供了一种非阻塞、反应式的方法来处理 I/O。这可以在高流量应用程序中实现更好的可扩展性和更高的性能。 - 函数式风格:
WebClient使用函数式编程风格,可以使代码更易于阅读和理解。它还提供了流畅的 API,可以更轻松地配置和自定义请求。 - 更好地支持流式传输:WebClient 支持请求和响应正文的流式传输,这对于处理大文件或实时数据非常有用。
- 改进的错误处理:
WebClient提供比RestTemplate更好的错误处理和日志记录,从而更轻松地诊断和解决问题。
1.1.3 RestClient和WebClient
RestClient和WebClient都是用于在Spring中进行HTTP请求的工具,但它们有一些关键的区别:- 模块位置:
RestClient是Spring 6.1 M1引入的一个新特性,它是Spring Framework中org.springframework.web.client包下的一部分,用于简化传统的REST客户端代码。
WebClient是Spring WebFlux中的一个模块,属于响应式编程的一部分,位于org.springframework.web.reactive.client包下。它是在Spring 5引入的,主要用于构建响应式的、非阻塞的 Web 客户端。 - 编程风格:
RestClient主要采用传统的阻塞式编程风格,适用于传统的Servlet环境。 WebClient是响应式编程的一部分,支持非阻塞式、异步的编程风格。它更适用于构建响应式的、高并发的应用。- 响应式支持:
WebClient提供了对响应式编程的支持,可以异步地处理HTTP请求和响应。
RestClient不提供响应式编程的支持,主要采用同步的方式进行HTTP请求和响应。 - 线程模型:
RestClient使用传统的阻塞式线程模型。
WebClient使用响应式线程模型,可以更好地处理并发请求。
1.2 RestClient
1.2.1 pom.xml
<parent> <groupId>org.springframework.bootgroupId> <artifactId>spring-boot-starter-parentartifactId> <version>3.2.0-M2version> <relativePath/> parent> <dependency> <groupId>org.springframework.bootgroupId> <artifactId>spring-boot-starter-webartifactId> dependency>- 1
- 2
- 3
- 4
- 5
- 6
- 7
- 8
- 9
- 10

1.2.2 创建全局 RestClient
创建
RestClient实例有可用的静态方法:create():委托给默认的 rest 客户端。create(String url):接受一个默认的基础 url。create(RestTemplate restTemplate):基于给定 rest 模板的配置初始化一个新的 RestClient。builder():允许使用 headers、错误处理程序、拦截器等选项自定义一个RestClient。builder(RestTemplate restTemplate):基于给定 RestTemplate 的配置获取一个RestClient builder
让我们使用 builder 方法调用客户
API来编写一个RestClientRestClient restClient = RestClient.builder() .baseUrl(properties.getUrl()) .defaultHeader(HttpHeaders.AUTHORIZATION, encodeBasic("pig", "pig") ).build();- 1
- 2
- 3
- 4
- 5
参数说明:
baseUrl:设置基础 urldefaultHeader:允许设置一个默认http请求头
1.2.3 Get接收数据 retrieve
使用客户端发送
http请求并接收响应。
RestClient为每种HTTP方法都提供了方法。例如,要搜索所有活动客户,必须执行GET请求。retrieve方法获取响应并声明如何提取它。让我们从使用完整正文作为
String的简单情况开始。String data = restClient.get() .uri("?name={name}&type={type}", "lengleng", "1") .accept(MediaType.APPLICATION_JSON) .retrieve() .body(String.class); logger.info(data);- 1
- 2
- 3
- 4
- 5
- 6
- 7
uri方法可以设置http参数第一个参数(一个字符串模板)是附加到RestClient中定义的base url的查询字符串。第二个参数是模板的uri变量(varargs)。我们还指定媒体类型为
JSON。输出显示在控制台中:[ { "id":1, "name":"lengleng", "type":"1" } ]- 1
- 2
- 3
- 4
- 5
- 6
- 7
如果需要检查响应状态码或响应头怎么办,
toEntity方法会返回一个ResponseEntity。ResponseEntity response = restClient.get() .uri("?name={name}&type={type}", "lengleng", "1") .accept(MediaType.APPLICATION_JSON) .retrieve() .toEntity(String.class); logger.info("Status " + response.getStatusCode()); logger.info("Headers " + response.getHeaders());- 1
- 2
- 3
- 4
- 5
- 6
- 7
- 8
1.2.4 结果转换 Bean
RestClient还可以将响应主体转换为JSON格式。Spring将自动默认注册MappingJackson2HttpMessageConverter或MappingJacksonHttpMessageConverter,如果在类路径中检测到Jackson 2库或Jackson库。但是可以注册自己的消息转换器并覆盖默认设置。在我们的例子中,响应可以直接转换为记录。例如,检索特定客户的 API:
ReqUserResponse customer = restClient.get() .uri("/{name}","lengleng") .accept(MediaType.APPLICATION_JSON) .retrieve() .body(ReqUserResponse.class); logger.info("res name: " + customer.personInfo().name());- 1
- 2
- 3
- 4
- 5
- 6
- 7
要搜索客户,我们只需要使用
List类,如下所示:List<ReqUserResponse> customers = restClient.get() .uri("?type={type}", "1") .accept(MediaType.APPLICATION_JSON) .retrieve() .body(List.class); logger.info("res size " + customers.size());- 1
- 2
- 3
- 4
- 5
- 6
- 7
1.2.5 Post发布数据
要发送 post 请求,只需调用 post 方法。下一段代码片段创建一个新客户。
ReqUserResponse customer = new ReqUserResponse( "lengleng-plus", "1" ); ResponseEntity<Void> response = restClient.post() .accept(MediaType.APPLICATION_JSON) .body(customer) .retrieve() .toBodilessEntity(); if (response.getStatusCode().is2xxSuccessful()) { logger.info("Created " + response.getStatusCode()); logger.info("New URL " + response.getHeaders().getLocation()); }- 1
- 2
- 3
- 4
- 5
- 6
- 7
- 8
- 9
- 10
- 11
- 12
- 13
- 14
- 15
响应代码确认客户已成功创建:
Created 201 CREATED New URL http://localhost:8080/api/v1/customers/11- 1
- 2
要验证客户是否已添加,可以通过 postman 检索以上 URL:
{ "id": 2, "name": "lengleng-plus", "type": "1" }- 1
- 2
- 3
- 4
- 5
当然,可以使用与前一节类似的代码通过
RestClient获取它。1.2.6 Delete删除数据
调用 delete 方法发出 HTTP delete 请求尝试删除资源非常简单。
ResponseEntity<Void> response = restClient.delete() .uri("/{id}",2) .accept(MediaType.APPLICATION_JSON) .retrieve() .toBodilessEntity(); logger.info("Deleted with status " + response.getStatusCode());- 1
- 2
- 3
- 4
- 5
- 6
- 7
值得一提的是,如果操作成功,响应主体将为空。对于这种情况,
toBodilessEntity方法非常方便。要删除的客户 ID 作为 uri 变量传递。Deleted with status 204 NO_CONTENT- 1
1.2.7 处理错误
如果我们尝试删除或查询一个不存在的客户会发生什么?客户端点将返回一个 404 错误代码以及消息详细信息。然而,每当接收到客户端错误状态码(400-499)或服务器错误状态码(500-599)时,
RestClient将抛出RestClientException的子类。要定义自定义异常处理程序,有两种选项适用于不同的级别:
在
RestClient中使用defaultStatusHandler方法(对其发送的所有 http 请求)RestClient restClient = RestClient.builder() .baseUrl(properties.getUrl()) .defaultHeader(HttpHeaders.AUTHORIZATION, encodeBasic("pig","pig")) .defaultStatusHandler( HttpStatusCode::is4xxClientError, (request, response) -> { logger.error("Client Error Status " + response.getStatusCode()); logger.error("Client Error Body "+new String(response.getBody().readAllBytes())); }) .build();- 1
- 2
- 3
- 4
- 5
- 6
- 7
- 8
- 9
- 10
- 11
在运行删除命令行运行程序后,控制台的输出如下:
Client Error Status 404 NOT_FOUND Client Error Body {"status":404,"message":"Entity Customer for id 2 was not found.","timestamp":"2023-07-23T09:24:55.4088208"}- 1
- 2
另一种选择是为删除操作实现
onstatus方法。它优先于RestClient默认处理程序行为。ResponseEntity response = restClient.delete() .uri("/{id}",2) .accept(MediaType.APPLICATION_JSON) .retrieve() .onStatus(HttpStatusCode::is4xxClientError, (req, res) -> logger.error("Couldn't delete "+res.getStatusText()) ) .toBodilessEntity(); if (response.getStatusCode().is2xxSuccessful()) logger.info("Deleted with status " + response.getStatusCode());- 1
- 2
- 3
- 4
- 5
- 6
- 7
- 8
- 9
- 10
- 11
现在控制台中的消息将是:
Couldn't delete Not Found- 1
1.2.8 Exchange 方法
当响应必须根据响应状态进行不同解码时,
exchange方法很有用。使用exchange方法时,状态处理程序将被忽略。在这个虚构的示例代码中,响应基于状态映射到实体:
SimpleResponse simpleResponse = restClient.get() .uri("/{id}",4) .accept(MediaType.APPLICATION_JSON) .exchange((req,res) -> switch (res.getStatusCode().value()) { case 200 -> SimpleResponse.FOUND; case 404 -> SimpleResponse.NOT_FOUND; default -> SimpleResponse.ERROR; } );- 1
- 2
- 3
- 4
- 5
- 6
- 7
- 8
- 9
- 10
1.3 WebClient
1.3.1 创建网络客户端
import io.netty.channel.ChannelOption; import io.netty.channel.ConnectTimeoutException; import io.netty.handler.timeout.ReadTimeoutException; import io.netty.handler.timeout.ReadTimeoutHandler; import io.netty.handler.timeout.TimeoutException; import jakarta.annotation.PostConstruct; import java.time.Duration; import org.slf4j.Logger; import org.slf4j.LoggerFactory; import org.springframework.beans.factory.annotation.Value; import org.springframework.http.HttpMethod; import org.springframework.http.MediaType; import org.springframework.http.client.reactive.ReactorClientHttpConnector; import org.springframework.stereotype.Service; import org.springframework.web.reactive.function.client.WebClient; import org.springframework.web.reactive.function.client.WebClientRequestException; import org.springframework.web.reactive.function.client.WebClientResponseException; import reactor.core.publisher.Mono; import reactor.netty.http.client.HttpClient; HttpClient httpClient = HttpClient.create() .option(ChannelOption.CONNECT_TIMEOUT_MILLIS, connectionTimeout) .responseTimeout(Duration.ofMillis(requestTimeout)) .doOnConnected(conn -> conn.addHandlerLast(new ReadTimeoutHandler(readTimeout))); WebClient client = WebClient.builder().clientConnector(new ReactorClientHttpConnector(httpClient)).build();- 1
- 2
- 3
- 4
- 5
- 6
- 7
- 8
- 9
- 10
- 11
- 12
- 13
- 14
- 15
- 16
- 17
- 18
- 19
- 20
- 21
- 22
- 23
- 24
- 25
- 26
- 27
- 28
- 29
1.3.2 同步发送请求(与RestTemplate一样)
如果想坚持使用发送
HTTP请求并等待响应的老方法,也可以使用WebClient实现如下所示的相同功能:public String postSynchronously(String url, String requestBody) { LOG.info("Going to hit API - URL {} Body {}", url, requestBody); String response = ""; try { response = client .method(HttpMethod.POST) .uri(url) .accept(MediaType.ALL) .contentType(MediaType.APPLICATION_JSON) .bodyValue(requestBody) .retrieve() .bodyToMono(String.class) .block(); } catch (Exception ex) { LOG.error("Error while calling API ", ex); throw new RunTimeException("XYZ service api error: " + ex.getMessage()); } finally { LOG.info("API Response {}", response); } return response; }- 1
- 2
- 3
- 4
- 5
- 6
- 7
- 8
- 9
- 10
- 11
- 12
- 13
- 14
- 15
- 16
- 17
- 18
- 19
- 20
- 21
- 22
- 23
- 24
block()用于同步等待响应,这可能并不适合所有情况,可能需要考虑subscribe()异步使用和处理响应。1.3.3 异步发送请求
有时我们不想等待响应,而是希望异步处理响应,这可以按如下方式完成:
import org.springframework.http.MediaType; import org.springframework.web.reactive.function.BodyInserters; import org.springframework.web.reactive.function.client.WebClient; import reactor.core.publisher.Mono; public static Mono<String> makePostRequestAsync(String url, String postData) { WebClient webClient = WebClient.builder().build(); return webClient.post() .uri(url) .contentType(MediaType.APPLICATION_FORM_URLENCODED) .body(BodyInserters.fromFormData("data", postData)) .retrieve() .bodyToMono(String.class); }- 1
- 2
- 3
- 4
- 5
- 6
- 7
- 8
- 9
- 10
- 11
- 12
- 13
- 14
要使用此函数,只需传入要向其发送
POST请求的URL以及要在请求正文中以URL编码字符串形式发送的数据。该函数将返回来自服务器的响应,或者如果请求由于任何原因失败,则返回一条错误消息。注意:在此示例中,WebClient是使用默认配置构建的。可能需要根据不同要求进行不同的配置。
另请注意,block()用于同步等待响应,这可能并不适合所有情况。可能需要考虑subscribe()异步使用和处理响应。要使用响应,可以订阅Mono并异步处理响应。下面是一个例子:
makePostRequestAsync( "https://example.com/api" , "param1=value1¶m2=value2" ) .subscribe(response -> { // 处理响应 System.out.println ( response ); }, error -> { / / 处理错误 System.err.println ( error .getMessage ()); } );- 1
- 2
- 3
- 4
- 5
- 6
- 7
- 8
- 9
subscribe()用于异步处理响应,可以提供两个lambda表达式作为subscribe()的参数。如果请求成功并收到响应作为参数,则执行第一个lambda表达式;如果请求失败并收到错误作为参数,则执行第二个lambda表达式1.3.4 处理4XX和5XX错误
import org.springframework.http.HttpStatus; import org.springframework.http.MediaType; import org.springframework.web.reactive.function.BodyInserters; import org.springframework.web.reactive.function.client.WebClient; import reactor.core.publisher.Mono; public static Mono<String> makePostRequestAsync(String url, String postData) { WebClient webClient = WebClient.builder() .baseUrl(url) .build(); return webClient.post() .uri("/") .contentType(MediaType.APPLICATION_FORM_URLENCODED) .body(BodyInserters.fromFormData("data", postData)) .retrieve() .onStatus(HttpStatus::is4xxClientError, clientResponse -> Mono.error(new RuntimeException("Client error"))) .onStatus(HttpStatus::is5xxServerError, clientResponse -> Mono.error(new RuntimeException("Server error"))) .bodyToMono(String.class); }- 1
- 2
- 3
- 4
- 5
- 6
- 7
- 8
- 9
- 10
- 11
- 12
- 13
- 14
- 15
- 16
- 17
- 18
- 19
在此示例中,该
onStatus()方法被调用两次,一次针对4xx客户端错误,一次针对5xx服务器错误。onStatus()每次调用都采用两个参数:- aPredicate确定错误状态代码是否与条件匹配
- aFunction用于返回Mono,即要传播到订阅者的错误信息。
如果状态代码与条件匹配,
Mono则会发出相应的状态代码,并且Mono链会因错误而终止。在此示例中,Mono将发出一条RuntimeException错误消息,指示该错误是客户端错误还是服务器错误。1.3.5 根据错误状态采取行动
要根据
Mono的subscribe()方法中的错误采取操作,可以在subscribe函数中处理响应的lambda表达式之后添加另一个lambda表达。如果在处理Monumber的过程中出现错误,则执行第二个lambda表达式。下面是如何使用makePostRequestAsync函数和处理subscribe方法中的错误的更新示例:
makePostRequestAsync("https://example.com/api", "param1=value1¶m2=value2") .subscribe(response -> { // handle the response System.out.println(response); }, error -> { // handle the error System.err.println("An error occurred: " + error.getMessage()); if (error instanceof WebClientResponseException) { WebClientResponseException webClientResponseException = (WebClientResponseException) error; int statusCode = webClientResponseException.getStatusCode().value(); String statusText = webClientResponseException.getStatusText(); System.err.println("Error status code: " + statusCode); System.err.println("Error status text: " + statusText); } });- 1
- 2
- 3
- 4
- 5
- 6
- 7
- 8
- 9
- 10
- 11
- 12
- 13
- 14
- 15
subscribe方法中的第二个lambda表达式检查错误是否是WebClientResponseException的实例,这是WebClient在服务器有错误响应时抛出的特定类型的异常。如果它是WebClientResponseException的实例,则代码将从异常中提取状态代码和状态文本,并将它们记录到日志中。1.3.6 处理成功响应和错误的完整代码
responseMono.subscribe( response -> { // handle the response LOG.info("SUCCESS API Response {}", response); }, error -> { // handle the error LOG.error("An error occurred: {}", error.getMessage()); LOG.error("error class: {}", error.getClass()); // Errors / Exceptions from Server if (error instanceof WebClientResponseException) { WebClientResponseException webClientResponseException = (WebClientResponseException) error; int statusCode = webClientResponseException.getStatusCode().value(); String statusText = webClientResponseException.getStatusText(); LOG.info("Error status code: {}", statusCode); LOG.info("Error status text: {}", statusText); if (statusCode >= 400 && statusCode < 500) { LOG.info( "Error Response body {}", webClientResponseException.getResponseBodyAsString()); } Throwable cause = webClientResponseException.getCause(); LOG.error("webClientResponseException"); if (null != cause) { LOG.info("Cause {}", cause.getClass()); if (cause instanceof ReadTimeoutException) { LOG.error("ReadTimeout Exception"); } if (cause instanceof TimeoutException) { LOG.error("Timeout Exception"); } } } // Client errors i.e. Timeouts etc - if (error instanceof WebClientRequestException) { LOG.error("webClientRequestException"); WebClientRequestException webClientRequestException = (WebClientRequestException) error; Throwable cause = webClientRequestException.getCause(); if (null != cause) { LOG.info("Cause {}", cause.getClass()); if (cause instanceof ReadTimeoutException) { LOG.error("ReadTimeout Exception"); } if (cause instanceof ConnectTimeoutException) { LOG.error("Connect Timeout Exception"); } } } });- 1
- 2
- 3
- 4
- 5
- 6
- 7
- 8
- 9
- 10
- 11
- 12
- 13
- 14
- 15
- 16
- 17
- 18
- 19
- 20
- 21
- 22
- 23
- 24
- 25
- 26
- 27
- 28
- 29
- 30
- 31
- 32
- 33
- 34
- 35
- 36
- 37
- 38
- 39
- 40
- 41
- 42
- 43
- 44
- 45
- 46
- 47
- 48
- 49
- 50
- 51
- 52
- 53
- 54
1.3.7 超时
我们可以在每个请求中设置超时,如下所示:
return webClient .method(this.httpMethod) .uri(this.uri) .headers(httpHeaders -> httpHeaders.addAll(additionalHeaders)) .bodyValue(this.requestEntity) .retrieve() .bodyToMono(responseType) .timeout(Duration.ofMillis(readTimeout)) // request timeout for this request .block();- 1
- 2
- 3
- 4
- 5
- 6
- 7
- 8
- 9
但是,我们无法在每个请求中设置连接超时,这是
WebClient的属性,只能设置一次。如果需要,我们始终可以使用新的连接超时值创建一个新的Web客户端实例。连接超时、读取超时和请求超时的区别如下:

1.4 HTTP Interface
1.4.1 示例
1.4.1.1 创建服务端
首先创建一个简单的
HTTP服务,这一步可以创建一个简单的Spring Boot工程来完成。
先创建一个实体类:public class User implements Serializable { private int id; private String name; // 省略构造方法、Getter和Setter @Override public String toString() { return id + ":" + name; } }- 1
- 2
- 3
- 4
- 5
- 6
- 7
- 8
- 9
- 10
再写一个简单的 Controller:
@GetMapping("/users") public List<User> list() { return IntStream.rangeClosed(1, 10) .mapToObj(i -> new User(i, "User" + i)) .collect(Collectors.toList()); }- 1
- 2
- 3
- 4
- 5
- 6
确保启动服务之后,能够从http://localhost:8080/users地址获取到一个包含十个用户信息的用户列表。
1.4.1.2 SpringBoot工程
下面我们新建一个 SpringBoot 工程

这里需要注意,
Spring Boot的版本至少需要是3.0.0,这样它以来的Spring Framework版本才是6.0的版本,才能够包含HTTP Interface特性,另外,Spring Framework 6.0和Spring Boot 3.0开始支持的Java 版本最低是 17,因此,需要选择至少是 17 的 Java 版本。
另外,需要依赖Spring Web和Spring Reactive Web依赖由于
Http Interface需要依赖webflux来实现,我们还需添加它的依赖。<dependency> <groupId>org.springframework.bootgroupId> <artifactId>spring-boot-starter-webfluxartifactId> dependency>- 1
- 2
- 3
- 4
创建好新的
SpringBoot工程后,首先需要定义一个HTTPInterface接口。最简单的定义如下即可:
需要通过@HttpExchange声明一个Http服务,使用@GetExchange注解表示进行GET请求;@HttpExchange public interface UserApiService { @GetExchange("/users") List<User> getUsers(); }- 1
- 2
- 3
- 4
- 5
然后,我们可以写一个测试方法。
@Test public void getUsers() { WebClient client = WebClient.builder().baseUrl("http://localhost:8080/").build(); HttpServiceProxyFactory factory = HttpServiceProxyFactory.builder(WebClientAdapter.forClient(client)).build(); UserApiService service = factory.createClient(UserApiService.class); List<User> users = service.getUsers(); for (User user : users) { System.out.println(user); } }- 1
- 2
- 3
- 4
- 5
- 6
- 7
- 8
- 9
- 10
1.4.2 深入分析
1.4.2.1 GetExchange(HttpExchange)
上文例子中的
GetExchange注解代表这个方法代替执行一个HTTP Get请求,与此对应,Spring还包含了其他类似的注解:

这些注解定义在
spring-web模块的org.springframework.web.service.annotation包下,除了HttpExchange之外,其他的几个都是HttpExchange的特殊形式,这一点与Spring MVC中的RequestMapping/GetMapping等注解非常相似。以下是 HttpExchange 的源码:
@Target({ElementType.TYPE, ElementType.METHOD}) @Retention(RetentionPolicy.RUNTIME) @Documented @Mapping @Reflective(HttpExchangeReflectiveProcessor.class) public @interface HttpExchange { @AliasFor("url") String value() default ""; @AliasFor("value") String url() default ""; String method() default ""; String contentType() default ""; String[] accept() default {}; }- 1
- 2
- 3
- 4
- 5
- 6
- 7
- 8
- 9
- 10
- 11
- 12
- 13
- 14
- 15
- 16
- 17
- 18
- 19
- 20
在上面的例子中,我们只指定了请求的资源路径。
1.4.2.2 UserApiService 实例创建
在上面例子中,我们定义的
HTTP Interface接口是UserApiService,在测试方法中,我们通过HttpServiceProxyFactory创建了UserApiService的实例,这是参考了Spring的官方文档的写法。
也可以将创建的过程写到一个@Bean方法中,从而可以将创建好的实例注入到其他的组件中。我们再定义
UserApiService的时候,只是声明了一个接口,那具体的请求操作是怎么发出的呢,我们可以通过DEBUG模式看得出来,这里创建的UserApiService的实例,是一个代理对象:
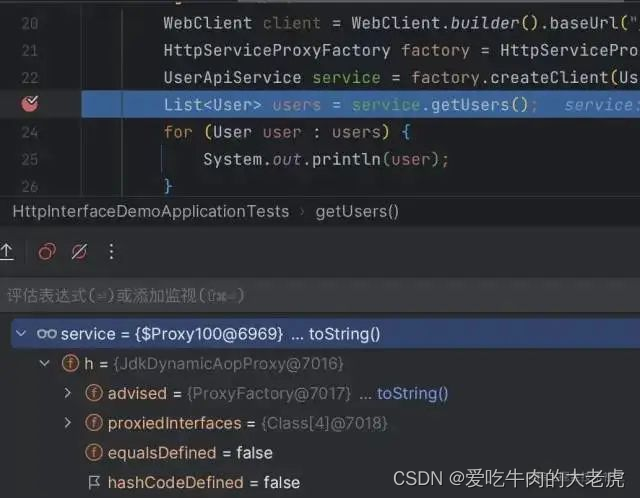
目前,
Spring还没有提供更方便的方式来创建这些代理对象,不过,之后的版本肯定会提供,如果感兴趣的话,可以从HttpServiceProxyFactory的createClient方法的源码中看到一些与创建AOP代理相似的代码,因此,我推测 Spring 之后可能会增加类似的注解来方便地创建代理对象。1.4.3 其他特性
除了上述例子中的简单使用之外,添加了
HttpExchange的方法还支持各种类型的参数,这一点也与Spring MVC的Controller方法类似,方法的返回值也可以是任意自定义的实体类型(就像上面的例子一样),此外,还支持自定义的异常处理。上面例子中为什么需要
Spring Reactive Web的依赖
引入了Spring Reactive Web的依赖,在创建代理的service对象的时候,使用了其中的WebClient类型。这是因为,HTTP Interface目前只内置了WebClient的实现,它属于Reactive Web的范畴。Spring在会在后续版本中推出基于RestTemplate的实现。 -
相关阅读:
设计模式day11
Android FloatingActionButton 使用神坑记录
windwos下配置ssh方式连接github/gitee,及常见连接失败问题解决
阿桑的感慨
JUC并发编程第八篇,谈谈你对CAS的理解?自旋锁,CAS底层原理和存在的问题?
Linux常用命令
RocketMQ源码解析-topic创建机制
【Three.js】知识梳理二十二:相机视角的平滑过渡与点击模型视角切换
SpringBoot集成RabbitMQ(生产者)
Programming Languages PartB Week3学习笔记——动态还是静态?编程语言哲学
- 原文地址:https://blog.csdn.net/u012060033/article/details/132714656
