-
SpringMVC_基本使用
一、JavaWEB
1.回顾 JavaWEB
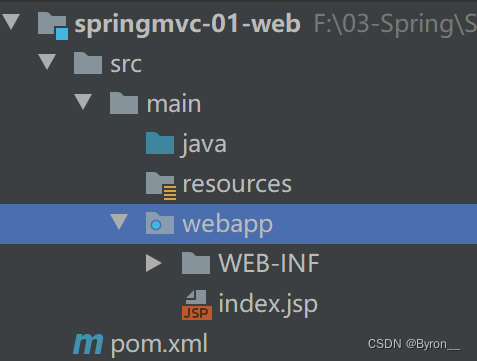
1.1新建项目结构
-
新建 javaweb 项目目录结构
1.2导入依赖
-
依赖
<dependency> <groupId>javax.servlet</groupId> <artifactId>javax.servlet-api</artifactId> <version>3.1.0</version> <scope>provided</scope> </dependency> <dependency> <groupId>javax.servlet</groupId> <artifactId>jsp-api</artifactId> <version>2.0</version> <scope>provided</scope> </dependency> <dependency> <groupId>jstl</groupId> <artifactId>jstl</artifactId> <version>1.2</version> </dependency> <dependency> <groupId>taglibs</groupId> <artifactId>standard</artifactId> <version>1.1.2</version> </dependency>- 1
- 2
- 3
- 4
- 5
- 6
- 7
- 8
- 9
- 10
- 11
- 12
- 13
- 14
- 15
- 16
- 17
- 18
- 19
- 20
- 21
- 22
- 23
1.3实现第一个 servlet
-
通过注解写 servlet 实现 HttpServlet
@WebServlet("/first") public class FirstServlet extends HttpServlet { @Override protected void service(HttpServletRequest req, HttpServletResponse resp) throws ServletException, IOException { System.out.println("====进入了servlet==="); req.setAttribute("username","sy"); req.getRequestDispatcher("/test.jsp").forward(req,resp); } }- 1
- 2
- 3
- 4
- 5
- 6
- 7
- 8
- 9
- 10
-
通过 web.xml 配置
<web-app> <display-name>Archetype Created Web Application</display-name> <servlet> <servlet-name>first-servlet</servlet-name> <servlet-class>cn.sycoder.FirstServlet</servlet-class> </servlet> <servlet-mapping> <servlet-name>first-servlet</servlet-name> <url-pattern>/test</url-pattern> </servlet-mapping> </web-app>- 1
- 2
- 3
- 4
- 5
- 6
- 7
- 8
- 9
- 10
- 11
-
开启 el 表达式支持
<%@ page contentType="text/html;charset=UTF-8" language="java" %> <%@ taglib uri="http://java.sun.com/jsp/jstl/core" prefix="c" %> <%@page isELIgnored="false" %> <html> <head> <title>Title</title> </head> <body> ${username} </body> </html>- 1
- 2
- 3
- 4
- 5
- 6
- 7
- 8
- 9
- 10
- 11
1.4思考问题
-
获取请求参数不方便
//获取请求参数 String username = req.getParameter("username"); String password = req.getParameter("password");- 1
- 2
- 3
-
给出的解决方案
-
如果可以直接从方法入参传参是不是很方便,可以直接拿来用
protected void service(String username,String password)- 1
-
-
设置响应视图或者设置响应的参数类型不方便
req.getRequestDispatcher("/test.jsp").forward(req,resp);- 1
-
给出的解决方案
-
如果不需要设置响应类型
-
如果不需要设置请求转发,直接跳转更方便
req.getRequestDispatcher("/test.jsp").forward(req,resp); //return "test";- 1
- 2
-
2.回顾MVC
- 概述:MVC是一种软件架构的思想,将软件按照模型、视图、控制器来划分
- MVC分别是什么
- M:Model:模型层,指工程中的JavaBean,作用是处理数据
- domain 对象,Student 对象
- 业务bean,Service,Mapper
- V:View:视图层,指工程中的html或jsp等页面,作用是与用户进行交互,展示数据
- C:Controller:控制层,指工程中的servlet,作用是接收请求和响应浏览器
- M:Model:模型层,指工程中的JavaBean,作用是处理数据
3.SpringMVC
- 概述:SpringMVC是一种基于原生的 Servlet 实现MVC模型的轻量级Web框架,基于原生的Servlet,通过前端控制器DispatcherServlet,对请求和响应进行统一处理
- 特点:
- Spring 系列产品,可以与Spring无缝衔接
- 基于原生的Servlet,使用DispatcherServlet对Servlet进行封装,可以对请求或者响应做统一的处理
- 组件非常丰富,以后想用什么组件,直接配置使用就可以
二、SpringMVC快速入门
1.基于XML方式配置
1.1导入依赖
-
导入依赖
<dependency> <groupId>org.springframework</groupId> <artifactId>spring-webmvc</artifactId> <version>5.2.17.RELEASE</version> </dependency> <dependency> <groupId>javax.servlet</groupId> <artifactId>javax.servlet-api</artifactId> <version>3.1.0</version> <scope>provided</scope> </dependency> <dependency> <groupId>javax.servlet</groupId> <artifactId>jsp-api</artifactId> <version>2.0</version> <scope>provided</scope> </dependency> <dependency> <groupId>jstl</groupId> <artifactId>jstl</artifactId> <version>1.2</version> </dependency> <dependency> <groupId>taglibs</groupId> <artifactId>standard</artifactId> <version>1.1.2</version> </dependency>- 1
- 2
- 3
- 4
- 5
- 6
- 7
- 8
- 9
- 10
- 11
- 12
- 13
- 14
- 15
- 16
- 17
- 18
- 19
- 20
- 21
- 22
- 23
- 24
- 25
- 26
- 27
- 28
1.2创建SpringMVC配置文件
-
配置文件
<?xml version="1.0" encoding="UTF-8"?> <beans xmlns="http://www.springframework.org/schema/beans" xmlns:xsi="http://www.w3.org/2001/XMLSchema-instance" xmlns:context="http://www.springframework.org/schema/context" xsi:schemaLocation="http://www.springframework.org/schema/beans http://www.springframework.org/schema/beans/spring-beans.xsd http://www.springframework.org/schema/context https://www.springframework.org/schema/context/spring-context.xsd"> <!-- 配置包扫描--> <context:component-scan base-package="cn.sycoder.controller"/> <bean id="view" class="org.springframework.web.servlet.view.InternalResourceViewResolver"> <!-- 配置视图前缀--> <property name="prefix" value="/WEB-INF/pages/"/> <!-- 配置视图后缀--> <property name="suffix" value=".jsp"/> </bean> </beans>- 1
- 2
- 3
- 4
- 5
- 6
- 7
- 8
- 9
- 10
- 11
- 12
- 13
- 14
1.3配置DispatcherServlet
-
web.xml
<!DOCTYPE web-app PUBLIC "-//Sun Microsystems, Inc.//DTD Web Application 2.3//EN" "http://java.sun.com/dtd/web-app_2_3.dtd" > <web-app> <display-name>Archetype Created Web Application</display-name> <servlet> <servlet-name>spring-mvc</servlet-name> <servlet-class>org.springframework.web.servlet.DispatcherServlet</servlet-class> <!-- 初始化 spring-mvc 配置--> <init-param> <param-name>contextConfigLocation</param-name> <param-value>classpath:spring-mvc.xml</param-value> </init-param> </servlet> <servlet-mapping> <servlet-name>spring-mvc</servlet-name> <url-pattern>/</url-pattern> </servlet-mapping> </web-app>- 1
- 2
- 3
- 4
- 5
- 6
- 7
- 8
- 9
- 10
- 11
- 12
- 13
- 14
- 15
- 16
- 17
- 18
- 19
- 20
- 21
1.4配置控制器
-
配置
@Controller public class XmlController { @RequestMapping("/test") public void test(){ System.out.println("---------"); } }- 1
- 2
- 3
- 4
- 5
- 6
- 7
- 8
1.5配置视图解析器
-
视图解析器
<?xml version="1.0" encoding="UTF-8"?> <beans xmlns="http://www.springframework.org/schema/beans" xmlns:xsi="http://www.w3.org/2001/XMLSchema-instance" xmlns:context="http://www.springframework.org/schema/context" xsi:schemaLocation="http://www.springframework.org/schema/beans http://www.springframework.org/schema/beans/spring-beans.xsd http://www.springframework.org/schema/context https://www.springframework.org/schema/context/spring-context.xsd"> <!-- 配置包扫描--> <context:component-scan base-package="cn.sycoder.controller"/> <bean id="view" class="org.springframework.web.servlet.view.InternalResourceViewResolver"> <!-- 配置视图前缀--> <property name="prefix" value="/WEB-INF/pages/"/> <!-- 配置视图后缀--> <property name="suffix" value=".jsp"/> </bean> </beans>- 1
- 2
- 3
- 4
- 5
- 6
- 7
- 8
- 9
- 10
- 11
- 12
- 13
- 14
-
视图解析操作
-
配置控制器
@RequestMapping("/login") public String login(String username, String password) { if ("sy".equals(username) && "123456".equals(password)) return "success"; return "fail"; }- 1
- 2
- 3
- 4
- 5
- 6
- 7
-
配置视图

-
2.基于注解方式配置
2.1导入依赖
-
导入依赖
<dependency> <groupId>org.springframework</groupId> <artifactId>spring-webmvc</artifactId> <version>5.2.17.RELEASE</version> </dependency> <dependency> <groupId>javax.servlet</groupId> <artifactId>javax.servlet-api</artifactId> <version>3.1.0</version> <scope>provided</scope> </dependency> <dependency> <groupId>javax.servlet</groupId> <artifactId>jsp-api</artifactId> <version>2.0</version> <scope>provided</scope> </dependency>- 1
- 2
- 3
- 4
- 5
- 6
- 7
- 8
- 9
- 10
- 11
- 12
- 13
- 14
- 15
- 16
- 17
2.2创建SpringMVC配置类
-
创建配置类
@Configuration @ComponentScan("cn.sycoder.controller") public class SpringMvcConfig { }- 1
- 2
- 3
- 4
2.3通过配置类替换web.xml
-
替换操作
public class ServletConfig extends AbstractDispatcherServletInitializer { @Override protected WebApplicationContext createServletApplicationContext() { //获取SpringMVC容器 AnnotationConfigWebApplicationContext context = new AnnotationConfigWebApplicationContext(); context.register(SpringMvcConfig.class);// 同等与mvc配置类替换xml文件 return context; } @Override protected String[] getServletMappings() { return new String[]{"/"}; } @Override protected WebApplicationContext createRootApplicationContext() { return null; } }- 1
- 2
- 3
- 4
- 5
- 6
- 7
- 8
- 9
- 10
- 11
- 12
- 13
- 14
- 15
- 16
- 17
- 18
- 19
- 20
2.4配置Controller
-
配置Controller
@Controller public class SpringMvcController { @RequestMapping("/get") public void getSpring(){ System.out.println("========"); } }- 1
- 2
- 3
- 4
- 5
- 6
- 7
四、请求
1.@RequestMapping
-
作用:设置请求映射路径
-
SpringMVC 接收到指定请求时,在映射关系中找到对应的控制方法
名称 @RequestMapping 位置 类或接口、或者方法上 作用 设置定义控制器方法的访问路径 属性 String[] value() 设置访问路径的,RequestMethod[] method() 指定访问方法 1.1 @ResponseBody与@RequestMapping的使用
-
当需要返回json串的时候才需要使用
@ResponseBody -
使用位置
@Controller @RequestMapping("/requestMappingController") public class RequestMappingController { @RequestMapping(headers ={"header=123"} ,value = {"/test"})// /requestMapping/test @ResponseBody public String test(){ System.out.println("============"); return "OK"; } }- 1
- 2
- 3
- 4
- 5
- 6
- 7
- 8
- 9
- 10
- 11
-
指定请求类型
- 延伸注解
- @GetMapping 发起get 请求
- @PostMapping 发起Post 请求
- @PutMapping 发起 put 请求
- @DeleteMapping 发起 delete 请求
@RequestMapping(value = "/test1",method = RequestMethod.POST) @ResponseBody public String test1(){ System.out.println("============"); return "OK"; }- 1
- 2
- 3
- 4
- 5
- 6
- 延伸注解
-
指定请求头(可以做权限拦截)(了解一下就行)
@RequestMapping(headers ={"header=123"} ,value = {"/test"})// /requestMapping/test @ResponseBody public String test(){ System.out.println("============"); return "OK"; }- 1
- 2
- 3
- 4
- 5
- 6
-
指定请求参数(没用)
@RequestMapping(params = {"username=123"},value = {"/test2"})// /requestMapping/test @ResponseBody public String test2(){ System.out.println("============"); return "OK"; }- 1
- 2
- 3
- 4
- 5
- 6
2.获取请求参数
2.1一般获取参数方式
-
获取方式
@Controller @RequestMapping("/requestParams") public class RequestParams { @RequestMapping("/test") @ResponseBody public String test(String username,String password){ System.out.println("username:"+username+",password:"+password); return "ok"; } }- 1
- 2
- 3
- 4
- 5
- 6
- 7
- 8
- 9
- 10
- 11
2.2参数名称不对应
-
@RequestParam
名称 @RequestParam 位置 控制器方法中的形参上 属性 boolean required() 表示是否必填String value(),参数重命名名称 作用 绑定请求参数与处理器方法之间形参的关系 -
出现问题,获取不到参数值

-
解决方案
@Controller @RequestMapping("/requestParams") public class RequestParams { @RequestMapping("/test") @ResponseBody public String test(@RequestParam(value = "un",required = false) String username, @RequestParam(value = "password1",required = false) String password){ System.out.println("username:"+username+",password:"+password); return "ok"; } }- 1
- 2
- 3
- 4
- 5
- 6
- 7
- 8
- 9
- 10
- 11
- 12
3.参数传递
3.1对象参数传递
-
传递方式
@RequestMapping("/user") @ResponseBody public String user(User user){ System.out.println("username:"+user.getAccount()+",password:"+user.getPassword()); return "ok"; }- 1
- 2
- 3
- 4
- 5
- 6
-
图示

3.2复合型对象参数传递
-
如果出现对象嵌套,直接通过属性名称.传参即可
public class User { private String account; private String password; private Address address; }- 1
- 2
- 3
- 4
- 5
- 6
-
图示

3.3数组参数传递
-
传数组
@RequestMapping("/array") @ResponseBody public String array(String[] cities){ System.out.println(Arrays.toString(cities)); return "ok"; }- 1
- 2
- 3
- 4
- 5
- 6
-
传递参数

3.4集合参数传递
-
传集合
@RequestMapping("/list") @ResponseBody public String list(@RequestParam List<String> cities){ System.out.println(cities); return "ok"; }- 1
- 2
- 3
- 4
- 5
- 6
-
传参图示

4.JSON 参数传递
- springMVC 默认支持的json处理不是使用fastjson,而是使用 jackson 处理的
4.1导入依赖
-
依赖
<dependency> <groupId>com.fasterxml.jackson.core</groupId> <artifactId>jackson-databind</artifactId> <version>2.12.5</version> </dependency>- 1
- 2
- 3
- 4
- 5
4.2开启 SpringMVC 注解支持
-
开启支持
@Configuration @ComponentScan("cn.sycoder.controller") @EnableWebMvc public class SpringMvcConfig { }- 1
- 2
- 3
- 4
- 5
-
@EnableWebMvc
名称 @EnableWebMvc 位置 SpringMVC 配置类上 作用 开启SpringMVC 的辅助功能支持 -
@RequestBody
名称 @RequestBody 位置 SpringMVC控制方法形参里面 作用 将请求中的请求体包含的数据传递给形参 属性 boolean required() 表示是否必填
4.2发送 json数据-@RequestBody
-
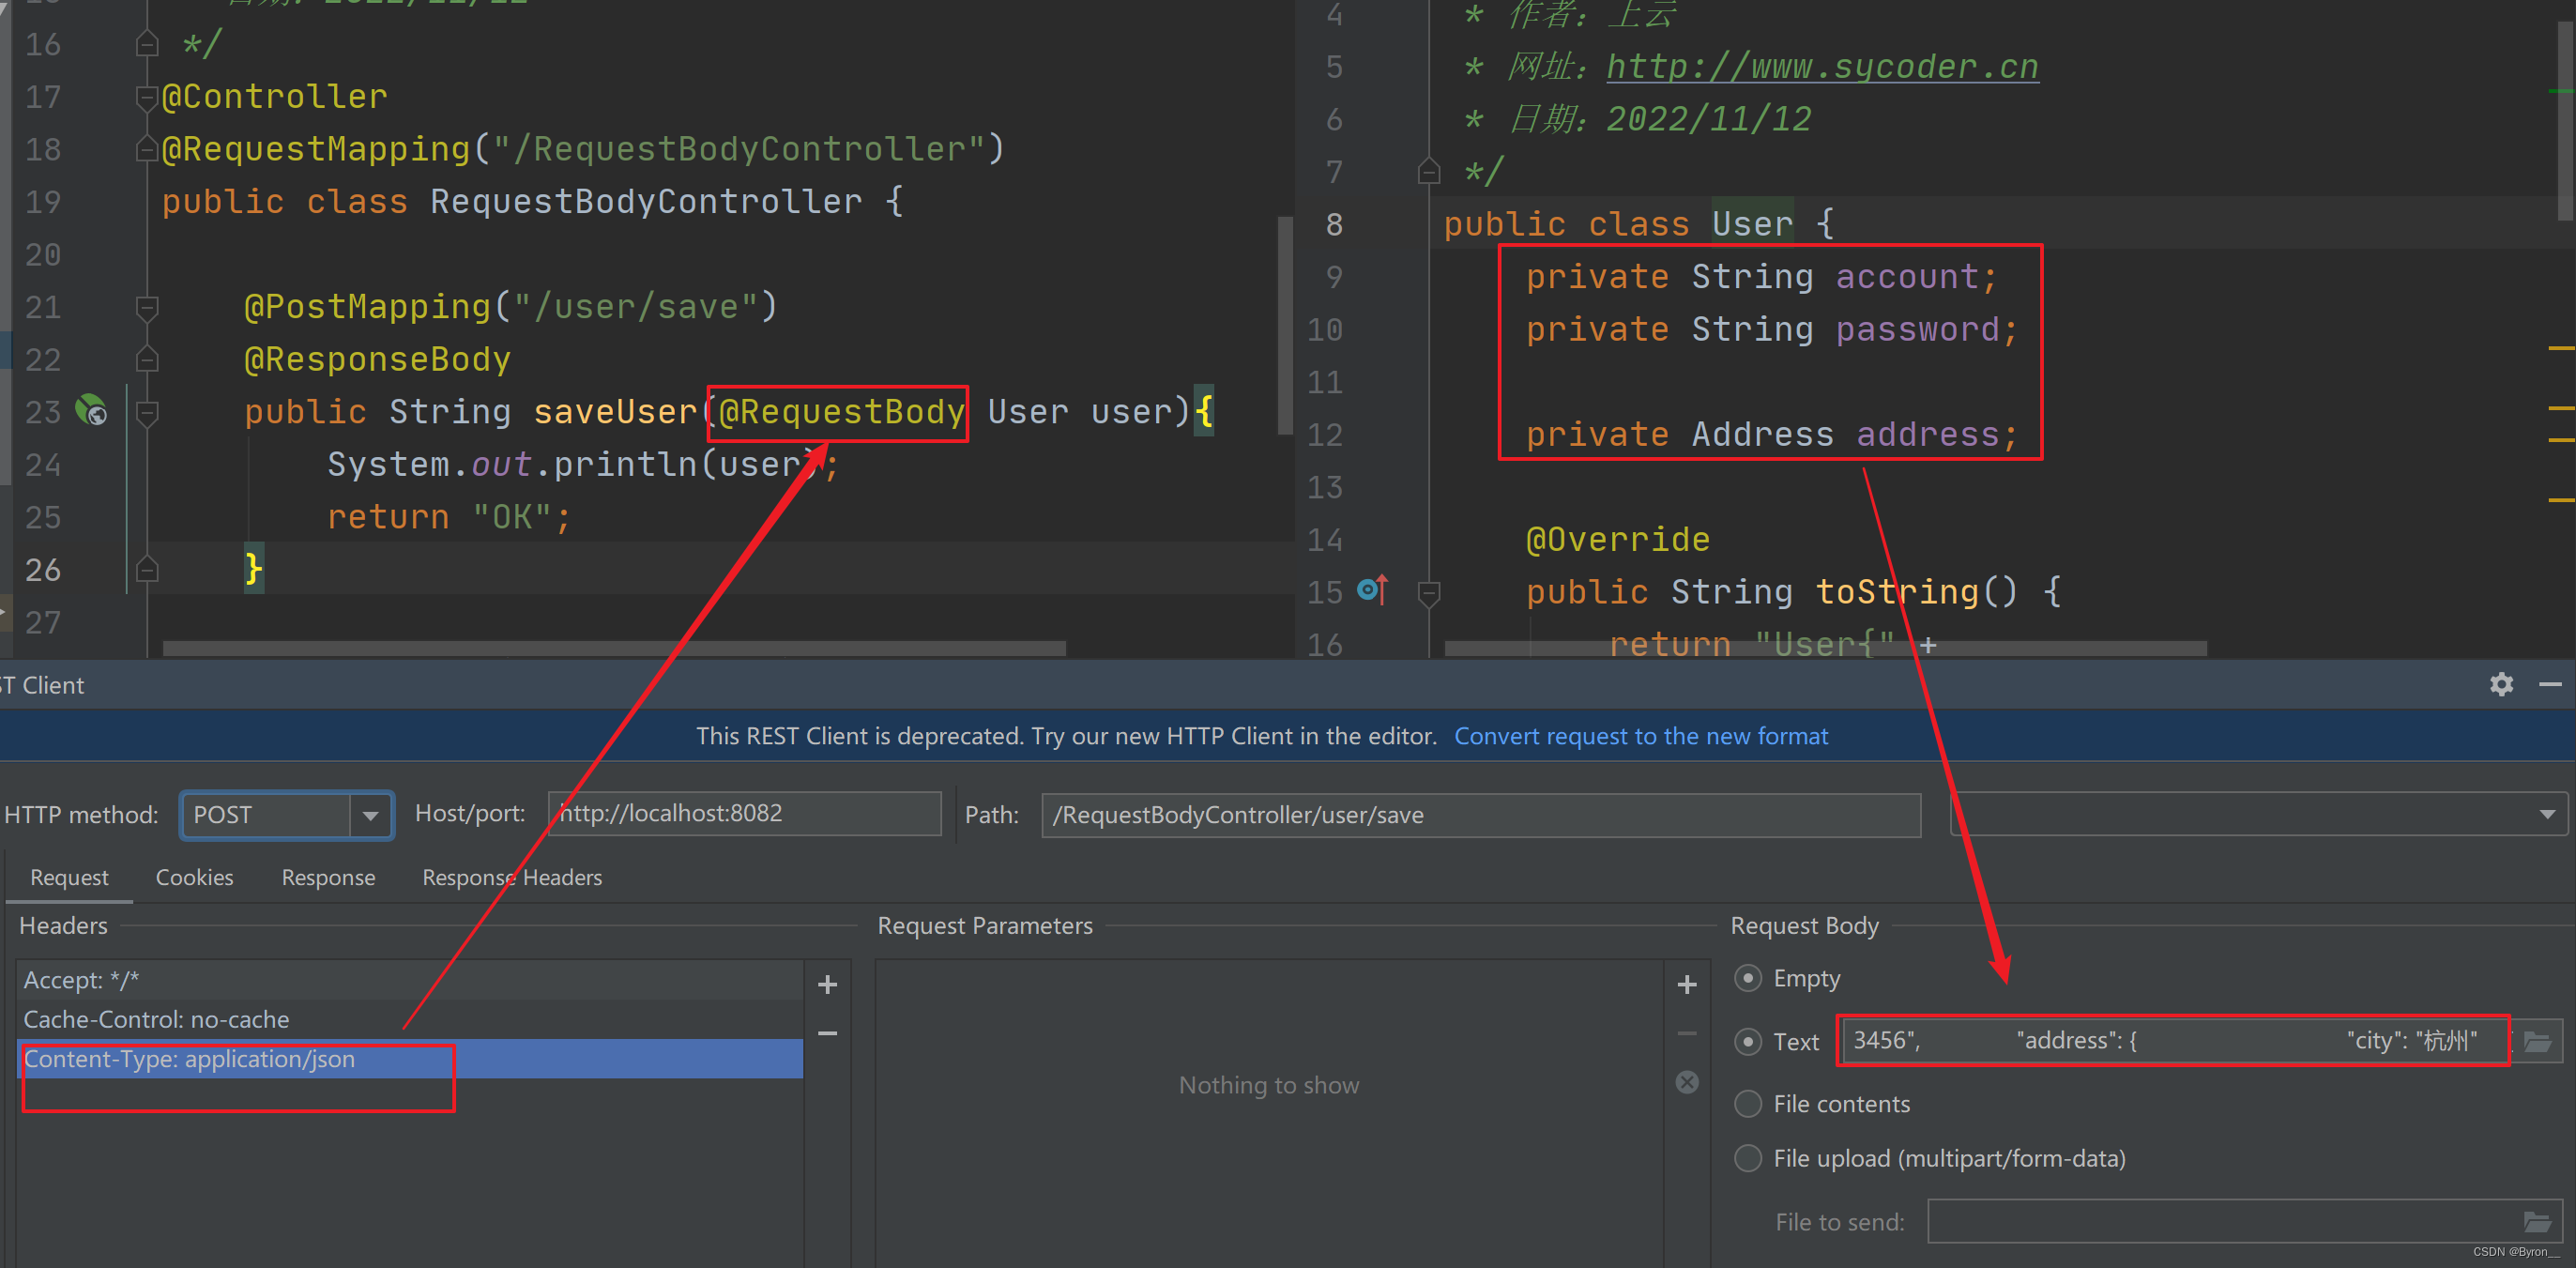
传送 json 用户数据到后台,只有加了@RequestBody这个注解,才可以通过json传递数据,并再前端需要设置contentType:application/json
@Controller @RequestMapping("/RequestBodyController") public class RequestBodyController { @PostMapping("/user/save") @ResponseBody public String saveUser(@RequestBody User user){ System.out.println(user); return "OK"; } }- 1
- 2
- 3
- 4
- 5
- 6
- 7
- 8
- 9
- 10
- 11
-
图示

-
如果 json 参数有嵌套也是老样子传参即可
{ "account": " 123", "password": "123456", "address": { "city": "杭州" } }- 1
-
接收图示
4.3传 json 数组到后台
-
传递json 数组
@PostMapping("/user/lists") @ResponseBody public String saveUser(@RequestBody List<String> lists){ System.out.println(lists); return "OK"; }- 1
- 2
- 3
- 4
- 5
- 6
-
图示

4.4传递对象集合json 数据
-
传递对象集合json数据
@PostMapping("/user/lists/user") @ResponseBody public String listUser(@RequestBody List<User> lists){ System.out.println(lists); return "OK"; }- 1
- 2
- 3
- 4
- 5
- 6
-
传递图示

-
json 数据
[{"account":" 123","password":"123456","address":{"city":"杭州"}},{"account":" sy","password":"123456","address":{"city":"北京"}}]- 1
5.@RequestParam 和 @RequestBody总结
- 区别
- @RequestBody 用于接收json 数据的[application/json]
- @RequestParam 用于接收 url 地址参数的 [application/x-www-form]
- 应用
- 后面的开发,都是前后端分离的,以 json 数据传输为主,所以 @RequestBody 使用更多
- 如果不是使用json传输,就用 @RequestParam
6.日期类型参数传递
- 2022-11-12
- 2022/11/12
6.1常规格式
-
控制器
@Controller @RequestMapping("/date") public class DateController { @RequestMapping("/test") @ResponseBody public String testDate(Date date){ System.out.println(date); return "ok"; } }- 1
- 2
- 3
- 4
- 5
- 6
- 7
- 8
- 9
- 10
- 11
-
图示

6.2修改格式
-
出现错误

-
定制化格式操作
@Controller @RequestMapping("/date") public class DateController { @RequestMapping("/test") @ResponseBody public String testDate(@DateTimeFormat(pattern = "yyyy-MM-dd") Date date){ System.out.println(date); return "ok"; } }- 1
- 2
- 3
- 4
- 5
- 6
- 7
- 8
- 9
- 10
- 11
6.3@DateTimeFormat
名称 @DateTimeFormat 作用 指定日期格式(yyyy-MM-dd) 属性 String pattern() 指定日期格式 使用位置 SpringMVC 控制器方法形参前面,还可以使用到具体的对象属性上 
6.4底层转换的原理

五、响应
1.注解配置的另一种方式
-
配置
public class ServletConfig extends AbstractAnnotationConfigDispatcherServletInitializer { @Override protected Class<?>[] getRootConfigClasses() { return new Class[0]; } @Override protected Class<?>[] getServletConfigClasses() { return new Class[]{SpringMvcConfig.class}; } @Override protected String[] getServletMappings() { return new String[]{"/"}; } }- 1
- 2
- 3
- 4
- 5
- 6
- 7
- 8
- 9
- 10
- 11
- 12
- 13
- 14
- 15
- 16
2.设置响应页面
-
注解配置视图解析器
@Configuration @ComponentScan("cn.sycoder.controller") @EnableWebMvc public class SpringMvcConfig implements WebMvcConfigurer { @Bean public ViewResolver viewResolver(){ InternalResourceViewResolver resolver = new InternalResourceViewResolver(); resolver.setPrefix("/WEB-INF/pages/"); resolver.setSuffix(".jsp"); return resolver; } }- 1
- 2
- 3
- 4
- 5
- 6
- 7
- 8
- 9
- 10
- 11
- 12
- 13
- 14
-
配置视图解析器之后跳转
@Controller public class TestController { @RequestMapping("/test") public String test(){ return "ok.jsp"; } //配置视图解析器之后的视图跳转 @RequestMapping("/view") public String view(){ return "view"; } }- 1
- 2
- 3
- 4
- 5
- 6
- 7
- 8
- 9
- 10
- 11
- 12
-
图示


3.响应文本类型
-
如果没有使用 @ResponseBody 会出现如下问题
@RequestMapping("/respbody") // @ResponseBody public String respbody(){ return "ok"; }- 1
- 2
- 3
- 4
- 5

-
响应文本类型使用 @ResponseBody
@RequestMapping("/respbody") @ResponseBody public String respbody(){ return "ok"; }- 1
- 2
- 3
- 4
- 5
4.响应JSON数据
-
使用 @ResponseBody + @EnableWebMvc 才能返回 json
-
SpringMVC 配置类
@Configuration @ComponentScan("cn.sycoder.controller") @EnableWebMvc public class SpringMvcConfig { @Bean public ViewResolver viewResolver(){ InternalResourceViewResolver resolver = new InternalResourceViewResolver(); resolver.setPrefix("/WEB-INF/pages/"); resolver.setSuffix(".jsp"); return resolver; } }- 1
- 2
- 3
- 4
- 5
- 6
- 7
- 8
- 9
- 10
- 11
- 12
- 13
- 14
4.1响应单个json对象
-
控制器方法使用 @ResponseBody
@RequestMapping("/userjson") @ResponseBody public User respUserJson(){ User user = new User(); user.setAddTime(new Date()); user.setName("sy"); user.setUsername("sy666"); user.setId(1L); return user; }- 1
- 2
- 3
- 4
- 5
- 6
- 7
- 8
- 9
- 10

4.2响应集合json对象
-
控制器方法
@RequestMapping("/listuserjson") @ResponseBody public List<User> respListUserJson(){ List<User> list = new ArrayList<>(); User user = new User(); user.setAddTime(new Date()); user.setName("sy"); user.setUsername("sy666"); user.setId(1L); list.add(user); User user1 = new User(); user1.setAddTime(new Date()); user1.setName("sy"); user1.setUsername("sy666"); user1.setId(1L); list.add(user1); return list; }- 1
- 2
- 3
- 4
- 5
- 6
- 7
- 8
- 9
- 10
- 11
- 12
- 13
- 14
- 15
- 16
- 17
- 18

4.3@RestController
-
@RestController = @Controller + @ResponseBody
-
应用
@RestController public class MyRestController { @RequestMapping("/listuserjson") public List<User> respListUserJson(){ List<User> list = new ArrayList<>(); User user = new User(); user.setAddTime(new Date()); user.setName("sy"); user.setUsername("sy666"); user.setId(1L); list.add(user); User user1 = new User(); user1.setAddTime(new Date()); user1.setName("sy"); user1.setUsername("sy666"); user1.setId(1L); list.add(user1); return list; } }- 1
- 2
- 3
- 4
- 5
- 6
- 7
- 8
- 9
- 10
- 11
- 12
- 13
- 14
- 15
- 16
- 17
- 18
- 19
- 20
- 21
4.4@ResponseBody 总结
名称 @ResponseBody 作用 设置控制器的返回值作为响应体,如果返回的是对象类型,会转换成 json 对象传输 位置 可以使用到类上,或者控制器方法上 六、域对象共享
1.HttpServletRequest
-
具体应用,就是jsp中可以获取后端的数据,通过el表达式获取到数据
@RequestMapping("/ok") public String okServletRequest(HttpServletRequest request){ request.setAttribute("ok","66666"); return "ok"; }- 1
- 2
- 3
- 4
- 5
-
jsp
<%@ page contentType="text/html;charset=UTF-8" language="java" %> <%@ taglib uri="http://java.sun.com/jsp/jstl/core" prefix="c" %> <%@page isELIgnored="false" %>Title ${ok}- 1
- 2
- 3
- 4
- 5
- 6
- 7
- 8
- 9
- 10
- 11
2.ModelAndView
-
具体应用
@RequestMapping("/modelAndView") public ModelAndView modelAndView(){ ModelAndView view = new ModelAndView(); view.setViewName("ok"); view.addObject("ok","=============="); return view; }- 1
- 2
- 3
- 4
- 5
- 6
- 7
-
jsp
<%@ page contentType="text/html;charset=UTF-8" language="java" %> <%@ taglib uri="http://java.sun.com/jsp/jstl/core" prefix="c" %> <%@page isELIgnored="false" %>Title ${ok}- 1
- 2
- 3
- 4
- 5
- 6
- 7
- 8
- 9
- 10
- 11
3.Map 向 Request 中共享数据
-
具体应用
@RequestMapping("/testMap") public String testMap(Map<String,Object> map){ map.put("ok","-------------"); return "ok"; }- 1
- 2
- 3
- 4
- 5
-
jsp
<%@ page contentType="text/html;charset=UTF-8" language="java" %> <%@ taglib uri="http://java.sun.com/jsp/jstl/core" prefix="c" %> <%@page isELIgnored="false" %>Title ${ok}- 1
- 2
- 3
- 4
- 5
- 6
- 7
- 8
- 9
- 10
- 11
七、RESTFul 风格
1.REST简介
- REST概述:Representational State Transfer,表现层资源状态转移
2.传统访问资源和 REST 对照
操作 传统方式 REST风格 查询操作 /student/getById?id=5 student/5 get请求 保存操作 /saveStudent student post 请求 更新 /updateStudent student put 请求 删除 /deleteById?id=5 student/5 delete 请求 - REST 优点
- 隐藏资源访问行为,做到无法根据资源访问猜测是什么样的逻辑
- 书写也简单化
- 注意
- REST 风格只是一种约定方式,并不是规范
- 以后通过 REST 风格访问网络资源就叫 RESTFul
3.案例实现
3.1案例分析

3.2传统实现方式
-
实现
@Controller @RequestMapping("/item") public class ItemController { //增加 @RequestMapping("/save") @ResponseBody public String save(@RequestBody Item item){ System.out.println(item); return "save OK"; } //删除 @RequestMapping("/delete") @ResponseBody public String delete(Long id){ System.out.println(id); return "delete OK"; } //修改 @RequestMapping("/update") @ResponseBody public String update(@RequestBody Item item){ System.out.println(item); return "update OK"; } //查询 @RequestMapping("/getById") @ResponseBody public String getById(Long id){ System.out.println(id); return "getById OK"; } }- 1
- 2
- 3
- 4
- 5
- 6
- 7
- 8
- 9
- 10
- 11
- 12
- 13
- 14
- 15
- 16
- 17
- 18
- 19
- 20
- 21
- 22
- 23
- 24
- 25
- 26
- 27
- 28
- 29
- 30
- 31
- 32
- 33
3.3RESTFul 实现方式
-
实现
@RestController public class ItemRestController { //增加 @PostMapping("/item") public String save(@RequestBody Item item){ System.out.println(item); return "rest save OK"; } //删除 @DeleteMapping("/item/{id}") public String delete(@PathVariable Long id){ System.out.println(id); return "rest delete OK"; } //修改 @PutMapping("/item") public String update(@RequestBody Item item){ System.out.println(item); return "rest update OK"; } //查询 @GetMapping("/item/{id}") public String getById(@PathVariable Long id){ System.out.println(id); return "rest getById OK"; } }- 1
- 2
- 3
- 4
- 5
- 6
- 7
- 8
- 9
- 10
- 11
- 12
- 13
- 14
- 15
- 16
- 17
- 18
- 19
- 20
- 21
- 22
- 23
- 24
- 25
- 26
- 27
4.静态资源的处理
4.1拷贝静态资源到项目webapp 下面

-
但是出现如下问题

-
原因:SpringMVC 拦截了静态资源,根据 /pages/item.html 去找对于的 controller 方法执行,匹配我们配置的 / 的getServletMappings,找不到所以 404
4.2解决方案
-
配置静态资源放行就可以了
-
配置如下
@Configuration public class StaticSupport extends WebMvcConfigurationSupport { @Override protected void addResourceHandlers(ResourceHandlerRegistry registry) { //当访问 /pages/ 资源的时候,设置放行 registry.addResourceHandler("/pages/**").addResourceLocations("/pages/"); registry.addResourceHandler("/js/**").addResourceLocations("/js/"); registry.addResourceHandler("/css/**").addResourceLocations("/css/"); registry.addResourceHandler("/plugins/**").addResourceLocations("/plugins/"); } }- 1
- 2
- 3
- 4
- 5
- 6
- 7
- 8
- 9
- 10
- 11
- 12
- 13
-
注意,需要将静态支持交给 springmvc 管理
@Configuration @ComponentScan("cn.sycoder") @EnableWebMvc public class SpringMvcConfig { }- 1
- 2
- 3
- 4
- 5
-
-
相关阅读:
CCF CSP认证 历年题目自练Day35
『Java安全』Shiro1.2.4反序列化漏洞(Shiro-550|CVE-2016-4437)复现与浅析
Linux创建删除用户,创建删除组,设置目录所有权,设置目录wre权限
mysql数据库设计理论
内存卡里的照片删了怎么恢复?
经典算法之折半查找(BinarySearch)
文献学习(part103)--Inductive Representation Learning on Large Graphs
网络安全——Goolge Hacking的使用
vscode one dark和c扩展变量颜色冲突 设置settings.json如下即可
ceph rados对象存储索引残留问题排查与处理
- 原文地址:https://blog.csdn.net/Byron__/article/details/132613895