-
Spring:AOP事务管理(14)
Spring事务简介
相关概念介绍
- 事务作用:在数据层保障一系列的数据库操作同成功同失败。
- Spring事务作用:在数据层或**业务层**保障一系列的数据库操作同成功同失败。
举个简单的例子,
- 转账业务会有两次数据层的调用,一次是加钱一次是减钱
- 把事务放在数据层,加钱和减钱就有两个事务
- 没办法保证加钱和减钱同时成功或者同时失败
- 这个时候就需要将事务放在业务层进行处理。
Spring为了管理事务,提供了一个平台事务管理器
PlatformTransactionManager
commit是用来提交事务,rollback是用来回滚事务。
PlatformTransactionManager只是一个接口,Spring还为其提供了一个具体的实现:

从名称上可以看出,我们只需要给它一个DataSource对象,它就可以帮你去在业务层管理事务。其内部采用的是JDBC的事务。所以说如果你持久层采用的是JDBC相关的技术,就可以采用这个事务管理器来管理你的事务。而Mybatis内部采用的就是JDBC的事务,Spring整合Mybatis就采用的这个DataSourceTransactionManager事务管理器,下面会进行介绍。
转账案例-需求分析
需求分析: 实现任意两个账户间转账操作
需求微缩: A账户减钱,B账户加钱
为了实现上述的业务需求,我们可以按照下面步骤来实现下:
①:数据层提供基础操作,指定账户减钱(outMoney),指定账户加钱(inMoney)
②:业务层提供转账操作(transfer),调用减钱与加钱的操作
③:提供2个账号和操作金额执行转账操作
④:基于Spring整合MyBatis环境搭建上述操作
转账案例-环境搭建
项目结构:

步骤1:准备数据库表
create database spring_db character set utf8; use spring_db; create table tbl_account( id int primary key auto_increment, name varchar(35), money double ); insert into tbl_account values(1,'lsm',1000); insert into tbl_account values(2,'yxy',1000);- 1
- 2
- 3
- 4
- 5
- 6
- 7
- 8
- 9
步骤2:创建项目导入jar包
项目的pom.xml添加相关依赖
<dependencies> <dependency> <groupId>org.springframeworkgroupId> <artifactId>spring-contextartifactId> <version>5.2.10.RELEASEversion> dependency> <dependency> <groupId>org.springframeworkgroupId> <artifactId>spring-testartifactId> <version>5.2.10.RELEASEversion> dependency> <dependency> <groupId>junitgroupId> <artifactId>junitartifactId> <version>4.12version> <scope>testscope> dependency> <dependency> <groupId>com.alibabagroupId> <artifactId>druidartifactId> <version>1.1.16version> dependency> <dependency> <groupId>mysqlgroupId> <artifactId>mysql-connector-javaartifactId> <version>5.1.47version> dependency> <dependency> <groupId>org.mybatisgroupId> <artifactId>mybatisartifactId> <version>3.5.6version> dependency> <dependency> <groupId>org.mybatisgroupId> <artifactId>mybatis-springartifactId> <version>1.3.0version> dependency> <dependency> <groupId>org.springframeworkgroupId> <artifactId>spring-jdbcartifactId> <version>5.2.10.RELEASEversion> dependency> dependencies>- 1
- 2
- 3
- 4
- 5
- 6
- 7
- 8
- 9
- 10
- 11
- 12
- 13
- 14
- 15
- 16
- 17
- 18
- 19
- 20
- 21
- 22
- 23
- 24
- 25
- 26
- 27
- 28
- 29
- 30
- 31
- 32
- 33
- 34
- 35
- 36
- 37
- 38
- 39
- 40
- 41
- 42
- 43
- 44
- 45
- 46
- 47
- 48
- 49
- 50
步骤3:根据表创建模型类
import java.io.Serializable; /** * @Author Mr.Lu * @Date 2022/11/22 17:44 * @ClassName Account * @Version 1.0 */ public class Account implements Serializable { private Integer id; private String name; private Double money; public Account() { } public Account(Integer id, String name, Double money) { this.id = id; this.name = name; this.money = money; } public Integer getId() { return id; } public void setId(Integer id) { this.id = id; } public String getName() { return name; } public void setName(String name) { this.name = name; } public Double getMoney() { return money; } public void setMoney(Double money) { this.money = money; } @Override public String toString() { return "Account{" + "id=" + id + ", name='" + name + '\'' + ", money=" + money + '}'; } }- 1
- 2
- 3
- 4
- 5
- 6
- 7
- 8
- 9
- 10
- 11
- 12
- 13
- 14
- 15
- 16
- 17
- 18
- 19
- 20
- 21
- 22
- 23
- 24
- 25
- 26
- 27
- 28
- 29
- 30
- 31
- 32
- 33
- 34
- 35
- 36
- 37
- 38
- 39
- 40
- 41
- 42
- 43
- 44
- 45
- 46
- 47
- 48
- 49
- 50
- 51
- 52
- 53
- 54
- 55
- 56
步骤4:创建Dao接口
import com.itheima.domain.Account; import org.apache.ibatis.annotations.Param; import org.apache.ibatis.annotations.Select; import org.apache.ibatis.annotations.Update; /** * @Author Mr.Lu * @Date 2022/11/22 17:45 * @ClassName AccountDao * @Version 1.0 */ public interface AccountDao { @Update("update tbl_account set money = money + #{money} where name = #{name}") void inMoney(@Param("name") String name, @Param("money") Double money); @Update("update tbl_account set money = money - #{money} where name = #{name}") void outMoney(@Param("name") String name, @Param("money") Double money); @Select("select * from tbl_account where id = #{id}") Account select(@Param("id") Integer id); }- 1
- 2
- 3
- 4
- 5
- 6
- 7
- 8
- 9
- 10
- 11
- 12
- 13
- 14
- 15
- 16
- 17
- 18
- 19
- 20
- 21
- 22
- 23
步骤5:创建Service接口和实现类
public interface AccountService { /** * 转账操作 * @param out 传出方 * @param in 转入方 * @param money 金额 */ public void transfer(String out, String in, Double money); /** * 根据id查询账户信息 * @param id * @return */ public Account select(Integer id); } @Service public class AccountServiceImpl implements AccountService { @Autowired private AccountDao accountDao; @Override public void transfer(String out, String in, Double money) throws IOException { accountDao.outMoney(out, money); accountDao.inMoney(in, money); } @Override public Account select(Integer id){ return accountDao.select(id); } }- 1
- 2
- 3
- 4
- 5
- 6
- 7
- 8
- 9
- 10
- 11
- 12
- 13
- 14
- 15
- 16
- 17
- 18
- 19
- 20
- 21
- 22
- 23
- 24
- 25
- 26
- 27
- 28
- 29
- 30
- 31
- 32
- 33
- 34
步骤6:添加jdbc.properties文件
jdbc.driver=com.mysql.jdbc.Driver jdbc.url=jdbc:mysql://localhost:3306/spring_db?useSSL=false&useUnicode=true&characterEncoding=UTF-8&serverTimezone=GMT%2B8 jdbc.username=root jdbc.password=1234- 1
- 2
- 3
- 4
步骤7:创建JdbcConfig配置类
public class JdbcConfig { @Value("${jdbc.driver}") private String driver; @Value("${jdbc.url}") private String url; @Value("${jdbc.username}") private String userName; @Value("${jdbc.password}") private String password; @Bean public DataSource dataSource() { DruidDataSource ds = new DruidDataSource(); ds.setDriverClassName(driver); ds.setUrl(url); ds.setUsername(userName); ds.setPassword(password); return ds; }- 1
- 2
- 3
- 4
- 5
- 6
- 7
- 8
- 9
- 10
- 11
- 12
- 13
- 14
- 15
- 16
- 17
- 18
- 19
步骤8:创建MybatisConfig配置类
public class MybatisConfig { @Bean public SqlSessionFactoryBean sqlSessionFactory(DataSource dataSource){ SqlSessionFactoryBean ssfb = new SqlSessionFactoryBean(); ssfb.setTypeAliasesPackage("com.itheima.domain"); ssfb.setDataSource(dataSource); return ssfb; } @Bean public MapperScannerConfigurer mapperScannerConfigurer(){ MapperScannerConfigurer msc = new MapperScannerConfigurer(); msc.setBasePackage("com.itheima.dao"); return msc; } }- 1
- 2
- 3
- 4
- 5
- 6
- 7
- 8
- 9
- 10
- 11
- 12
- 13
- 14
- 15
- 16
步骤9:创建SpringConfig配置类
import org.springframework.context.annotation.ComponentScan; import org.springframework.context.annotation.Configuration; import org.springframework.context.annotation.Import; import org.springframework.context.annotation.PropertySource; import org.springframework.transaction.annotation.EnableTransactionManagement; @Configuration @ComponentScan("com.itheima") @PropertySource("jdbc.properties") @Import({JdbcConfig.class, MybatisConfig.class}) public class SpringConfig { }- 1
- 2
- 3
- 4
- 5
- 6
- 7
- 8
- 9
- 10
- 11
- 12
步骤10:编写测试类
import com.itheima.config.SpringConfig; import com.itheima.domain.Account; import org.junit.Test; import org.junit.runner.RunWith; import org.springframework.beans.factory.annotation.Autowired; import org.springframework.test.context.ContextConfiguration; import org.springframework.test.context.junit4.SpringJUnit4ClassRunner; import java.io.IOException; @RunWith(SpringJUnit4ClassRunner.class) @ContextConfiguration(classes = SpringConfig.class) public class AccountServiceTest { @Autowired private AccountService accountService; @Test public void testTransfer() throws IOException { accountService.transfer("lsm", "yxy", 100D); Account account1 = accountService.select(1); System.out.println(account1); Account account2 = accountService.select(2); System.out.println(account2); } @Test public void testSelect(){ Account account1 = accountService.select(1); System.out.println(account1); Account account2 = accountService.select(2); System.out.println(account2); } }- 1
- 2
- 3
- 4
- 5
- 6
- 7
- 8
- 9
- 10
- 11
- 12
- 13
- 14
- 15
- 16
- 17
- 18
- 19
- 20
- 21
- 22
- 23
- 24
- 25
- 26
- 27
- 28
- 29
- 30
- 31
- 32
- 33
testSelect:

testTransfer:

怎么解决呐???????????
事务管理
上述环境,运行单元测试类,会执行转账操作,
lsm的账户会减少100,yxy的账户会加100。这是正常情况下的运行结果,但是如果在转账的过程中出现了异常,如:
@Service public class AccountServiceImpl implements AccountService { @Autowired private AccountDao accountDao; public void transfer(String out,String in ,Double money) { accountDao.outMoney(out,money); int i = 1/0; accountDao.inMoney(in,money); } }- 1
- 2
- 3
- 4
- 5
- 6
- 7
- 8
- 9
- 10
- 11
- 12
这个时候就模拟了转账过程中出现异常的情况,正确的操作应该是转账出问题了,
Tom应该还是900,Jerry应该还是1100,但是真正运行后会发现,并没有像我们想象的那样,Tom账户为800而Jerry还是1100,100块钱凭空消息了,银行乐疯了。如果把转账换个顺序,银行就该哭了。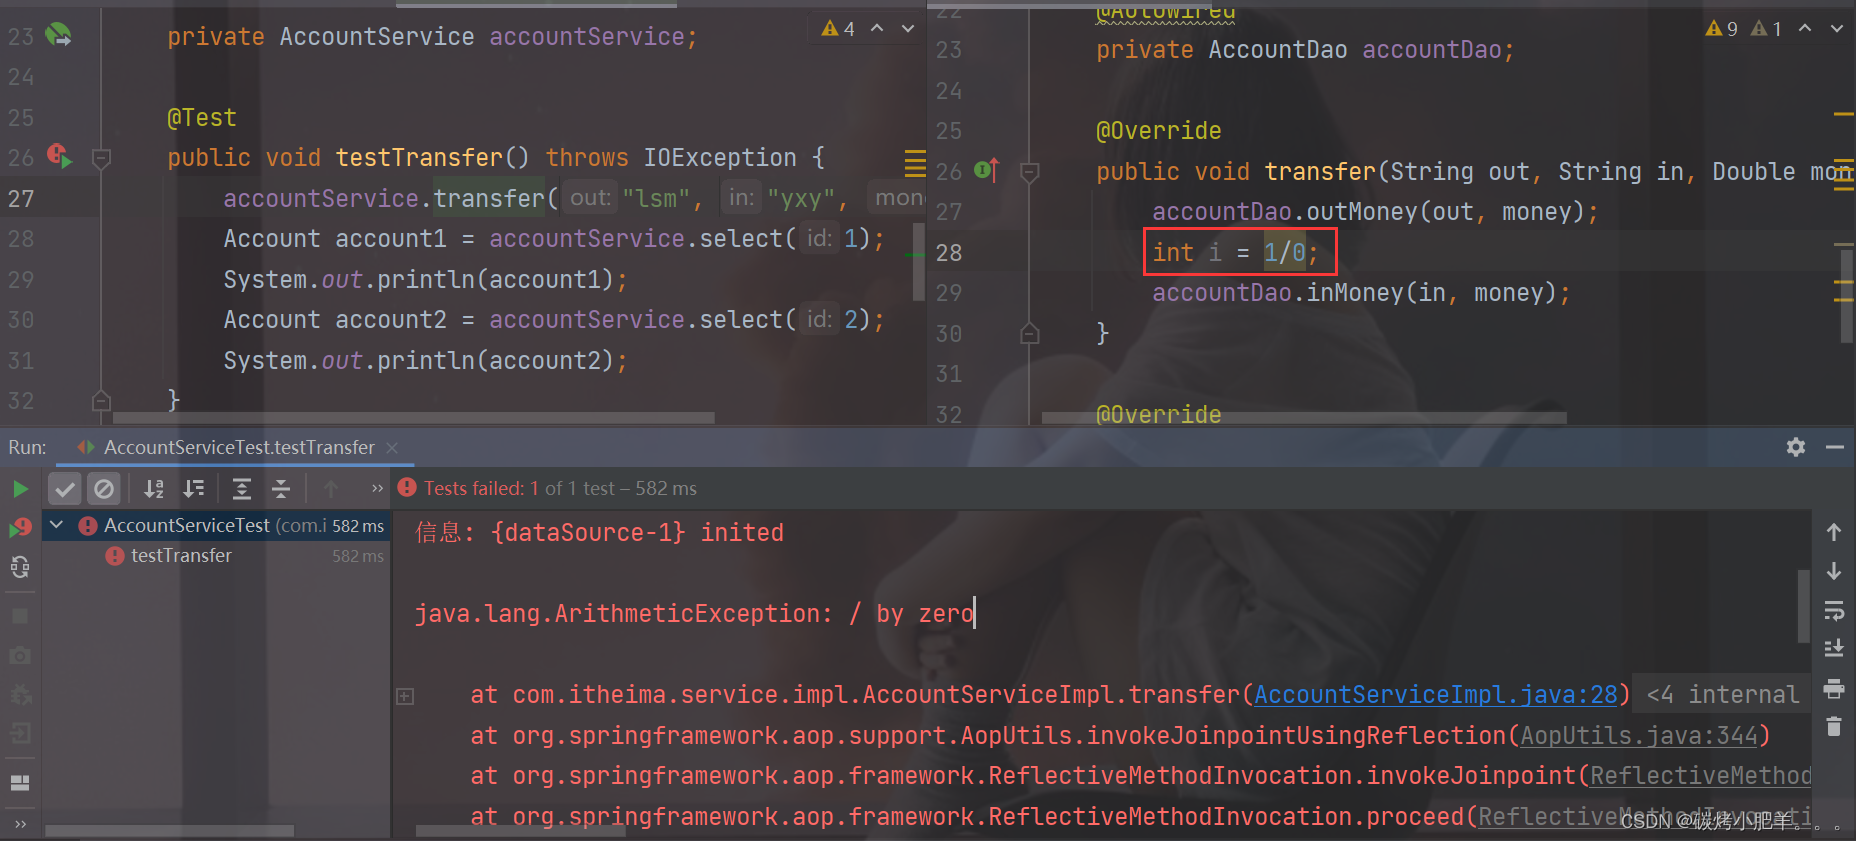

不管哪种情况,都是不允许出现的,对刚才的结果我们做一个分析:
①:程序正常执行时,账户金额A减B加,没有问题
②:程序出现异常后,转账失败,但是异常之前操作成功,异常之后操作失败,整体业务失败
当程序出问题后,我们需要让事务进行回滚,而且这个事务应该是加在业务层上,而Spring的事务管理就是用来解决这类问题的。
Spring事务管理具体的实现步骤为:
步骤1:在需要被事务管理的方法上添加注解
public interface AccountService { /** * 转账操作 * @param out 传出方 * @param in 转入方 * @param money 金额 */ //配置当前接口方法具有事务 public void transfer(String out,String in ,Double money) ; } @Service public class AccountServiceImpl implements AccountService { @Autowired private AccountDao accountDao; @Transactional public void transfer(String out,String in ,Double money) { accountDao.outMoney(out,money); int i = 1/0; accountDao.inMoney(in,money); } }- 1
- 2
- 3
- 4
- 5
- 6
- 7
- 8
- 9
- 10
- 11
- 12
- 13
- 14
- 15
- 16
- 17
- 18
- 19
- 20
- 21
- 22
注意:
@Transactional可以写在接口类上、接口方法上、实现类上和实现类方法上
- 写在接口类上,该接口的所有实现类的所有方法都会有事务
- 写在接口方法上,该接口的所有实现类的该方法都会有事务
- 写在实现类上,该类中的所有方法都会有事务
- 写在实现类方法上,该方法上有事务
- 建议写在实现类或实现类的方法上
步骤2:在JdbcConfig类中配置事务管理器
public class JdbcConfig { @Value("${jdbc.driver}") private String driver; @Value("${jdbc.url}") private String url; @Value("${jdbc.username}") private String userName; @Value("${jdbc.password}") private String password; @Bean public DataSource dataSource(){ DruidDataSource ds = new DruidDataSource(); ds.setDriverClassName(driver); ds.setUrl(url); ds.setUsername(userName); ds.setPassword(password); return ds; } //配置事务管理器,mybatis使用的是jdbc事务 @Bean public PlatformTransactionManager transactionManager(DataSource dataSource){ DataSourceTransactionManager transactionManager = new DataSourceTransactionManager(); transactionManager.setDataSource(dataSource); return transactionManager; } }- 1
- 2
- 3
- 4
- 5
- 6
- 7
- 8
- 9
- 10
- 11
- 12
- 13
- 14
- 15
- 16
- 17
- 18
- 19
- 20
- 21
- 22
- 23
- 24
- 25
- 26
- 27
- 28
注意:事务管理器要根据使用技术进行选择,Mybatis框架使用的是JDBC事务,可以直接使用
DataSourceTransactionManager步骤3:开启事务注解
在SpringConfig的配置类中开启
@Configuration @ComponentScan("com.itheima") @PropertySource("classpath:jdbc.properties") @Import({JdbcConfig.class,MybatisConfig.class //开启注解式事务驱动 @EnableTransactionManagement public class SpringConfig { }- 1
- 2
- 3
- 4
- 5
- 6
- 7
- 8
步骤4:运行测试类
会发现在转换的业务出现错误后,事务就可以控制回顾,保证数据的正确性。
知识点1:@EnableTransactionManagement
名称 @EnableTransactionManagement 类型 配置类注解 位置 配置类定义上方 作用 设置当前Spring环境中开启注解式事务支持 知识点2:@Transactional
名称 @Transactional 类型 接口注解 类注解 方法注解 位置 业务层接口上方 业务层实现类上方 业务方法上方 作用 为当前业务层方法添加事务(如果设置在类或接口上方则类或接口中所有方法均添加事务) Spring事务角色
重点介绍
事务管理员和事务协调员。- 未开启Spring事务之前:
![[外链图片转存失败,源站可能有防盗链机制,建议将图片保存下来直接上传(img-kPL3S1Ft-1669364243136)(assets/1630248794837.png)]](https://1000bd.com/contentImg/2024/04/18/49691ceaad448d6a.png)
- AccountDao的outMoney因为是修改操作,会开启一个事务T1
- AccountDao的inMoney因为是修改操作,会开启一个事务T2
- AccountService的transfer没有事务,
- 运行过程中如果没有抛出异常,则T1和T2都正常提交,数据正确
- 如果在两个方法中间抛出异常,T1因为执行成功提交事务,T2因为抛异常不会被执行
- 就会导致数据出现错误
- 开启Spring的事务管理后
![[外链图片转存失败,源站可能有防盗链机制,建议将图片保存下来直接上传(img-0SuqBAYU-1669364243137)(assets/1630249111055.png)]](https://1000bd.com/contentImg/2024/04/18/f832a849746888ba.png)
- transfer上添加了@Transactional注解,在该方法上就会有一个事务T
- AccountDao的outMoney方法的事务T1加入到transfer的事务T中
- AccountDao的inMoney方法的事务T2加入到transfer的事务T中
- 这样就保证他们在同一个事务中,当业务层中出现异常,整个事务就会回滚,保证数据的准确性。
通过上面例子的分析,我们就可以得到如下概念:
- 事务管理员:发起事务方,在Spring中通常指代业务层开启事务的方法
- 事务协调员:加入事务方,在Spring中通常指代数据层方法,也可以是业务层方法
注意:
目前的事务管理是基于
DataSourceTransactionManager和SqlSessionFactoryBean使用的是同一个数据源。Spring事务属性
重点介绍
事务配置、转账业务追加日志、事务传播行为。事务配置
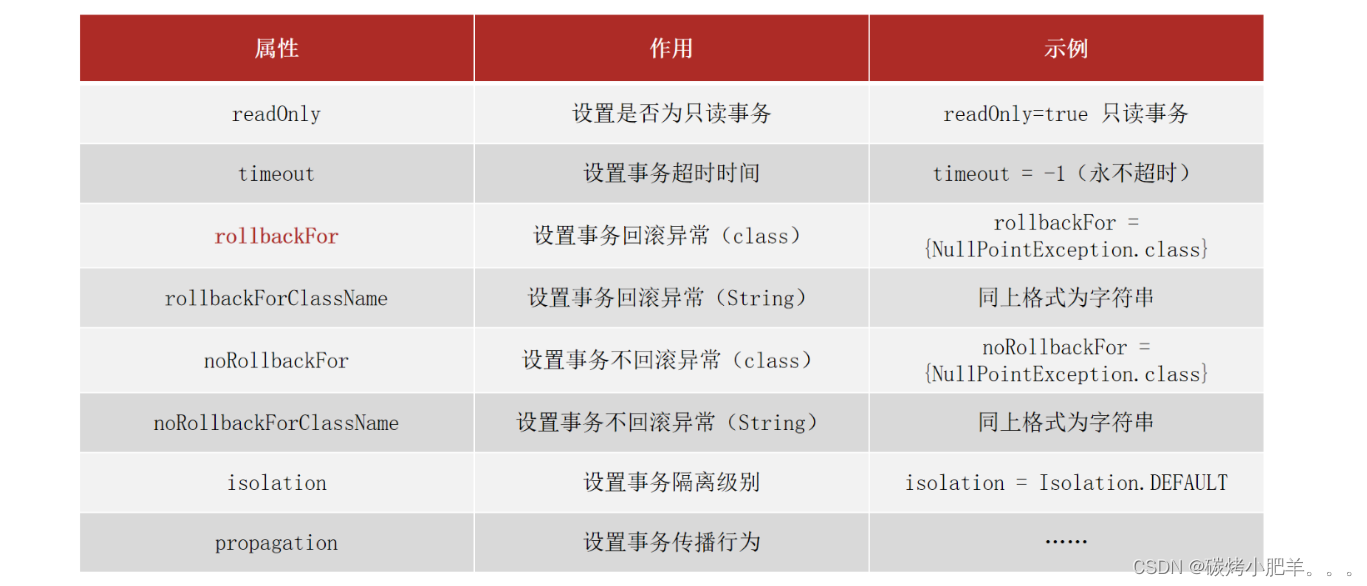
上面这些属性都可以在
@Transactional注解的参数上进行设置。-
readOnly:true只读事务,false读写事务,增删改要设为false,查询设为true。
-
timeout:设置超时时间单位秒,在多长时间之内事务没有提交成功就自动回滚,-1表示不设置超时时间。
-
rollbackFor**:当出现指定异常进行事务回滚**
-
noRollbackFor:当出现指定异常不进行事务回滚
-
思考:出现异常事务会自动回滚,这个是我们之前就已经知道的
-
noRollbackFor是设定对于指定的异常不回滚,这个好理解
-
rollbackFor是指定回滚异常,对于异常事务不应该都回滚么,为什么还要指定?
- 这块需要更正一个知识点,并不是所有的异常都会回滚事务,比如下面的代码就不会回滚
-
public interface AccountService { /** * 转账操作 * @param out 传出方 * @param in 转入方 * @param money 金额 */ //配置当前接口方法具有事务 public void transfer(String out,String in ,Double money) throws IOException; } @Service public class AccountServiceImpl implements AccountService { @Autowired private AccountDao accountDao; @Transactional public void transfer(String out,String in ,Double money) throws IOException{ accountDao.outMoney(out,money); //int i = 1/0; //这个异常事务会回滚 if(true){ throw new IOException(); //这个异常事务就不会回滚 } accountDao.inMoney(in,money); } }- 1
- 2
- 3
- 4
- 5
- 6
- 7
- 8
- 9
- 10
- 11
- 12
- 13
- 14
- 15
- 16
- 17
- 18
- 19
- 20
- 21
- 22
- 23
- 24
- 25
- 26
- 27
-
出现这个问题的原因是,Spring的事务只会对
Error异常和RuntimeException异常及其子类进行事务回顾,其他的异常类型是不会回滚的,对应IOException不符合上述条件所以不回滚-
此时就可以使用rollbackFor属性来设置出现IOException异常不回滚
@Service public class AccountServiceImpl implements AccountService { @Autowired private AccountDao accountDao; @Transactional(rollbackFor = {IOException.class}) public void transfer(String out,String in ,Double money) throws IOException{ accountDao.outMoney(out,money); //int i = 1/0; //这个异常事务会回滚 if(true){ throw new IOException(); //这个异常事务就不会回滚 } accountDao.inMoney(in,money); } }- 1
- 2
- 3
- 4
- 5
- 6
- 7
- 8
- 9
- 10
- 11
- 12
- 13
- 14
- 15
- 16
-
-
rollbackForClassName等同于rollbackFor,只不过属性为异常的类全名字符串
-
noRollbackForClassName等同于noRollbackFor,只不过属性为异常的类全名字符串
-
isolation设置事务的隔离级别
- DEFAULT :默认隔离级别, 会采用数据库的隔离级别
- READ_UNCOMMITTED : 读未提交
- READ_COMMITTED : 读已提交
- REPEATABLE_READ : 重复读取
- SERIALIZABLE: 串行化
介绍完上述属性后,还有最后一个事务的传播行为,为了讲解该属性的设置,我们需要完成下面的案例。
转账业务追加日志案例
需求分析
在前面的转案例的基础上添加新的需求,完成转账后记录日志。
- 需求:实现任意两个账户间转账操作,并对每次转账操作在数据库进行留痕
- 需求微缩:A账户减钱,B账户加钱,数据库记录日志
基于上述的业务需求,我们来分析下该如何实现:
①:基于转账操作案例添加日志模块,实现数据库中记录日志
②:业务层转账操作(transfer),调用减钱、加钱与记录日志功能
需要注意一点就是,我们这个案例的预期效果为:
无论转账操作是否成功,均进行转账操作的日志留痕

环境准备

步骤1:创建日志表
create table tbl_log( id int primary key auto_increment, info varchar(255), createDate datetime )- 1
- 2
- 3
- 4
- 5
步骤2:添加LogDao接口
public interface LogDao { @Insert("insert into tbl_log(info, createDate) values(#{info}, now())") void log(String info); }- 1
- 2
- 3
- 4
步骤3:添加LogService接口与实现类
public interface LogService { void log(String out, String in, Double money); } @Service public class LogServiceImpl implements LogService { @Autowired private LogDao logDao; @Transactional public void log(String out,String in,Double money ) { logDao.log("转账操作由"+out+"到"+in+",金额:"+money); } }- 1
- 2
- 3
- 4
- 5
- 6
- 7
- 8
- 9
- 10
- 11
- 12
- 13
步骤4:在转账的业务中添加记录日志
public interface AccountService { /** * 转账操作 * @param out 传出方 * @param in 转入方 * @param money 金额 */ //配置当前接口方法具有事务 public void transfer(String out,String in ,Double money)throws IOException ; } @Service public class AccountServiceImpl implements AccountService { @Autowired private AccountDao accountDao; @Autowired private LogService logService; @Transactional public void transfer(String out,String in ,Double money) { try{ accountDao.outMoney(out,money); accountDao.inMoney(in,money); }finally { logService.log(out,in,money); } } }- 1
- 2
- 3
- 4
- 5
- 6
- 7
- 8
- 9
- 10
- 11
- 12
- 13
- 14
- 15
- 16
- 17
- 18
- 19
- 20
- 21
- 22
- 23
- 24
- 25
- 26
- 27
步骤5:运行程序
-
当程序正常运行,tbl_account表中转账成功,tbl_log表中日志记录成功
-
当转账业务之间出现异常(int i =1/0),转账失败,tbl_account成功回滚,但是tbl_log表未添加数据
-
这个结果和我们想要的不一样,什么原因?该如何解决?
-
失败原因:日志的记录与转账操作隶属同一个事务,同成功同失败
-
最终效果:无论转账操作是否成功,日志必须保留
事务传播行为

对于上述案例的分析:
- log方法、inMoney方法和outMoney方法都属于增删改,分别有事务T1,T2,T3
- transfer因为加了@Transactional注解,也开启了事务T
- 前面我们讲过Spring事务会把T1,T2,T3都加入到事务T中
- 所以当转账失败后,所有的事务都回滚,导致日志没有记录下来
- 这和我们的需求不符,这个时候我们就想能不能让log方法单独是一个事务呢?
要想解决这个问题,就需要用到事务传播行为,所谓的事务传播行为指的是:
事务传播行为:事务协调员对事务管理员所携带事务的处理态度。
具体如何解决,就需要用到之前我们没有说的
propagation属性。修改logService改变事务的传播行为
@Service public class LogServiceImpl implements LogService { @Autowired private LogDao logDao; // propagation设置事务属性:传播行为设置为当前操作需要新事务 @Transactional(propagation = Propagation.REQUIRES_NEW) public void log(String out,String in,Double money ) { logDao.log("转账操作由"+out+"到"+in+",金额:"+money); } }- 1
- 2
- 3
- 4
- 5
- 6
- 7
- 8
- 9
- 10
- 11
运行后,就能实现我们想要的结果,不管转账是否成功,都会记录日志。
事务传播行为的可选值

-
相关阅读:
karmada 调度策略想要实现,这三个组件必须了解 | K8S Internals 系列第 4 期
OKLink携手CertiK在港举办Web3生态安全主题论坛
电商兴桃,打造乡村振兴新样本
算法题:最大出牌数量
前端bootstrap+fileInput+django后端是用ajax方式上传form表单数据及多个文件保存到数据库
电脑系统升级Win11变卡顿?如何解决!
网络原理 - HTTP/HTTPS(3)
JS中的 typeof 针对各种类型的返回值 以及typeof历史遗留问题
以 ZGC 为例,谈一谈 JVM 是如何实现 Reference 语义的
Android -- 对话框 Dialog: 确定取消,单选多选,进度显示, 常用控件示例:单选多选框,下拉列表,进度条,自动完成文本框, 菜单显示
- 原文地址:https://blog.csdn.net/qq_43751200/article/details/127962845