-
【龙芯1B】:74HC595数码管或74HC138数码管程序开发


学习目标:解决龙芯1B:74HC595或74HC138数码管显示问题
首先我们要知道数码管的原理;以74HC595为例,74HC595是具有三态输出功能(即具有高电平、低电平和高阻抗三种输出状态)的门电路。输出寄存器可以直接清除,具有100MHz的移位频率。
详细看数据手册:
(1条消息) 单片机数码管74HC595数据手册-单片机文档类资源-CSDN文库
龙芯1B开发板 集成74HC595电路图:

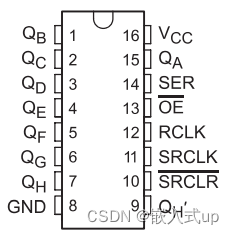
手册图:
开发流程:
第一步:目的:将要准备输入的位数据移入74HC595数据输入端上。方法:送位数据到595。
第二步:目的:将位数据逐位移入74HC595,即数据串入方法:SH_CP产生一上升沿,将DS上的数据移入74HC595移位寄存器中,先送高位,再送低位。
第三步:目的:并行输出数据。即数据并出方法:ST_CP产生一上升沿,将由DS上已移入数据寄存器中的数据送入到输出锁存器。
STM32数码管显示代码:
解决方法我可以根据STM32的代码思想来解决,当然这就是一名高级CV工程师必会的东西了,不过大部分也是因为STM32的代码生态比较好,要不然也用不上这种方法,所以我们更要支持国产,愿祖国越来越好。
main.c:
- #include "SysTick.h"
- #include "smg.h"
- char smgduan[16]={0x3F,0x06,0x5B,0x4F,0x66,0x6D,0x7D,0x07,0x7F,0x6F,0x77,0x7C,0x39,0x5E,0x79,0x71};//0~F 数码管段选数据
- int main()
- {
- int i;
- SysTick_Init(72);
- LED_Init();
- SMG_Init();
- while(1)
- {
- for(i=0;i<16;i++)
- {
- GPIO_Write(SMG_PORT,(int)~smgduan[i]);
- delay_ms(1000);
- }
- }
- }
smg.h:
- #ifndef _SMG_H
- #define _SMG_H
- #include "system.h"
- #define SMG_PORT_RCC RCC_APB2Periph_GPIOC
- #define SMG_PIN GPIO_Pin_0|GPIO_Pin_1|GPIO_Pin_2|GPIO_Pin_3|GPIO_Pin_4|GPIO_Pin_5|GPIO_Pin_6|GPIO_Pin_7
- #define SMG_PORT GPIOC
- void SMG_Init(void);
- #endif
smg.c:
- #include "smg.h"
- void SMG_Init()
- {
- GPIO_InitTypeDef GPIO_InitStructure;//结构体定义
- RCC_APB2PeriphClockCmd(SMG_PORT_RCC,ENABLE);//打开GPIOC的时钟
- GPIO_InitStructure.GPIO_Pin=SMG_PIN;
- GPIO_InitStructure.GPIO_Mode =GPIO_Mode_Out_PP;
- GPIO_InitStructure.GPIO_Speed =GPIO_Speed_50MHz;
- GPIO_Init(SMG_PORT,&GPIO_InitStructure);
- GPIO_SetBits(GPIOC,GPIO_Pin_0|GPIO_Pin_1|GPIO_Pin_2|GPIO_Pin_3|GPIO_Pin_4|GPIO_Pin_5|GPIO_Pin_6|GPIO_Pin_7);
- }
龙芯1B数码管代码:
smg_drv.c:
- /*
- * smg_drv.c
- *
- * created:2022.11.18
- * author:LHB 数码管程序
- */
- #include "smg_drv.h"
- #include
- #include "ls1b.h"
- #include "mips.h"
- #include "ls1b_gpio.h"
- //74HC138
- //#define HC138_A(val) GPIO_WriteBit(GPIOD, GPIO_Pin_12, (BitAction)val)
- //#define HC138_B(val) GPIO_WriteBit(GPIOD, GPIO_Pin_13, (BitAction)val)
- //#define HC138_C(val) GPIO_WriteBit(GPIOD, GPIO_Pin_14, (BitAction)val)
- //74HC595
- #define HC595_SI(val) gpio_write(39,val)// GPIO_WriteBit(GPIOC, GPIO_Pin_6, (BitAction)val)
- #define HC595_RCK(val) gpio_write(48,val)// GPIO_WriteBit(GPIOC, GPIO_Pin_7, (BitAction)val)
- #define HC595_SCK(val) gpio_write(49,val)//GPIO_WriteBit(GPIOC, GPIO_Pin_8, (BitAction)val)
- /*******************************
- 功 能:数码管端口初始化
- 参 数:无
- 返回值:无
- *******************************/
- void SMG_Init(void)
- {
- gpio_enable(39,DIR_OUT);
- gpio_enable(48,DIR_OUT);
- gpio_enable(49,DIR_OUT);
- gpio_enable(45,DIR_OUT);
- gpio_enable(44,DIR_OUT);
- gpio_enable(43,DIR_OUT);
- gpio_enable(42,DIR_OUT);
- HC595_Send(0xff);
- }
- /*******************************
- 功 能:HC595发送数据
- 参 数:dat 数据
- 返回值:无
- *******************************/
- void HC595_Send(unsigned char dat)
- {
- unsigned char dat_buf = 0, i;
- for(i=0; i<8; i++)
- {
- dat_buf = dat & 0x80;
- if (dat_buf) //输出1bit数据
- {
- HC595_SI(1); //将74HC595串行数据输入引脚设置为高电平
- }
- else
- {
- HC595_SI(0); //将74HC595串行数据输入引脚设置为低电平
- }
- HC595_SCK(0);
- delay_us(1);
- HC595_SCK(1);
- delay_us(1);
- dat <<= 1;
- }
- HC595_RCK(0);
- delay_us(3);
- HC595_RCK(1);
- }
- //显示的数字数组, 依次为0, 1, 2 3 4 5 6 7
- unsigned char digivalue[] = {0x3F, 0x06, 0x5B, 0x4F, 0x66, 0x6D, 0x7D, 0x07};
- unsigned char Display[] = {0x3f,0x06,0x5b,0x4f,0x66,0x6d,0x7d,0x07,0x7f,0x6f}; // 不带小数点
- unsigned char Display_1[] = {0xbf,0x86,0xdb,0xcf,0xef,0xed,0xfd,0x87,0xff,0xef,0xff,0x00}; // 带小数点
- /*******************************
- 功 能:数码管位段控制
- *******************************/
- void SMG_Sele(unsigned char index)
- {
- switch(index)
- {
- case 0:
- gpio_write(45,1);
- gpio_write(44,0);
- gpio_write(43,0);
- gpio_write(42,0);
- break;
- case 1:
- gpio_write(45,0);
- gpio_write(44,1);
- gpio_write(43,0);
- gpio_write(42,0);
- break;
- case 2:
- gpio_write(45,0);
- gpio_write(44,0);
- gpio_write(43,1);
- gpio_write(42,0);
- break;
- case 3:
- gpio_write(45,0);
- gpio_write(44,0);
- gpio_write(43,0);
- gpio_write(42,1);
- break;
- default:
- gpio_write(45,0);
- gpio_write(44,0);
- gpio_write(43,0);
- gpio_write(42,0);
- break;
- }
- }
- /**************************************************************
- *功 能:动态数码管模拟
- **************************************************************/
- void hc595_Test(unsigned short num)
- {
- unsigned char temp = 0;
- unsigned char j = 0;
- if(num >= 9999)
- num = 0000;
- for(j = 0; j < 10; j++)
- {
- // 数据选择
- temp = Display[num / 1000];
- HC595_Send(temp);
- SMG_Sele(0); //数码管显示数据
- delay_ms(1);
- // 选择数据
- temp = Display[num / 100%10];
- HC595_Send(temp);
- SMG_Sele(1); //数码管显示数据
- delay_ms(1);
- // 选择数据
- temp = Display[num / 10%10];
- HC595_Send(temp);
- SMG_Sele(2); //数码管显示数据
- delay_ms(1);
- // 选择数据
- temp = Display[num % 10];
- HC595_Send(temp);
- SMG_Sele(3); //数码管显示数据
- delay_ms(1);
- }
- }
运行结果:

总结
需要详细工程请联系
- 关注微信公众号(嵌入式up)
- CSDN私信
- 工作微信:bulidupup
努力到无能为力,拼搏到感动自己。
-
相关阅读:
Electron 18-19 值得关注的变化
初识Spring(一)IOC
ubuntu安装nvm
对于koa中间件的理解
Dubbo入门
“Vue进阶:深入理解插值、指令、过滤器、计算属性和监听器“
C中结构体和C++类各自对象的大小——C++
龙蜥开发者说:海纳百川,有容乃大,我在龙蜥社区的升级之旅 | 第 11 期
[Power Query] 数据类型转换
.NET Reactor简单使用教程
- 原文地址:https://blog.csdn.net/oxygen23333/article/details/127933740