-
java多线程基础技术
1.1 进程与多线程
1、进程
程序由指令和数据组成,但这些指令要运行,数据要读写,就必须将指令加载至 CPU,数据加载至内存。在 指令运行过程中还需要用到磁盘、网络等设备。进程就是用来加载指令、管理内存、管理 IO 的 当一个程序被运行,从磁盘加载这个程序的代码至内存,这时就开启了一个进程。 进程就可以视为程序的一个实例。大部分程序可以同时运行多个实例进程(例如记事本、画图、浏览器 等),也有的程序只能启动一个实例进程(例如网易云音乐、360 安全卫士等)
2、那什么是线程呢?
线程可以理解成是在进程中独立运行的子任务。比如,QQ.exe 运行时就有很多的子任务在同时运行。再如,好友视频线程、下载文件线程、传输数据线程、发送表情线程等,这些不同的任务或者说功能都可以同时运行,其中每一项任务完全可以理解成是“线程”在工作,传文件、听音乐、发送图片表情等功能都有对应的线程在后台默默地运行。这样做有什么优点呢?更具体来讲,使用多线程有什么优点呢?其实如果读者有使用“多任务操作系统”的经验,比如 Windows 系列,那么它的方便性大家应该都有体会:使用多任务操作系统 Windows后,可以最大限度地利用CPU的空闲时间来处理其他的任务,比如一边让操作系统处理正在由打印机打印的数据,一边使用 Word 编辑文档。而CPU在这些任务之间不停地切换,由于切换的速度非常快,给使用者的感受就是这些任务似乎在同时运行。所以使用多线程技术后,可以在同一时间内运行更多不同种类的任务
3、多线程优点(为什么使用多线程):
普及概念:
以调用方角度来讲,如果 需要等待结果返回,才能继续运行就是同步
不需要等待结果返回,就能继续运行就是异步

在图中可以发现,CPU 完全可以在任务1和任务2之间来切换,使任务2不必等到10秒再运行,系统的运行效率大大得到提升。这就是要使用多线程技术、要学习多线程的原因。这是多线程技术的优点,使用多线程也就是在使用异步。
1.2、多线程的使用
1.2.1继承Thread类
public class Thread implements Runnable- 1
从上面的源代码中可以发现,Thread类实现了 Runnable 接口,它们之间具有多态关系其实,使用继承Thread类的方式创建新线程时,最大的局限就是不支持多继承,因为Java语言的特点就是单根继承,所以为了支持多继承,完全可以实现 Runnable 接口的方式边实现一边继承。但用这两种方式创建的线程在工作时的性质是一样的,没有本质的区别
public class MyThread extends Thread{ @Override public void run() { //代码就是线程在开启之后执行的代码 for (int i = 0; i < 100; i++) { System.out.println("线程开启了" + i); } } public static void main(String[] args) { //创建一个线程对象 MyThread t1 = new MyThread(); //创建一个线程对象 MyThread t2 = new MyThread(); //t1.run();//表示的仅仅是创建对象,用对象去调用方法,并没有开启线程. //t2.run(); //开启一条线程 t1.start(); //开启第二条线程 t2.start(); } }- 1
- 2
- 3
- 4
- 5
- 6
- 7
- 8
- 9
- 10
- 11
- 12
- 13
- 14
- 15
- 16
- 17
- 18
- 19
- 20
- 21
- 22

从图的运行结果来看,MyThread.java类中的run 方法执行的时间比较晚,这也说明在使用多线程技术时,代码的运行结果与代码执行顺序或调用顺序是无关的。
线程是一个子任务,CPU 以不确定的方式,或者说是以随机的时间来调用线程中的run方法,所以就会出现先打印“运行结束!”后输出“MyThread”这样的结果了。
两个小问题:
-
为什么要重写run()方法?
因为run()是用来封装被线程执行的代码
-
run()方法和start()方法的区别?
run():封装线程执行的代码,直接调用,相当于普通方法的调用
start():启动线程;然后由JVM调用此线程的run()方法
1.2.2 实现Runnable 接口
如果欲创建的线程类已经有一个父类了,这时就不能再继承自Thread类了,因为Java不支持多继承,所以就需要实现 Runnable 接口来应对这样的情况。
public class MyRunnable implements Runnable{ @Override public void run() { //线程启动后执行的代码 for (int i = 0; i < 100; i++) { System.out.println(Thread.currentThread().getName() + "第二种方式实现多线程" + i); } } public static void main(String[] args) { //创建了一个参数的对象 MyRunnable mr = new MyRunnable(); //创建了一个线程对象,并把参数传递给这个线程. //在线程启动之后,执行的就是参数里面的run方法 Thread t1 = new Thread(mr); //开启线程 t1.start(); MyRunnable mr2 = new MyRunnable(); Thread t2 = new Thread(mr2); t2.start(); } }- 1
- 2
- 3
- 4
- 5
- 6
- 7
- 8
- 9
- 10
- 11
- 12
- 13
- 14
- 15
- 16
- 17
- 18
- 19
- 20
- 21
- 22
- 23
- 24
- 25
- 26

使用继承 Thread类的方式来开发多线程应用程序在设计上是有局限性的,因为 Java 是单根继承,不支持多继承,所以为了改变这种限制,可以使用实现 Runnable 接口的方式来实现多线程技术。 Thread(Runnable target)不光可以传人 Runnable接口的对象,还可以传人一个Thread类的对象,这样做完全可以将一个Thread 对象中的run0方法交由其他的线程进行调用。
实现Runnable接口 VS 继承 Thread
实现接口会更好一些,因为:
- Java 不支持多重继承,因此继承了 Thread 类就无法继承其它类,但是可以实现多个接口;
- 类可能只要求可执行就行,继承整个 Thread 类开销过大。
1.2.3实现多线程方式三: 实现Callable接口
实现步骤
- 定义一个类MyCallable实现Callable接口
- 在MyCallable类中重写call()方法
- 创建MyCallable类的对象
- 创建Future的实现类FutureTask对象,把MyCallable对象作为构造方法的参数
- 创建Thread类的对象,把FutureTask对象作为构造方法的参数
- 启动线程
- 再调用get方法,就可以获取线程结束之后的结果。
代码:
public class MyCallable implements Callable{ @Override public String call() throws Exception { for (int i = 0; i < 100; i++) { System.out.println("跟女孩表白" + i); } //返回值就表示线程运行完毕之后的结果 return "答应"; } } public class Demo { public static void main(String[] args) throws ExecutionException, InterruptedException { //线程开启之后需要执行里面的call方法 MyCallable mc = new MyCallable(); //Thread t1 = new Thread(mc); //可以获取线程执行完毕之后的结果.也可以作为参数传递给Thread对象 FutureTask ft = new FutureTask<>(mc); //创建线程对象 Thread t1 = new Thread(ft); String s = ft.get(); //开启线程 t1.start(); //String s = ft.get(); System.out.println(s); } } - 1
- 2
- 3
- 4
- 5
- 6
- 7
- 8
- 9
- 10
- 11
- 12
- 13
- 14
- 15
- 16
- 17
- 18
- 19
- 20
- 21
- 22
- 23
- 24
- 25
- 26
- 27
- 28
- 29
- 30
- 31

三种实现方式的对比
-
实现Runnable、Callable接口
-
好处: 扩展性强,实现该接口的同时还可以继承其他的类
-
缺点: 编程相对复杂,不能直接使用Thread类中的方法
-
-
继承Thread类
-
好处: 编程比较简单,可以直接使用Thread类中的方法
-
缺点: 可以扩展性较差,不能再继承其他的类
-

1.2.4实例变量与线程安全
自定义线程类中的实例变量针对其他线程可以有共享与不共享之分,这在多个线程之间进行交互时是很重要的一个技术点。
(1)不共享数据模型

public class MyThread extends Thread { private int count = 5; public MyThread(String name) { super(); this.setName(name);//设置线程名称 } @Override public void run() { super.run(); while (count>0){ count--; System.out.println("由" + this.currentThread().getName() + "计算,count=" + count); } } public static void main(String[] args) { MyThread a = new MyThread("A"); MyThread b = new MyThread("A"); MyThread c = new MyThread("A"); a.start(); b.start(); c.start(); } }- 1
- 2
- 3
- 4
- 5
- 6
- 7
- 8
- 9
- 10
- 11
- 12
- 13
- 14
- 15
- 16
- 17
- 18
- 19
- 20
- 21
- 22
- 23
- 24
- 25
- 26
不共享数据运行结果如图所示

由图可以看到,一共创建了3个线程,每个线程都有各自的count 变量,自己减少自己的count变量的值。这样的情况就是变量不共享,此示例并不存在多个线程访问同一个实例变量的情况。
如果想实现3个线程共同对一个count 变量进行减法操作的目的,该如何设计代码呢?(2)共享数据的情况

共享数据的情况就是多个线程可以访问同一个变量,比如在实现投票功能的软件时,多个线程可以同时处理同一个人的票数
下面通过一个示例来看下数据共享情况。测试案例:
public class MyThread extends Thread { private int count = 5; @Override public void run() { super.run(); count--; System.out.println("由" + this.currentThread().getName() + "计算,count=" + count); } public static void main(String[] args) { MyThread mythread = new MyThread(); Thread a = new Thread(mythread,"A"); Thread b = new Thread(mythread,"B"); Thread c = new Thread(mythread,"C"); Thread d = new Thread(mythread,"D"); Thread e = new Thread(mythread,"E"); a.start(); b.start(); c.start(); d.start(); } }- 1
- 2
- 3
- 4
- 5
- 6
- 7
- 8
- 9
- 10
- 11
- 12
- 13
- 14
- 15
- 16
- 17
- 18
- 19
- 20
- 21
- 22

从结果可以看到,线程A和B打印出的count值都是3,说明A和B同时对count 进行处理,产生了“非线程安全”问题。而我们想要得到的打印结果却不是重复的,而是依次递减的在某些JVM 中,i–的操作要分成如下3步
1)取得原有i值
2)计算 i-1。3)对进行赋值
在这3个步骤中,如果有多个线程同时访问,那么一定会出现非线程安全问题
1.3 currentThread()方法
-
方法介绍
方法名 说明 void setName(String name) 将此线程的名称更改为等于参数name String getName() 返回此线程的名称 Thread currentThread() 返回对当前正在执行的线程对象的引用 currentThread0方法可返回代码段正在被哪个线程调用的信息。下面通过一个示例进行说明。
创建项目,创建代码如下:public class t6 { public static void main(String[] args) { System.out.println(Thread.currentThread().getName()); } }- 1
- 2
- 3
- 4
- 5
-
代码演示
public class MyThread extends Thread { public MyThread() {} public MyThread(String name) { super(name); } @Override public void run() { for (int i = 0; i < 100; i++) { System.out.println(getName()+":"+i); } } } public class MyThreadDemo { public static void main(String[] args) { MyThread my1 = new MyThread(); MyThread my2 = new MyThread(); //void setName(String name):将此线程的名称更改为等于参数 name my1.setName("高铁"); my2.setName("飞机"); //Thread(String name) MyThread my1 = new MyThread("高铁"); MyThread my2 = new MyThread("飞机"); my1.start(); my2.start(); //static Thread currentThread() 返回对当前正在执行的线程对象的引用 System.out.println(Thread.currentThread().getName()); } }- 1
- 2
- 3
- 4
- 5
- 6
- 7
- 8
- 9
- 10
- 11
- 12
- 13
- 14
- 15
- 16
- 17
- 18
- 19
- 20
- 21
- 22
- 23
- 24
- 25
- 26
- 27
- 28
- 29
- 30
- 31
- 32
- 33
1.4 isAlive()方法
方法isAlive0)的功能是判断当前的线程是否处于活动状态新建项目t7,类文件代码如下
public class t7 extends MyThread{ @Override public void run() { System.out.println("run"+this.isAlive()); } public static void main(String[] args) { t7 myThread = new t7(); System.out.println("begin=="+myThread.isAlive()); myThread.start(); System.out.println("end=="+ myThread.isAlive()); } }- 1
- 2
- 3
- 4
- 5
- 6
- 7
- 8
- 9
- 10
- 11
- 12
- 13

1.5 线程休眠
-
static void sleep(long millis) 使当前正在执行的线程停留(暂停执行)指定的毫秒数 -
代码演示
public class MyRunnable implements Runnable { @Override public void run() { for (int i = 0; i < 100; i++) { try { Thread.sleep(100); } catch (InterruptedException e) { e.printStackTrace(); } System.out.println(Thread.currentThread().getName() + "---" + i); } } } public class Demo { public static void main(String[] args) throws InterruptedException { /*System.out.println("睡觉前"); Thread.sleep(3000); System.out.println("睡醒了");*/ MyRunnable mr = new MyRunnable(); Thread t1 = new Thread(mr); Thread t2 = new Thread(mr); t1.start(); t2.start(); } }- 1
- 2
- 3
- 4
- 5
- 6
- 7
- 8
- 9
- 10
- 11
- 12
- 13
- 14
- 15
- 16
- 17
- 18
- 19
- 20
- 21
- 22
- 23
- 24
- 25
- 26
- 27
- 28
- 29
-
1.6 getId()方法
getId0方法的作用是取得线程的唯一标识。创建测试用的项目runThread,创建Test,java类,代码
public static void main(String[] args) { Thread run=Thread.currentThread(); Thread runThread = Thread.currentThread();System.out.println(runThread.getName() +" "+runThread.getId()); }- 1
- 2
- 3
- 4

1.7 线程停止
大多数停止个线程的操作使用Thread.interrupt0方法,尽管方法的名称是“停止,中止”的意思,但这个方法不会终止一个正在运行的线程,还需要加人一个判断才可以完成线程的停止。关于此知识点在后面有专门的章节进行介绍。
在Java中有以下3种方法可以终止正在运行的线:
1)使用退出标志,使线程正常退出,也就是当run 方法完成后线程终止。2)使用stop 方法强行终止线程,但是不推荐使用这个方法,因为stop 和suspend 及resume一样,都是作废过期的方法,使用它们可能产生不可预料的结果。
3)使用interrupt 方法中断线程。
本示例将调用interrupt0方法来停止线程,但interrupt0)方法的使用效果并不像for+break 语句那样,马上就停止循环。调用interrupt0方法仅仅是在当前线程中打了一个停止的标记,并不是真的停止线程。
1.7.1 interrupt()–停止标记
本示例将调用interrupt0方法来停止线程,但interrupt0方法的使用效果并不像for+break语句那样,马上就停止循环。调用interrupt0)方法仅仅是在当前线程中打了一个停止的标记,并不是真的停止线程。
public class t11 extends Thread{ @Override public void run() { super.run(); for (int i = 0; i < 50000; i++) { System.out.println("i="+(i+1)); } } public static void main(String[] args) { try { t11 thread=new t11(); thread.start(); Thread.sleep(2000); thread.interrupt(); } catch (InterruptedException e) { System.out.println("main catch"); e.printStackTrace(); } } }- 1
- 2
- 3
- 4
- 5
- 6
- 7
- 8
- 9
- 10
- 11
- 12
- 13
- 14
- 15
- 16
- 17
- 18
- 19
- 20
- 21

从运行的结果来看,调用interrupt 方法并没有停止线程。如何停止线程呢?
Java的SDK中,Threadjava类里提供了两种方法
1)this.interrupted():测试当前线程是否已经中断。
2)this.isInterrupted():测试线程是否已经中断。下面通过代码比较两个方法
1)interrupted()
public class t11 extends Thread{ @Override public void run() { super.run(); for (int i = 0; i < 50000; i++) { System.out.println("i="+(i+1)); } } public static void main(String[] args) { try { t11 thread=new t11(); thread.start(); Thread.sleep(1000); thread.interrupt(); System.out.println("是否停止1?="+thread.interrupted()); System.out.println("是否停止1?="+thread.interrupted()); } catch (InterruptedException e) { System.out.println("main catch"); e.printStackTrace(); } System.out.println("end!"); } }- 1
- 2
- 3
- 4
- 5
- 6
- 7
- 8
- 9
- 10
- 11
- 12
- 13
- 14
- 15
- 16
- 17
- 18
- 19
- 20
- 21
- 22
- 23
- 24
- 25

来判断 thread 对象所代表的线程是否停止,但从控制台打印的结果来看,线程并未停止,这也就证明了interrupted0 方法的解释:测试当前线程是否已经中断。这个“当前线程是main,它从未中断过,所以打印的结果是两个 false。
如何在main线程中产生效果?
修改代码:
public static void main(String[] args) { try { t11 thread=new t11(); thread.start(); Thread.sleep(1000); thread.interrupt(); Thread.currentThread().interrupt(); System.out.println("是否停止1?="+thread.interrupted()); System.out.println("是否停止1?="+thread.interrupted()); System.out.println("end!"); } catch (InterruptedException e) { System.out.println("main catch"); e.printStackTrace(); } } }- 1
- 2
- 3
- 4
- 5
- 6
- 7
- 8
- 9
- 10
- 11
- 12
- 13
- 14
- 15
- 16
- 17

为什么第2个布尔值是false呢?查看一下官方帮助文档中对interrupted 方法的解释
测试当前线程是否已经中断。线程的中断状态由该方法清除。换句话说,如果连续两次调用该方法,则第二次调用将返回 false (在第一次调用已清除了其中断状态之后,且第二次调用检验完中断状态前,当前线程再次中断的情况除外)。
文档已经解释得很详细interrupted0方法具有清除状态的功能,所以第2次调用interrupted0方法返回的值是false。2)isInterrupted():
public static void main(String[] args) { try { t11 thread=new t11(); thread.start(); Thread.sleep(1000); thread.interrupt(); //Thread.currentThread().interrupt(); System.out.println("是否停止1?="+thread.isInterrupted()); System.out.println("是否停止1?="+thread.isInterrupted()); } catch (InterruptedException e) { System.out.println("main catch"); e.printStackTrace(); } System.out.println("end!"); } }- 1
- 2
- 3
- 4
- 5
- 6
- 7
- 8
- 9
- 10
- 11
- 12
- 13
- 14
- 15
- 16
- 17
- 18

从结果中可以看到,方法isInterrupted0并未清除状态标志,所以打印了两个 true。
最后,再来看一下这两个方法的解释1)this.interrupted():测试当前线程是否已经是中断状态执行后具有将状态标志置清除为 false 的功能。
2)this.isInterrupted():测试线程Thread 对象是否已经是中断状态,但不清除状态标志。1.7.2 异常法停止线程
在线程中用for语句来判断一下线程是否是停止状态,但如果 for 语句下面还有语句,还是会继续运行的。
所以
package com.text; public class MyThread extends Thread { @Override public void run() { super.run(); try { for (int i = 0; i < 500000; i++) { if (this.interrupted()){ System.out.println("已经是停止状态!臣退了!"); throw new InterruptedException(); } System.out.println("i="+(i+1)); } System.out.println("我在for下方!"); } catch (InterruptedException e) { System.out.println("进入run方法的catch中了!"); e.printStackTrace(); } } public static void main(String[] args) { try { MyThread thread = new MyThread(); thread.start(); Thread.sleep(200); thread.interrupt(); } catch (InterruptedException e) { System.out.println("main catch"); e.printStackTrace(); } System.out.println("end!!"); } }- 1
- 2
- 3
- 4
- 5
- 6
- 7
- 8
- 9
- 10
- 11
- 12
- 13
- 14
- 15
- 16
- 17
- 18
- 19
- 20
- 21
- 22
- 23
- 24
- 25
- 26
- 27
- 28
- 29
- 30
- 31
- 32
- 33

1.7.3在线程sleep()中停止
如果线程在sleep0状态下停止线程,会是什么效果呢?
public class MyThread extends Thread { @Override public void run() { super.run(); try { System.out.println("run begin..."); Thread.sleep(200000); System.out.println("run sleep..."); } catch (InterruptedException e) { System.out.println("sleep中的线程被停止!进入catch"+this.isInterrupted()); e.printStackTrace(); } }- 1
- 2
- 3
- 4
- 5
- 6
- 7
- 8
- 9
- 10
- 11
- 12
- 13
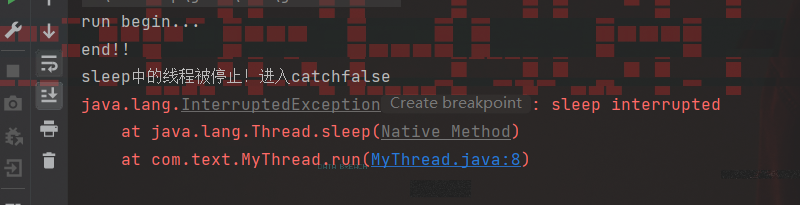
从打印的结果来看,如果在 sleep 状态下停止某一线程,会进人 cath 语句,并且清除停止状态值,使之变成 false。前一个实验是先sleep 然后再用interrupt0停止,与之相反的操作在学习线程时也要注意。
1.7.4 stop()—暴力停止
使用stop0方法停止线程则是非常暴力的
public class MyThread extends Thread { private int i = 0; @Override public void run() { super.run(); try { while (true) { i++; System.out.println("i="+i); Thread.sleep(1000); } } catch (InterruptedException e) { e.printStackTrace(); } } public static void main(String[] args) { try { MyThread thread = new MyThread(); thread.start(); Thread.sleep(8000); thread.stop(); } catch (InterruptedException e) { e.printStackTrace(); } }- 1
- 2
- 3
- 4
- 5
- 6
- 7
- 8
- 9
- 10
- 11
- 12
- 13
- 14
- 15
- 16
- 17
- 18
- 19
- 20
- 21
- 22
- 23
- 24
- 25
- 26

线程被暴力停止(stop)运行后图标呈灰色
1.7.5线程优先级【应用】
-
线程调度
-
两种调度方式
- 分时调度模型:所有线程轮流使用 CPU 的使用权,平均分配每个线程占用 CPU 的时间片
- 抢占式调度模型:优先让优先级高的线程使用 CPU,如果线程的优先级相同,那么会随机选择一个,优先级高的线程获取的 CPU 时间片相对多一些
-
Java使用的是抢占式调度模型
-
随机性
假如计算机只有一个 CPU,那么 CPU 在某一个时刻只能执行一条指令,线程只有得到CPU时间片,也就是使用权,才可以执行指令。所以说多线程程序的执行是有随机性,因为谁抢到CPU的使用权是不一定的
-
-
优先级相关方法
方法名 说明 final int getPriority() 返回此线程的优先级 final void setPriority(int newPriority) 更改此线程的优先级线程默认优先级是5;线程优先级的范围是:1-10 -
代码演示
public class MyCallable implements Callable<String> { @Override public String call() throws Exception { for (int i = 0; i < 100; i++) { System.out.println(Thread.currentThread().getName() + "---" + i); } return "线程执行完毕了"; } } public class Demo { public static void main(String[] args) { //优先级: 1 - 10 默认值:5 MyCallable mc = new MyCallable(); FutureTask<String> ft = new FutureTask<>(mc); Thread t1 = new Thread(ft); t1.setName("飞机"); t1.setPriority(10); //System.out.println(t1.getPriority());//5 t1.start(); MyCallable mc2 = new MyCallable(); FutureTask<String> ft2 = new FutureTask<>(mc2); Thread t2 = new Thread(ft2); t2.setName("坦克"); t2.setPriority(1); //System.out.println(t2.getPriority());//5 t2.start(); } }- 1
- 2
- 3
- 4
- 5
- 6
- 7
- 8
- 9
- 10
- 11
- 12
- 13
- 14
- 15
- 16
- 17
- 18
- 19
- 20
- 21
- 22
- 23
- 24
- 25
- 26
- 27
- 28
- 29
- 30
- 31
- 32
- 33

可见没有先后顺序,所以优先级在操作系统前并不好使!
1.7.6守护线程【应用】
-
相关方法
方法名 说明 void setDaemon(boolean on) 将此线程标记为守护线程,当运行的线程都是守护线程时,Java虚拟机将退出 -
代码演示!
public class MyThread1 extends Thread { @Override public void run() { for (int i = 0; i < 10; i++) { System.out.println(getName() + "---" + i); } } } public class MyThread2 extends Thread { @Override public void run() { for (int i = 0; i < 100; i++) { System.out.println(getName() + "---" + i); } } } public class Demo { public static void main(String[] args) { MyThread1 t1 = new MyThread1(); MyThread2 t2 = new MyThread2(); t1.setName("女神"); t2.setName("备胎"); //把第二个线程设置为守护线程 //当普通线程执行完之后,那么守护线程也没有继续运行下去的必要了. t2.setDaemon(true); t1.start(); t2.start(); } }- 1
- 2
- 3
- 4
- 5
- 6
- 7
- 8
- 9
- 10
- 11
- 12
- 13
- 14
- 15
- 16
- 17
- 18
- 19
- 20
- 21
- 22
- 23
- 24
- 25
- 26
- 27
- 28
- 29
- 30
- 31
- 32

-
可见守护线程要等普通线程运行完再运行或者停止!
} public class MyThread2 extends Thread { @Override public void run() { for (int i = 0; i < 100; i++) { System.out.println(getName() + "---" + i); } } } public class Demo { public static void main(String[] args) { MyThread1 t1 = new MyThread1(); MyThread2 t2 = new MyThread2(); t1.setName("女神"); t2.setName("备胎"); //把第二个线程设置为守护线程 //当普通线程执行完之后,那么守护线程也没有继续运行下去的必要了. t2.setDaemon(true); t1.start(); t2.start(); } } ```- 1
- 2
- 3
- 4
- 5
- 6
- 7
- 8
- 9
- 10
- 11
- 12
- 13
- 14
- 15
- 16
- 17
- 18
- 19
- 20
- 21
- 22
- 23
- 24
- 25
- 26
可见守护线程要等普通线程运行完再运行或者停止!
-
相关阅读:
Sql力扣算法:262. 行程和用户
贪心算法(算法竞赛、蓝桥杯)--排队接水问题
【浅学Java】详解网络层IP协议
【牛客 - 剑指offer】JZ84 二叉树中和为某一值的路径(三)
防御XSS攻击的方法
React 官网为什么那么快?
SpringBoot多数据源以及事务处理
34. 在排序数组中查找元素的第一个和最后一个位置
性能测试之性能调优
K--书店--“可达鸭编程杯”山东大学程序设计精英挑战赛 扬帆组
- 原文地址:https://blog.csdn.net/weixin_56462645/article/details/127876138