-
flutter入门-MaterialApp详解
MaterialApp属性定义
const MaterialApp({ super.key, this.navigatorKey, this.scaffoldMessengerKey, this.home, Map<String, WidgetBuilder> this.routes = const <String, WidgetBuilder>{}, this.initialRoute, this.onGenerateRoute, this.onGenerateInitialRoutes, this.onUnknownRoute, List<NavigatorObserver> this.navigatorObservers = const <NavigatorObserver>[], this.builder, this.title = '', this.onGenerateTitle, this.color, this.theme, this.darkTheme, this.highContrastTheme, this.highContrastDarkTheme, this.themeMode = ThemeMode.system, this.locale, this.localizationsDelegates, this.localeListResolutionCallback, this.localeResolutionCallback, this.supportedLocales = const <Locale>[Locale('en', 'US')], this.debugShowMaterialGrid = false, this.showPerformanceOverlay = false, this.checkerboardRasterCacheImages = false, this.checkerboardOffscreenLayers = false, this.showSemanticsDebugger = false, this.debugShowCheckedModeBanner = true, this.shortcuts, this.actions, this.restorationScopeId, this.scrollBehavior, this.useInheritedMediaQuery = false, })- 1
- 2
- 3
- 4
- 5
- 6
- 7
- 8
- 9
- 10
- 11
- 12
- 13
- 14
- 15
- 16
- 17
- 18
- 19
- 20
- 21
- 22
- 23
- 24
- 25
- 26
- 27
- 28
- 29
- 30
- 31
- 32
- 33
- 34
- 35
- 36
- 37
routes(静态路由导航方式)
Map<String, WidgetBuilder> this.routes = const <String, WidgetBuilder>{}, this.initialRoute, this.onGenerateRoute, this.onGenerateInitialRoutes, this.onUnknownRoute,- 1
- 2
- 3
- 4
- 5
routes(map对象):是项目的各个页面路由配置
initialRoute:是项目的根路由,初始化的时候最先展示的页面
onGenerateRoute(RouteFactory类型函数):路由钩子,可以对某些指定的路由进行拦截,有时候不想改变页面结构,但是又想要求跳转到这个页面的时候可以用到,比如,页面设定了传参你进行跳转的时候。
onUnknownRoute(RouteFactory类型函数):在路由匹配不到的时候用到,一般都返回一个统一的错误页面main.dart
import 'package:flutter/material.dart'; import 'package:flutter_hello/home_page.dart'; import 'package:flutter_hello/login_page.dart'; import 'package:flutter_hello/second_page.dart'; import 'package:flutter_hello/unknow_page.dart'; void main() { runApp(const MyMainApp()); } class MyMainApp extends StatelessWidget { const MyMainApp({super.key}); Widget build(BuildContext context) { return MaterialApp( theme: ThemeData(primaryColor: Colors.white, primarySwatch: Colors.yellow), routes: { 'home': (context) => const HomePage(), 'second': (context) => const SecondPage() }, initialRoute: 'home', onGenerateRoute: (RouteSettings settings) { switch (settings.name) { case 'needLogin': return MaterialPageRoute(builder: (BuildContext context) { return const LoginPage(); }); } }, onUnknownRoute: (RouteSettings settings) { return MaterialPageRoute(builder: (BuildContext context) { return const UnknowPage(); }); }, // home: HomePage(), ); } }- 1
- 2
- 3
- 4
- 5
- 6
- 7
- 8
- 9
- 10
- 11
- 12
- 13
- 14
- 15
- 16
- 17
- 18
- 19
- 20
- 21
- 22
- 23
- 24
- 25
- 26
- 27
- 28
- 29
- 30
- 31
- 32
- 33
- 34
- 35
- 36
- 37
- 38
- 39
- 40
- 41
home_page.dart
import 'package:flutter/material.dart'; class HomePage extends StatelessWidget { const HomePage({super.key}); Widget build(BuildContext context) { return MaterialApp( home: Scaffold( body: Center( child: MaterialButton( child: const Text( '下一页', style: TextStyle(color: Colors.redAccent), )), ), ), ); } }- 1
- 2
- 3
- 4
- 5
- 6
- 7
- 8
- 9
- 10
- 11
- 12
- 13
- 14
- 15
- 16
- 17
- 18
- 19
- 20
- 21
login_page.dart
import 'package:flutter/material.dart'; class LoginPage extends StatelessWidget { const LoginPage({super.key}); Widget build(BuildContext context) { return const MaterialApp( home: Scaffold( body: Center( child: Text('登陆页面'), ), ), ); } }- 1
- 2
- 3
- 4
- 5
- 6
- 7
- 8
- 9
- 10
- 11
- 12
- 13
- 14
- 15
- 16
- 17
unknow_page.dart
import 'package:flutter/material.dart'; class UnknowPage extends StatelessWidget { const UnknowPage({super.key}); Widget build(BuildContext context) { return const MaterialApp( home: Scaffold( body: Center( child: Text( '页面飞走了', style: TextStyle( color: Colors.red, ), ), ), ), ); } }- 1
- 2
- 3
- 4
- 5
- 6
- 7
- 8
- 9
- 10
- 11
- 12
- 13
- 14
- 15
- 16
- 17
- 18
- 19
- 20
- 21
- 22
MaterialApp路由的搜索规则如下(app.dart):
/// The [MaterialApp] configures the top-level [Navigator] to search for routes /// in the following order: /// /// 1. For the `/` route, the [home] property, if non-null, is used. /// /// 2. Otherwise, the [routes] table is used, if it has an entry for the route. /// /// 3. Otherwise, [onGenerateRoute] is called, if provided. It should return a /// non-null value for any _valid_ route not handled by [home] and [routes]. /// /// 4. Finally if all else fails [onUnknownRoute] is called. /// If a [Navigator] is created, at least one of these options must handle the /// `/` route, since it is used when an invalid [initialRoute] is specified on /// startup- 1
- 2
- 3
- 4
- 5
- 6
- 7
- 8
- 9
- 10
- 11
- 12
- 13
- 14
1、home属性就代表‘/’根路径,如果设置了home属性,就会先查询该路径
2、如果没有设置home属性,则会查询routes表里面的
3、如果也没有设置routes表,则会查询onGenerateRoute
4、最后才会查找onUnknownRoutePS:home属性不能和routes表里面的’/'路径同时出现,否则会抛出如下异常:

path_routers_page.dartimport 'package:flutter/material.dart'; import 'package:flutter_hello/home_page.dart'; import 'package:flutter_hello/login_page.dart'; import 'package:flutter_hello/second_page.dart'; import 'package:flutter_hello/three_page.dart'; import 'package:flutter_hello/unknow_page.dart'; class PathRoutersPage extends StatelessWidget { Widget build(BuildContext context) { return MaterialApp( routes: <String, WidgetBuilder>{ '/home': (context) { return HomePage(); }, '/second': (context) { return SecondPage(); }, '/three': (context) { return MyThreePage(); } }, initialRoute: '/four', onGenerateRoute: (RouteSettings settings) { print("RouteSettings:" + (settings.name.toString())); return MaterialPageRoute(builder: (BuildContext context) { return LoginPage(); }); }, onUnknownRoute: (RouteSettings settings) { return MaterialPageRoute(builder: (BuildContext context) { return UnknowPage(); }); }, home: HomePage(), ); } }- 1
- 2
- 3
- 4
- 5
- 6
- 7
- 8
- 9
- 10
- 11
- 12
- 13
- 14
- 15
- 16
- 17
- 18
- 19
- 20
- 21
- 22
- 23
- 24
- 25
- 26
- 27
- 28
- 29
- 30
- 31
- 32
- 33
- 34
- 35
- 36
- 37
- 38
- 39
一、设置initialRoute,同时设置home属性,如果routes和onGenerateRoute都无法匹配到,则按照’/'匹配home属性
情况1:
如果定义的路径中包含“/”,首先会到routes表里面查找,发现routes表里面没有定义该路径,则会到onGenerateRoute里面查找,如果也没有定义相关逻辑,不是调用onUnknownRoute,而是会把路径当做’/'根路径去匹配,因为我们设置了home属性,则会加载home定义的页面,会抛出异常,但不会导致应用崩溃。


情况2:
如果定义的路径中不包含“/”,首先会到routes表里面查找,发现routes表里面没有定义该路径,则会到onGenerateRoute里面查找,如果也没有定义相关逻辑,不是调用onUnknownRoute,而是会把路径当做’/'根路径去匹配,因为我们设置了home属性,则会加载home定义的页面,不会抛出异常。
二、设置initialRoute,不设置home属性,如果routes和onGenerateRoute都无法匹配到,则按照’/'匹配,由于没有设置home属性,则会调用onUnknownRoute
import 'package:flutter/material.dart'; import 'package:flutter_hello/home_page.dart'; import 'package:flutter_hello/login_page.dart'; import 'package:flutter_hello/second_page.dart'; import 'package:flutter_hello/three_page.dart'; import 'package:flutter_hello/unknow_page.dart'; class PathRoutersPage extends StatelessWidget { Widget build(BuildContext context) { return MaterialApp( routes: <String, WidgetBuilder>{ '/home': (context) { return HomePage(); }, '/second': (context) { return SecondPage(); }, '/three': (context) { return MyThreePage(); } }, initialRoute: 'four', onGenerateRoute: (RouteSettings settings) { print("RouteSettings:" + (settings.name.toString())); switch (settings.name) { case '/login': return MaterialPageRoute(builder: (BuildContext context) { return LoginPage(); }); } }, onUnknownRoute: (RouteSettings settings) { return MaterialPageRoute(builder: (BuildContext context) { return UnknowPage(); }); }, // home: HomePage(), ); } }- 1
- 2
- 3
- 4
- 5
- 6
- 7
- 8
- 9
- 10
- 11
- 12
- 13
- 14
- 15
- 16
- 17
- 18
- 19
- 20
- 21
- 22
- 23
- 24
- 25
- 26
- 27
- 28
- 29
- 30
- 31
- 32
- 33
- 34
- 35
- 36
- 37
- 38
- 39
- 40
- 41
- 42
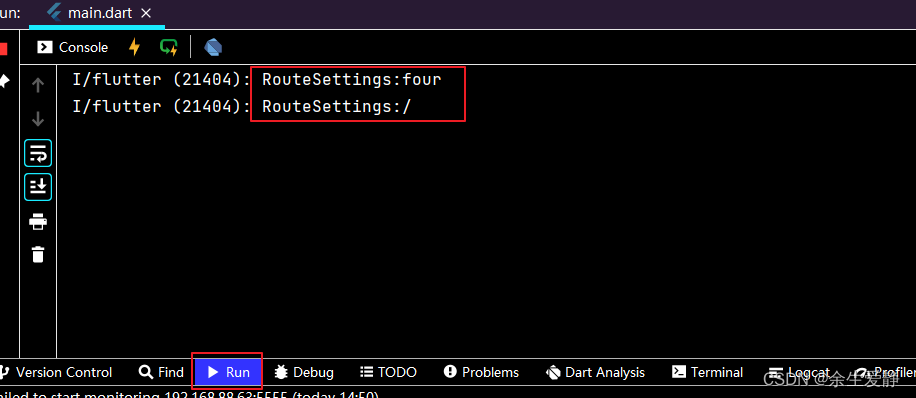

通过打印的日志可以发现,其实如果没有匹配到,还是按照’/'查找的,由于没有定义home属性,所以调用onUnknownRoute。theme
this.theme, this.darkTheme, this.highContrastTheme, this.highContrastDarkTheme, this.themeMode = ThemeMode.system,- 1
- 2
- 3
- 4
- 5
theme
/// Default visual properties, like colors fonts and shapes, for this app's /// material widgets. /// /// A second [darkTheme] [ThemeData] value, which is used to provide a dark /// version of the user interface can also be specified. [themeMode] will /// control which theme will be used if a [darkTheme] is provided. /// /// The default value of this property is the value of [ThemeData.light()]. /// /// See also: /// /// * [themeMode], which controls which theme to use. /// * [MediaQueryData.platformBrightness], which indicates the platform's /// desired brightness and is used to automatically toggle between [theme] /// and [darkTheme] in [MaterialApp]. /// * [ThemeData.brightness], which indicates the [Brightness] of a theme's /// colors. final ThemeData? theme;- 1
- 2
- 3
- 4
- 5
- 6
- 7
- 8
- 9
- 10
- 11
- 12
- 13
- 14
- 15
- 16
- 17
- 18
theme属性是默认的主题。
darkTheme
/// The [ThemeData] to use when a 'dark mode' is requested by the system. /// /// Some host platforms allow the users to select a system-wide 'dark mode', /// or the application may want to offer the user the ability to choose a /// dark theme just for this application. This is theme that will be used for /// such cases. [themeMode] will control which theme will be used. /// /// This theme should have a [ThemeData.brightness] set to [Brightness.dark]. /// /// Uses [theme] instead when null. Defaults to the value of /// [ThemeData.light()] when both [darkTheme] and [theme] are null. /// /// See also: /// /// * [themeMode], which controls which theme to use. /// * [MediaQueryData.platformBrightness], which indicates the platform's /// desired brightness and is used to automatically toggle between [theme] /// and [darkTheme] in [MaterialApp]. /// * [ThemeData.brightness], which is typically set to the value of /// [MediaQueryData.platformBrightness]. final ThemeData? darkTheme;- 1
- 2
- 3
- 4
- 5
- 6
- 7
- 8
- 9
- 10
- 11
- 12
- 13
- 14
- 15
- 16
- 17
- 18
- 19
- 20
- 21
darkTheme是为了支持设备暗黑模式而定义的主题
themeMode
/// Determines which theme will be used by the application if both [theme] /// and [darkTheme] are provided. /// /// If set to [ThemeMode.system], the choice of which theme to use will /// be based on the user's system preferences. If the [MediaQuery.platformBrightnessOf] /// is [Brightness.light], [theme] will be used. If it is [Brightness.dark], /// [darkTheme] will be used (unless it is null, in which case [theme] /// will be used. /// /// If set to [ThemeMode.light] the [theme] will always be used, /// regardless of the user's system preference. /// /// If set to [ThemeMode.dark] the [darkTheme] will be used /// regardless of the user's system preference. If [darkTheme] is null /// then it will fallback to using [theme]. /// /// The default value is [ThemeMode.system]. /// /// See also: /// /// * [theme], which is used when a light mode is selected. /// * [darkTheme], which is used when a dark mode is selected. /// * [ThemeData.brightness], which indicates to various parts of the /// system what kind of theme is being used. final ThemeMode? themeMode; /// Describes which theme will be used by [MaterialApp]. enum ThemeMode { /// Use either the light or dark theme based on what the user has selected in /// the system settings. system, /// Always use the light mode regardless of system preference. light, /// Always use the dark mode (if available) regardless of system preference. dark, }- 1
- 2
- 3
- 4
- 5
- 6
- 7
- 8
- 9
- 10
- 11
- 12
- 13
- 14
- 15
- 16
- 17
- 18
- 19
- 20
- 21
- 22
- 23
- 24
- 25
- 26
- 27
- 28
- 29
- 30
- 31
- 32
- 33
- 34
- 35
- 36
- 37
- 38
ThemeMode默认为system,就是跟随系统,如果系统设置的为light模式,则应用使用的是theme定义的主题;如果系统设置的为dark模式,则应用使用的是darkTheme定义的主题样式。
如果应用设置ThemeMode为light模式,无论系统设置的何种模式,该应用都会使用theme定义的样式主题
如果应用设置ThemeMode为dark模式,无论系统设置的何种模式,该应用都会使用darkTheme定义的样式主题
locale
this.locale, this.localizationsDelegates, this.localeListResolutionCallback, this.localeResolutionCallback, this.supportedLocales = const <Locale>[Locale('en', 'US')- 1
- 2
- 3
- 4
- 5
locale 设置应用的语言,设置以后,应用不会随着系统语言的改变而改变
localizationsDelegates 国际化多语言支持的代理
supportedLocales 应用支持的语言方式一、官网推荐方式(https://docs.flutter.dev/development/accessibility-and-localization/internationalization)
1、在 pubspec.yaml 文件中添加它作为依赖:
dependencies: flutter: sdk: flutter flutter_localizations: # Add this line sdk: flutter # Add this line- 1
- 2
- 3
- 4
- 5
2、先运行 pub get packages,然后引入 flutter_localizations 库,然后为 MaterialApp 指定 localizationsDelegates 和 supportedLocales:
return const MaterialApp( title: 'Localizations Sample App', localizationsDelegates: [ GlobalMaterialLocalizations.delegate, GlobalWidgetsLocalizations.delegate, GlobalCupertinoLocalizations.delegate, ], supportedLocales: [ Locale('en', ''), // English, no country code Locale('zh', ''), // Chinese, no country code ], home: MyHomePage(), );- 1
- 2
- 3
- 4
- 5
- 6
- 7
- 8
- 9
- 10
- 11
- 12
- 13
3、将 intl package 添加到 pubspec.yaml 文件中:
dependencies: flutter: sdk: flutter flutter_localizations: sdk: flutter intl: ^0.17.0 # Add this line- 1
- 2
- 3
- 4
- 5
- 6
4、在 pubspec.yaml 文件中,启用 generate 标志。该设置项添加在 pubspec 中 Flutter 部分,通常处在 pubspec 文件中后面的部分。
generate: true # Add this line- 1
完整的pubspec.yaml
name: flutter_hello description: A new Flutter project. publish_to: 'none' # Remove this line if you wish to publish to pub.dev version: 1.0.0+1 environment: sdk: '>=2.18.2 <3.0.0' dependencies: flutter: sdk: flutter cupertino_icons: ^1.0.2 flutter_localizations: sdk: flutter intl: ^0.17.0 dev_dependencies: flutter_test: sdk: flutter flutter_lints: ^2.0.0 flutter: uses-material-design: true assets: - images/flutter.jpg - images/2.0x/flutter.jpg - images/3.0x/flutter.jpg fonts: - family: Niramit fonts: - asset: fonts/Niramit-BoldItalic.ttf - family: Pacifico fonts: - asset: fonts/Pacifico-Regular.ttf generate: true- 1
- 2
- 3
- 4
- 5
- 6
- 7
- 8
- 9
- 10
- 11
- 12
- 13
- 14
- 15
- 16
- 17
- 18
- 19
- 20
- 21
- 22
- 23
- 24
- 25
- 26
- 27
- 28
- 29
- 30
- 31
- 32
- 33
- 34
- 35
- 36
- 37
- 38
- 39
- 40
- 41
- 42
- 43
- 44
- 45
- 46
- 47
5、在 Flutter 项目的根目录中添加一个新的 yaml 文件,命名为 l10n.yaml,其内容如下:
arb-dir: lib/l10n template-arb-file: app_en.arb output-localization-file: app_localizations.dart- 1
- 2
- 3
6、在 ${FLUTTER_PROJECT}/lib/l10n 中,添加 app_en.arb 模板文件。如下:
{ "helloWorld": "Hello World!", "@helloWorld": { "description": "The conventional newborn programmer greeting" } }- 1
- 2
- 3
- 4
- 5
- 6
7、在同一目录中添加一个 app_zh.arb 文件,对同一条信息做中文的翻译:
{ "helloWorld": "世界,您好!" }- 1
- 2
- 3
8、运行 flutter gen-l10n 命令,您将在 ${FLUTTER_PROJECT}/.dart_tool/flutter_gen/gen_l10n 中看到生成的文件
flutter gen-l10n- 1
总体目录结构


PS:运行flutter gen-l10n,会抛出截图异常,按照给出的解决方案,删除相关的文件。再次运行,如果没有异常抛出,就说明执行成功了,在android studio是看不到目录的,需要在文件管理器中查看。

9、在项目中添加依赖包import 'package:flutter_gen/gen_l10n/app_localizations.dart';- 1
10、在MaterialApp中配置代理
localizationsDelegates: AppLocalizations.localizationsDelegates, supportedLocales: AppLocalizations.supportedLocales,- 1
- 2
11、调用静态方法获取对应的值
AppLocalizations.of(context).helloWorld- 1
完整的配置如下:
import 'package:flutter/material.dart'; import 'package:flutter_gen/gen_l10n/app_localizations.dart'; class MyThemePage extends StatelessWidget { const MyThemePage({super.key}); Widget build(BuildContext context) { return MaterialApp( theme: ThemeData(primaryColor: Colors.amber, brightness: Brightness.dark), darkTheme: ThemeData(), themeMode: ThemeMode.dark, highContrastTheme: ThemeData(primaryColor: Colors.redAccent), localizationsDelegates: AppLocalizations.localizationsDelegates, supportedLocales: AppLocalizations.supportedLocales, home: Scaffold( body: Center( child: Text(AppLocalizations.of(context).helloWorld)), ), ); } }- 1
- 2
- 3
- 4
- 5
- 6
- 7
- 8
- 9
- 10
- 11
- 12
- 13
- 14
- 15
- 16
- 17
- 18
- 19
- 20
- 21
- 22
- 23
12、部署运行到设备上


PS:如何解决呢?只需要在使用的控件外面包一层Builder即可:import 'package:flutter/material.dart'; import 'package:flutter_gen/gen_l10n/app_localizations.dart'; class MyThemePage extends StatelessWidget { const MyThemePage({super.key}); Widget build(BuildContext context) { return MaterialApp( theme: ThemeData(primaryColor: Colors.amber, brightness: Brightness.dark), darkTheme: ThemeData(), themeMode: ThemeMode.dark, highContrastTheme: ThemeData(primaryColor: Colors.redAccent), localizationsDelegates: AppLocalizations.localizationsDelegates, supportedLocales: AppLocalizations.supportedLocales, home: Scaffold( body: Center( child: Builder( builder: (BuildContext context) => Text(AppLocalizations.of(context).helloWorld)), ), ), ); } }- 1
- 2
- 3
- 4
- 5
- 6
- 7
- 8
- 9
- 10
- 11
- 12
- 13
- 14
- 15
- 16
- 17
- 18
- 19
- 20
- 21
- 22
- 23
- 24
- 25
- 26

重新运行,并且设置设备的语言,可以成功实现多语言的支持了!


方式二、采用插件,简化步骤
1、安装flutter-intl插件:

2、添加 flutter_localizations依赖:

3、Tools–>Flutter Intl -->Initialize for the Project
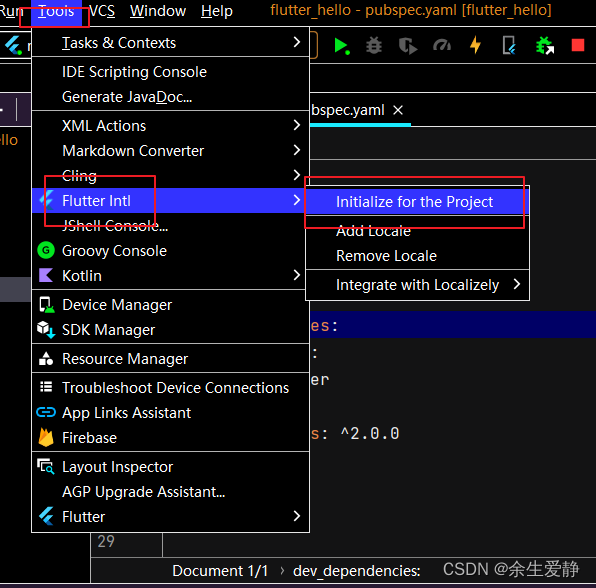
插件会自动初始化好相关的配置:

4、添加其他语言的arb文件,两种方式,第一种是和intl_en.arb同级的目录下直接创建intl_zh.arb;第二种是利用插件:Tools–>Flutter intl -->Add Local

intl_en.arb{ "hello" : "Hello world,support multi language" }- 1
- 2
- 3
intl_zh.arb
{ "hello" : "您好,世界,支持多语言" }- 1
- 2
- 3
5、添加导入l10n.dart,添加S.delegate和S.delegate.supportedLocales
import 'package:flutter/material.dart'; import 'generated/l10n.dart'; class MyThemePage extends StatelessWidget { const MyThemePage({super.key}); Widget build(BuildContext context) { return MaterialApp( theme: ThemeData(primaryColor: Colors.amber, brightness: Brightness.dark), darkTheme: ThemeData(), themeMode: ThemeMode.dark, highContrastTheme: ThemeData(primaryColor: Colors.redAccent), localizationsDelegates: const [ S.delegate ], supportedLocales: S.delegate.supportedLocales, home: Scaffold( body: Center( child: Builder(builder: (BuildContext context)=>Text(S.of(context).hello)) ), ), ); } }- 1
- 2
- 3
- 4
- 5
- 6
- 7
- 8
- 9
- 10
- 11
- 12
- 13
- 14
- 15
- 16
- 17
- 18
- 19
- 20
- 21
- 22
- 23
- 24
- 25

PS:一定要在使用的控件外加一层Builder,解决方案源于https://github.com/localizely/flutter-intl-intellij/issues/78

-
相关阅读:
了解如何通过 UltraEdit丨UEStudio 中的窗口停靠系统显示、控制和配置文件选项卡
【计算机毕业设计】基于JAVA的在线租房网站系统源码
C++ 20 内存模型(一)
Matlab绘图(2)通过代码进行局部放大绘图、多文件绘图
Sentinel持久限流化化规则到Nacos
Spring-事务
你不能错过的【Python爬虫】测试3(爬取所有内容 + 完整源代码 + 架构 + 结果)
海螺问问编写shell脚本zabbix监控华为设备微信接入预警
如何轻松打造属于自己的水印相机小程序?
CRM客户管理系统究竟是什么?如何实施?
- 原文地址:https://blog.csdn.net/u011557841/article/details/127306376
